Creating your own synthesizer patch is the first step towards creating your own signature sound.
Patches that you’ve created will help your tracks to stand out and you might even surprise yourself with what you come up with!
Subtractive synthesis is one of the main types of synthesis. As its name implies, tones are created by subtracting unwanted frequencies, to form the sound that you’re looking to produce.
Think of the process of subtractive synthesis as being like a sculptor. You’re chipping away at a block of marble to create a beautiful work of art!
There are a few key components to any subtractive synthesizer. These are:
* Oscillator
* Filter
* Amp
* LFO
These elements form the key attributes of the sound that you’re working to produce. Once you understand each of these components, then building new patches is easy.
Contributed by David Whitehead for Roland Corporation Australia
What Is Sound?
To understand synthesis, let’s start with understanding what sound is.
We all hear sounds, but what are these invisible forces that we interpret as audio?
Sounds are pressure waves that move through the air. They hit our ears, causing our eardrums to move in and out, in response to changes in pressure. We then interpret these changes as sounds.
Rhythmical waves are musical rhythms. So what causes these pressure waves?
What Is An Oscillator?
An oscillator generates a repeating signal in a particular waveform.
Oscillators output the full sound of a waveform, containing all of its dynamic range and harmonic frequencies. Going back to our sculpting reference, imagine an oscillator as your original “marble block”.
You can get different colours of marble to use. These are your oscillator’s waveforms. Think of the waveforms as your different “colours”, some are “lighter” and some are “darker”. Waveforms are expressed by the way they oscillate between their minimum and maximum value (or amplitude).
There are four main types of oscillators that we find in modern synths. These are:
* Sine
* Sawtooth
* Square
* Triangle
SINE

A Sine wave is one of the most basic waveforms. Its edges are smooth, like ripples in a pond, with no sharp changes.
This produces a smooth, mellow sound. Sine waves are often used to recreate pipe sounds, like a flute or an organ, or for smooth pads.
SAWTOOTH

The next waveform is the Sawtooth, named as it looks like the teeth on a saw. Sawtooth waves have very sharp points and abrupt changes, which create a strong “buzz” sound.
Because of this, a Sawtooth waveform has harmonic frequencies at regular intervals that get progressively quieter.
It’s these harmonic frequencies that make Sawtooth waves sound rich and full, great for powerful synth bass and lead sounds!
DID YOU KNOW?
Sawtooth waves are created by adding a number of Sine waves together (this is one of the fundamentals of additive synthesis, which we’ll look at in an upcoming article).
These two waveforms sit at opposite ends of the sound spectrum, from sharp changes in amplitude (Sawtooth), to smooth gradual changes (Sine).
SQUARE
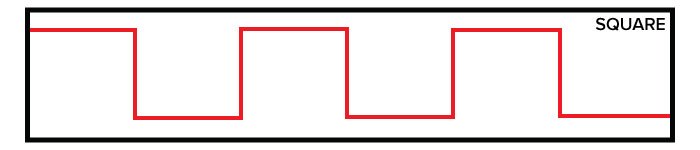
Square waves have a sound that is rich in harmonics, that is not as “buzzy” as a Sawtooth, but not as smooth as a Sine. They have half as many harmonic frequencies as a Sawtooth does, which repeat every second cycle.
Square waves are a particular type of pulse-wave. As the name suggests, the signal pulses on and off. Pulse waves are commonly used for pulse-width modulation (PWM), which was used in early synthesizers to replicate two oscillators interacting with each other.
Square waves are often described as sounding “hollow” or “nasal”. This means that they are good for creating wind instruments, like a clarinet.
TRIANGLE
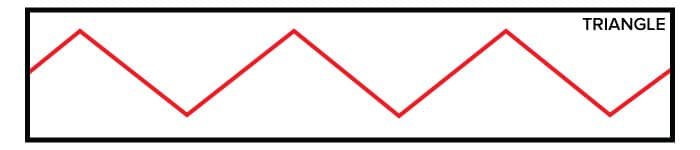
Triangle waves lie between a Square wave and a Sine wave. Similar to a Square wave, they contain the odd harmonics of the original frequency. However, the volume of these harmonics drops much more quickly.
This causes the waveform to look and sound much closer to a Sine wave, but still retain some of the “buzzing” quality of a Square wave.
Tell Me About The Frequency
 The other determining factor to a waveform is the RATE or FREQUENCY at which it repeats itself. People hear changes in frequency as changes in pitch, i.e., the faster the waveform repeats, the higher the pitch of the sound.
In a synthesizer, the fundamental pitch of an oscillator is often controlled by either a Tune knob, or broken into steps that are labeled in feet, i.e., 2’, 4’, 8’, 16’, 32’.
This idea of measuring pitches in feet comes from old pipe organs, where the pipes were arranged in different lengths for different pitches.
Many synths have more than one oscillator. By building individual layers and combining them, you can create some truly huge sounds!
The Filter – What Does It Do?
Now we’ll move on to discussing the FILTER section. By passing the sound through a VCF (Voltage Controlled Filter), you carve out unwanted frequencies from the raw material sound.
There are a few different kinds of filters, but most synths rely on two key ones – a Low Pass Filter (LPF) and a High Pass Filter (HPF).
The Low Pass Filter allows the low frequencies to pass through, cutting off the high frequencies and creating bass sounds. The High Pass Filter does the opposite. Turning the CUTOFF knob shifts the point at which the filter starts to act on the sound.
A filter does not just stop the sound abruptly, it slopes down from the original volume. The Slope is measured in decibels (dB) per octave, which is why you might see a -12dB or -24dB filter on a synthesizer. The higher the number, the steeper the slope and the stronger the filter.

Along with the Cutoff, the other key part of a filter is the RESONANCE. Most filters have a Resonance or Q control. Resonance occurs when the sound in the same range as the cutoff frequency is routed back to the filter, creating feedback. For more on Resonance and Q, this article can help.
At very high levels, this feedback can cause the filter to self-oscillate and generate a Sine wave. Turning up the Resonance results in brighter and harsher tones around the cutoff frequency and can be used for a range of techniques including to “squeal” the synth, or create a classic wah effect.
While less common, you also sometimes get BANDPASS and BAND REJECT (or NOTCH) filters. A Bandpass is a combination of both a High and Low Pass, leaving only the central part of the audio unfiltered. Band Reject is the opposite, leaving the higher and lower frequencies unfiltered.
Amplification Is The Solution
The next step in the chain is the AMPLIFIER, also called a VCA (Voltage Controlled Amplifier). This controls the volume of the sound. Since we started with a pure waveform, we need be able to control the level that’s coming out it.
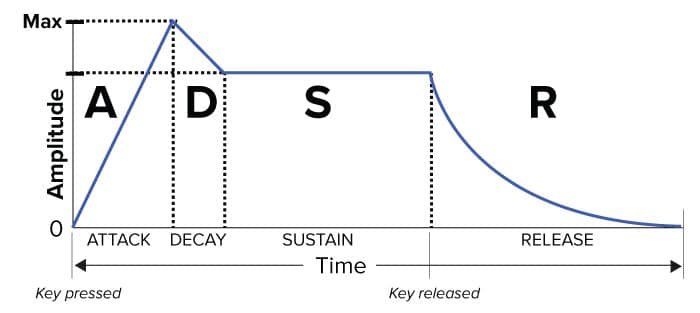
Most VCA sections also have a volume ENVELOPE. This further sculpts the tone, shaping the waveform to create the sound that we’re looking for. Envelopes are broken into four parts:
* Attack
* Decay
* Sustain
* Release
Collectively, this is known as ADSR and is shown below.
The Envelope is key in determining what sound you want to create. Consider for instance, the difference between a drum sound and a violin sound.
The drum has a sharp, sudden increase in volume (Attack), with almost no Sustain and quite a short Release time.
The violin has a longer, slower Attack, building to maximum volume, a long Sustain and the sound tails off slowly.
Envelopes don’t just apply to the amplifier, many synthesizers have an envelope on the filter or the pitch. If you’re using modular synths, you can set an envelope to virtually any parameter you like.
For example, on a filter envelope, the amplifier works similarly to if you were turning the cutoff knob over time, gradually turning it up and back again.
This is the core of creating your sound, but what about that other section that is on most synths, the LFO?
Control From The Bottom
An LFO (Low Frequency Oscillator) is exactly what it sounds like. It’s another oscillator, with similar waveforms to the ones we spoke about earlier in this piece. However, it occurs at such a low frequency that you can’t hear it!
Rather than using an LFO to create a tone, you can use it to manipulate other parameters. Think of it as automatic knob twiddling.
LFOs have a RATE control that change the speed at which it oscillates and DEPTH controls for each parameter that you can affect on the synth.
These depth controls allow you to set the LFO to twiddle your chosen parameter by varying amounts, in a positive or negative direction.
Many synths include controls to set the LFO to PITCH (which creates Vibrato), VOLUME (which creates Tremolo) or FILTER CUTOFF.
Having the LFO control filter cutoff is a highly popular synthesis technique used to modulate tone and can be used to create the wah-wah sound mentioned earlier. At extreme amounts, it can produce a “wobble” that is popular in dubstep basslines.
By using subtractive synthesis and the three basic blocks of VCO, VCF and VCA you can carve out almost any type of sound. Then, using LFOs and Envelopes you can give that sound movement and shape. Happy twiddling!
Related Articles
THE A-TO-Z OF SYNTHESIZER TERMS
AIRA MODULAR: WHAT IS A MODULAR SYNTHESIZER?
7 ESSENTIAL SYNTH TUTORIALS
ESSENTIAL SYNTH TUTORIALS: PART 2
Related Products