Contributed by Christian Moraga for the Roland Australia Blog
Live looping has quickly become a technique that has taken the art of live performance to a whole new level! Any musician, from bedroom producers to guitar gods, can add their own flair to their part, solo or track by using a Loop Station live on stage. Looping can even inspire a completely new song when used in the studio!
But what is looping and how can you add it to your repertoire? Let’s start at the very beginning…
WHAT IS LOOPING?
Looping is the technique that allows a musician to record a snippet of what they are playing to form a repetitive loop, or “phrase” in real-time. What you do next with this phrase is up to you! Use it as a backing track, as a rhythmic/percussive effect, as a soundscape… the options are limitless.
But don’t stop there! The real power of looping comes from “overdubbing”. This is the process of recording over the previously recorded phrase. It’s similar to the same way you would overdub vocals when recording a song. Adding overdubs gives depth to your phrase and takes your looping to the next level. You can overdub a bass line over a drum loop – ready for your solo! Or you could “stack” a number of overdubs together by playing/singing different harmonies for a dense, rich track.
You’re ready to start looping now, right? Well, get out your instrument of choice and your Loop Station. Here is a step-by-step guide to get you looping!
HOW DO YOU LOOP?
First thing is first – let’s connect the Loop Station. Insert the cable from your instrument (we’ll use a guitar for this example) into the INPUT of the Loop Station. The OUTPUT then goes to your amp. Make sure you have power for your pedal (by BOSS PSA DC adaptor or 9V battery) and we are set to loop!
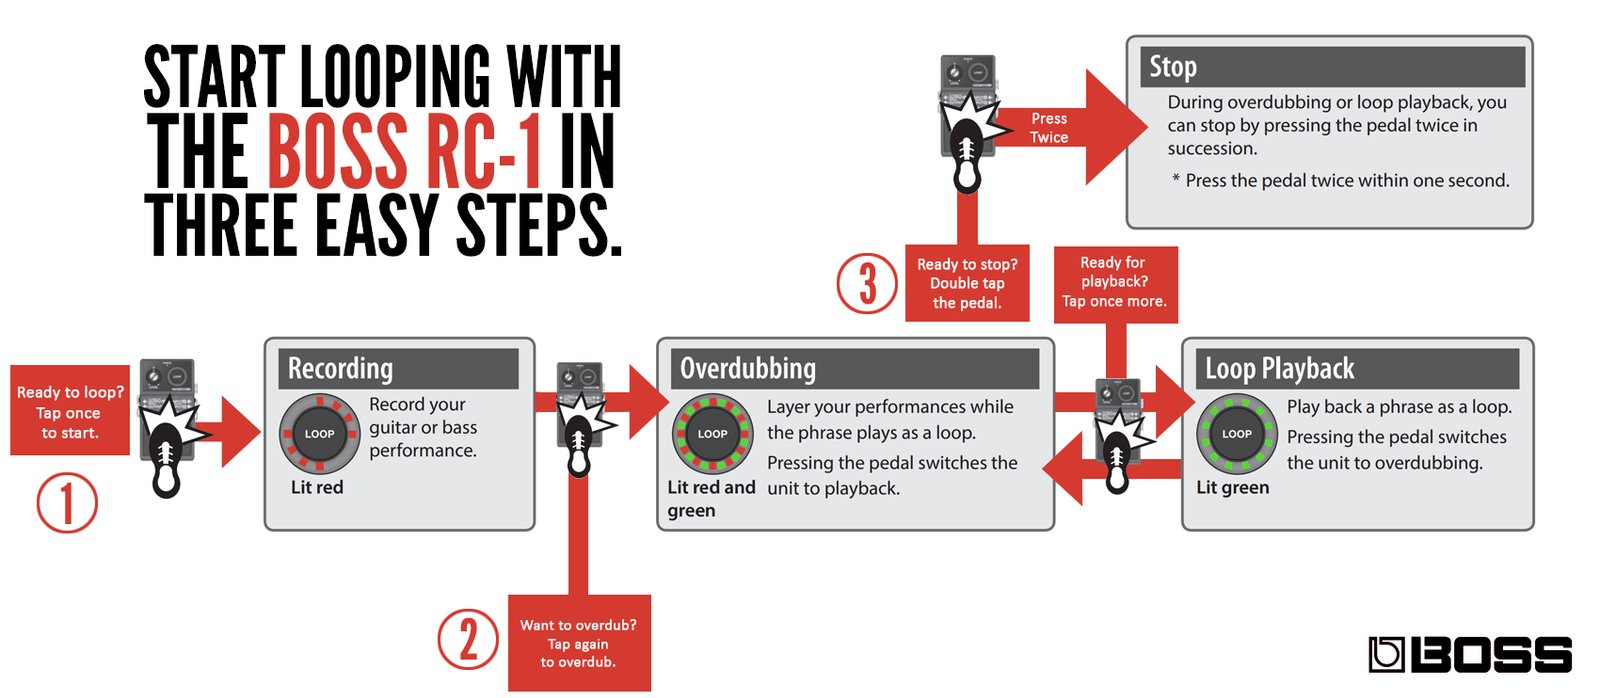
Looping your first phrase is super easy. The flowchart below shows you how you can make your first phrase using the BOSS RC-1 in THREE easy steps! Click image to enlarge.RECORD will be marked with the red flashing LED indicator.
(1) RECORDBefore stepping on your Loop Station, let’s do a practice run!
First step is to think about WHAT you want to loop. Let’s start with one four-count bar of a G major chord. Strum a rhythm and count:
1, 2, 3, 4 (bar one).
1, 2, 3, 4 (bar two).
Now this time around, you will start recording on bar two by pressing once to make a start point of the phrase and then once again for the end point. Recording will be marked when the red REC LED is lit. Let’s start.
Strum the same rhythm again for bar one and count: 1, 2, 3, 4. When you get to the “1” of bar two, step once on the Loop Station. Count 2, 3, 4 and on the next “1”, step once on the pedal again and stop playing your guitar.
You will now hear a phrase of your G major chord looping over and over. Congrats, you’ve made your first loop!
Your phrase is now playing in overdub mode. Let’s move to Step 2 to expand our phrase!
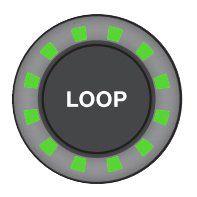
OVERDUB mode is indicated by both red and green LEDs being lit.
(2) OVERDUB OR PLAYBACK
When you made your first loop, the first press of the footswitch of your Loop Station marked the start point of the phrase. When you want to mark the end point, you actually have two options; you can keep recording or you can just hear your phrase played back. Let’s look at the flowchart once again.
OVERDUB MODE
Let’s keep recording. OVERDUB mode is engaged by pressing the footswitch ONCE to mark the end point and is indicated by both red and green LEDs being lit. This mode keeps on recording so anything you play “over the top” of the phrase will record. Let’s give that a try!
Make a loop and engage OVERDUB mode. Start playing another version of the G major chord, then stop playing while leaving the Loop Station play. You can now hear both parts playing over each other. If you are finished overdubbing, press the footswitch ONCE again. You are now in PLAYBACK mode.
PLAYBACK mode is indicated by the green LED being lit.
PLAYBACK MODE
You can switch between OVERDUB and PLAYBACK mode by pressing the footswitch ONCE. Importantly, you can not record in PLAYBACK mode but you can play over the top! This is perfect for practising solos over your looped chords.
You can see if you are in PLAYBACK mode if just the GREEN “Play” LED is on. You can go from RECORD mode straight to PLAYBACK by hitting the footswitch TWICE SLOWLY when marking the end point in Step 1.
(3) STOP
Once you’re happy with your phrase and you want to stop your loop, press the footswitch of your Loop Station TWICE QUICKLY. You can do this at any time in the looping process to stop your phrase from playing back and you are back to Step 1.
…
Well done! You have just become a Looping Apprentice but you have only scratched the looping surface. With each Loop Station (like the RC-1, RC-3, RC-30, RC-300, RC-202 and RC-505), comes more looping functions like Auto-Start, rhythm tracks, Undo, Redo, Reverse, One-Shot… there are many tricks to help you become a Looping Master.
IN CONCLUSION
Looping is a fun and inspiring technique that is easy to get started and can be quite addictive! With one instrument/voice, you can simulate a whole band or you can create a lush soundscape by stacking phrase on top of phrase! It all comes down to your own creative voice and vision.
Once you get into the finer points of looping, you will start to see the Loop Station as an instrument onto itself and it will inspire you to look at your own instrument a bit differently.
Created by Roland V-Drums specialist Simon Ayton, these patches were designed using the internal factory sounds and many of the techniques covered in the TD-50 guide. Enjoy exploring the possibilities!