As discussed in Part 1, the first rule in connecting guitar effects: there are no rules.
There are, however, some good ideas.
Contributed by Roland US Team
Plugging In
Using our basic guidelines, let’s connect our pedalboard together:
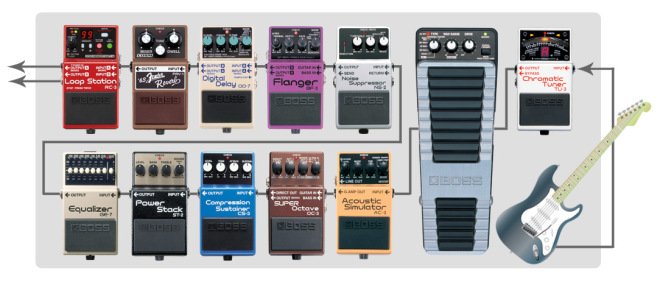
That is one rockin’ pedalboard! But why is this the suggested signal path? Follow along as we go pedal by pedal.
 The tuner goes first. This one is pretty easy. It doesn’t want to hear an effected signal; it wants to see the direct input from the guitar. Another reason for putting the tuner first is that if you’re using any true-bypass pedals, the TU-3 will give them a buffered signal, which will protect your tone from loss of signal in the cables when other pedals are off. This is another one of the reasons there as so many TU tuners in pedalboards worldwide, even ones using nothing else but boutique true-bypass stompers.
The next three pedals — PW-10, AC-3, and OC-3 — change the basic tone of the guitar. For the most variety of sound, you want all the other pedals to have a shot at the sound from these pedals, so it’s best to have them as close to the guitar as possible.
After these is the overdrive/distortion, in this case our ST-2 Power Stack. The CS-3 Compression/Sustainer (and the PW-10 V-Wah) can improve the ST-2’s sustain and tone by increasing the signal to it, so they’re placed before the ST-2. Many players use a compressor just for this reason, and the “fixed wah” sound, which is a wah pedal turned on but not continuously swept, is very common in rock and metal lead tones.
The GE-7 Graphic Equalizer is good to have after the overdrive in case you want to use it to scoop mids or bump certain frequencies for solos. (To show that these are not hard rules, it also works pretty well if the EQ is after the compressor but before the overdrive. But this changes how the EQ sounds, since you would be distorting it with the overdrive, so try it in the suggested position first.) Also, it’s good to have the EQ before the noise suppressor, since EQs can add noise as they boost tone at various points in the frequency spectrum, including any noise that is already there.
The NS-2 Noise Suppressor is best used in the middle, so it can take out the noise created by the amplifying pedals before the signal moves into the modulation and ambience pedals.
 Modulation stompboxes like our BF-3 Flanger should be after the tone-producing effects like distortion, wah, etc. so they can process and modify the tone built by the pedals before it. If you put it before the distortion, then you are distorting the sound of the flanger. Maybe that’s what you’re after, but in general, put the BF-3 and other modulation effects after the tone-shaping (and noise–producing) pedals. And then there are the ambience effects: delay and reverb. As we discussed earlier, reverb—and sometimes delay, depending on the space—is the last thing that happens before the sound reaches your ears in a physical space, so these go last. Delaying reverb can sound muddy, so it’s usually better to have the reverb after the delay.
And last, but certainly not least, is the Loop Station. Loopers aren’t effects—they’re recorders. Normally, you’ll want the looper to be able to record and playback any of your sounds. Of course, this means you should place it at the very end of the chain so it can hear and record whatever pedal combinations you use.
That’s a Wrap
So there it is. To recap, while there are no rules for creating tones, these basic principles will help you achieve tone nirvana. By following the guidelines we’ve laid out here, you will:
- keep the noise to a minimum.
- achieve the most tonal flexibility.
- produce tone in the most natural, organic way, as close as possible to how tone is created without effects.
At the same time, experiment! Maybe the tone you seek is made by the wah after the distortion—it’s noisy, but sounds cool. Ultimately, the only rule is this: what sounds best is best, so get your BOSS pedals and grab your tone. It’s what we make them for!


