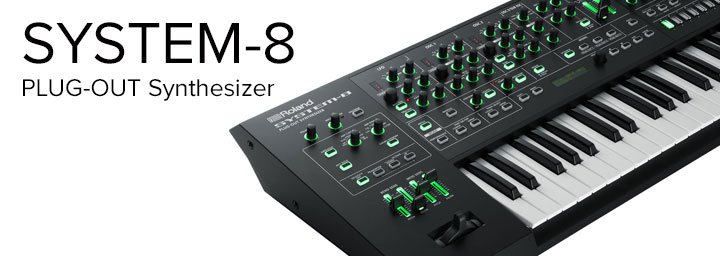
The AIRA SYSTEM-8 Plug Out Synthesizer has made serious polyphonic ‘waves’ in the keyboard world. In 1973, Roland released the SH-1000 synthesizer and started a journey that continues to this day. During the 1970s, analog monosynths evolved into multi-oscillator modular synthesizers that eventually ushered in the Golden Age of polyphonic analog synthesizers.
The 1980s saw the birth of the digital revolution, with Roland pushing the envelope of digital synthesizer design into the 1990s and 2000s. This innovation evolved into the successful AIRA range – instruments that are inspired by Roland’s legacy but utilise the technology of the future.
In the spirit of its predecessors (SYSTEM-100, SYSTEM-100M and SYSTEM-700), the Roland AIRA SYSTEM-8 PLUG-OUT Synthesizer breaks new ground, thanks to its remarkable flexibility and accurate sound. It is the world’s first polyphonic PLUG-OUT synth, which means it provides access to plug-in versions of classic Roland synths. These plug-ins can be hosted within the SYSTEM-8, without the need for a computer.
In this Ultimate Guide to the Roland AIRA SYSTEM-8 PLUG-OUT SYNTHESIZER, we will break down each section of the synth and show you how to get the most out of your SYSTEM-8, both on stage and in the studio.
Contributed by Hannah Lockwood for the Roland Australia Blog
Index
#1: CHOOSE ONE OF TWELVE OSCILLATOR WAVEFORMS TO CREATE A WORLD OF SOUNDS
#2: MASTER OSCILLATOR MODULATION TO CREATE COMPLEX SYNTH TONES
#3: MIX SOME DEPTH TO YOUR SOUND WITH SUB-BASS AND NOISE
#4: CONTROL YOUR SYNTH PATCH WITH THE MULTIMODE FILTER
#5: USE THE AMP ENVELOPE TO SHAPE THE VOLUME OF EACH NOTE
#6: CREATE SPACE, MOVEMENT AND TEXTURE WITH EXPANDED ONBOARD EFFECTS
#7: MASTER MOVEMENT WITH LFO MODULATION
#8: ADD EXPRESSION TO YOUR NOTES WITH PITCH MODULATION
#9: USE CHORDS & ARPEGGIOS TO EXPAND YOUR PERFORMANCE
#10: BRING YOUR SOUNDS TO LIFE WITH THE POWERFUL STEP SEQUENCER
#11: GET VOCAL WITH THE VOCODER
#12: STEP BACK INTO ROLAND’S HISTORY AND “PLUG-OUT” AN ICONIC SYNTHESIZER
#13: SAVE, EDIT AND RECALL UP TO 256 KILLER SYNTH PATCHES
#14: MIDI AND CV ARE THE KEY TO MASTERING YOUR SYNTH RIG
#15: CUSTOMISE YOUR KEYBOARD WITH MODES
TIP #1: CHOOSE ONE OF TWELVE OSCILLATOR WAVEFORMS TO CREATE A WORLD OF SOUNDS
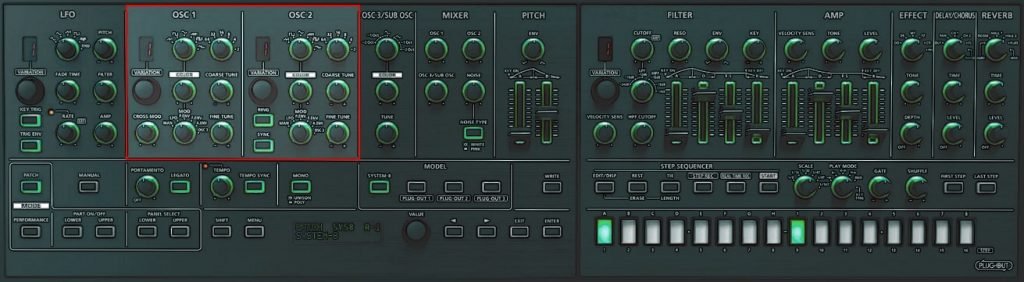
The AIRA SYSTEM-8 PLUG-OUT Synthesizer has two oscillators, (OSC1 and OSC2), that each host 12 waveforms! An additional oscillator (OSC3/SUB OSC) with triangle or sine waveforms allows you to stack similar waveforms for a thick bass or lead, or combine different waveforms for different pitch ranges, selected by the 6-position OCTAVE (feet) knob.
The WAVE knob shows 6 waveforms on the SYSTEM-8 synthesizer. These are SAW, SQUARE and TRIANGLE, the traditional wave shapes typically found in most synthesizers. However, there are also 3 unique waveforms that have the same character as the first 3 waveforms, with additional harmonics. They are SUPER-SAW, SUPER-SQUARE AND SUPER-TRIANGLE.
The AIRA SYSTEM-8 also has 6 new waveforms unique to the AIRA series, so you have a vast range of sounds to add to your arsenal. These new waveforms provide a great palette for creating modern electronic sounds and add a complex range of sounds and harmonics to the classic 6 original waveforms.
The 6 new waveforms are:
1. NOISE SAW:
The Noise Saw takes the traditional sawtooth to another level, with the introduction of noise. This adds a brighter, brassier sound with a fuller bass response when using LPF cutoff.
2. LOGIC OPERATION:
A logic operation refers to a gate signal, switched high or low (on or off) based on a mathematical function. There are a number of logic operations that you may have seen in modular synth world, such as OR, AND, NAND, XOR… there are many more. In synthesis, these gates provide a semi-random on/off signal for triggering envelopes, or can mix signals, including oscillators, to create a unique and complex waveform.
This LOGIC OPERATION waveform features a novel cascaded logic circuit that mixes multiple waveforms to create a special synth tone unique to this AIRA synthesizer.
3. FREQUENCY MODULATION:
There are a number of ways to control the pitch of an oscillator. One of which is using one oscillator to modulate the frequency of another. You can use an LFO for vibrato effects, or use an audio-rate oscillator for FREQUENCY MODULATION – also called FM. As the pitch of the modulating oscillator rises (i.e. frequency of the wave gets faster), a very complex waveform is produced, which contains overtones normally not available from the original oscillator.
These can be harmonic overtones that are great for deep basslines, or non-harmonic overtones that provide metallic, bell-like sounds. This complex synthesis process is made easy on the SYSTEM-8, with a range of sounds controlled by one knob: COLOR.
4. FM + SYNC:
This waveform combines the same synthesis method as above, (i.e. Frequency Modulation), but uses oscillator sync with the FM oscillator to produce a waveform with more harmonics. Waveform synchronisation, or “sync”, is the process of modulating a high frequency waveform to generate a thick, aggressive harmonic synth tone. Combined with FM, it can produce an impressive range of harmonics when swept, for build-ups and crescendos.
5. VOWEL:
This formant waveform uses a series of waveforms and complex filtering to mimic the sound and articulation of the human voice. The COLOR knob sweeps through a series of vowel-like modulations from “A” to “U” in each oscillator. Modulating the COLOR knob with an envelope or LFO via the MOD knob will create some expressive and unique synth voices. Explore these distinctive waveforms and take advantage of their potential!
6. COWBELL:
The cowbell has become an iconic drum machine sound, courtesy of the Roland TR-808. This metallic waveform is also now part of the 12 oscillator wave shapes in the SYSTEM-8 synthesizer. This unique tone now has a suite of controls. Try adding delay and a long release for cowbell/pad-like sounds. Or, use a snappy amplifier envelope with an arpeggio for a pitched percussive line that you can match, or syncopate, with your rhythm track.
To access the 6 additional waveforms, turn the [VARIATION] knob to select between Type 1 and 2.
TIP #2: MASTER OSCILLATOR MODULATION TO CREATE COMPLEX SYNTH TONES
A waveform’s shape is a foundation on which you build your synth tone. Modulating, or creating movement of a waveform, provides an evolution of the synth tone by adding and subtracting harmonics. With a shallow depth of modulation, you can create subtle, expressive variations in tone. Larger modulation depth will create aggressive, dissonant tones. Using one, or a number of modulation types, allows you to shape the sound that you want and provides further control to get your own unique tones.
DETUNING
Detuning is a technique that involves changing the pitch of one oscillator, relative to another. This can be done by a few cents, sharp or flat, to create a thicker, chorus-like sound. Or, it can be spread out to harmonic intervals (fifths are a good starting point). This is a favourite synth technique with saw waves, and creates an iconic detuned lead tone. The AIRA SYSTEM-8 has a Coarse Tune control knob for OSC1 and OSC2, and a Fine Tune control has been added to all oscillators.
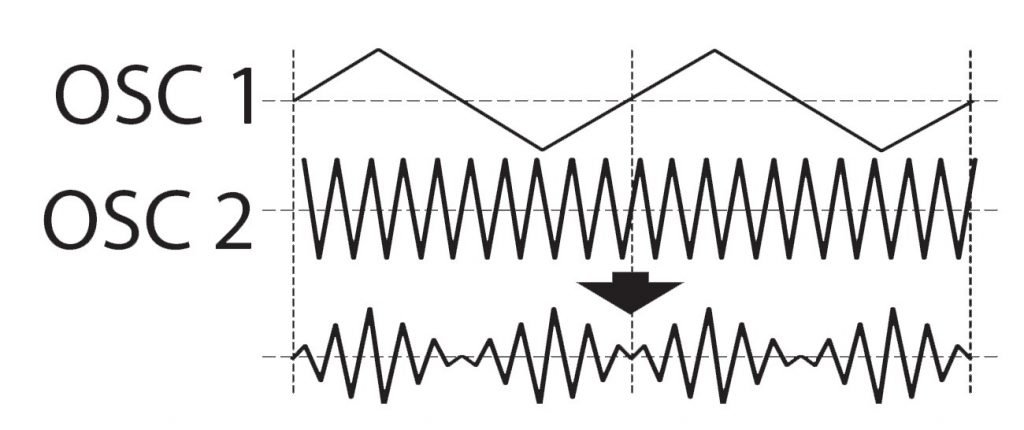
RING MODULATION
OSC2 offers Ring Modulation and Hard Sync options. A ring modulator is a circuit that “multiplies” the frequencies of OSC1 and OSC2, creating an output signal result that contains none of the original input frequencies. The output contains the sum and difference of the input signals, which produces “sidebands“, resulting in a complex harmonic sound that greatly differs from the original. Coarse tuning is presented on the display screen, allowing you to accurately set your intervals.
PULSE WIDTH MODULATION (PWM)
Each waveform has a shape that repeats with each cycle. The symmetry or “width” of this shape is a source of modulation with an envelope or LFO. A square/pulse waveform is a classic combination. This is Pulse Width Modulation (PWM) however, waveform width modulation can yield interesting textures for a number of different shapes.
The source and rate of modulation is important to mastering this synth technique. Slow sine wave sweeps can add subtle dynamic movement to a drone. An S&H LFO can produce a randomised evolving tone when synced to tempo.
The COLOR knob on the SYSTEM-8 controls the depth of the width modulation with different modulation sources. These include the LFO, any of 3 envelopes (PITCH, FILTER and AMP) or OSC3.
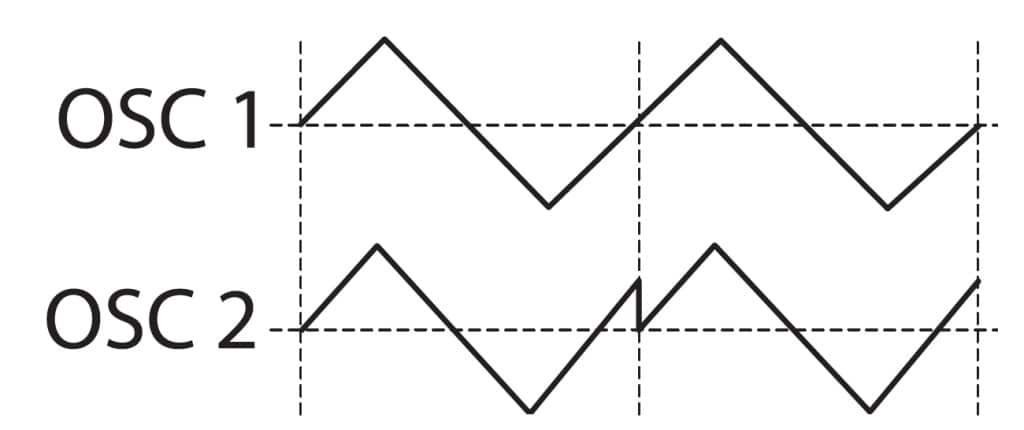
OSCILLATOR SYNCHRONISATION (SYNC)
Sync involves using one oscillator to “reset” another oscillator, shifting the wave shape cycle to zero. This reset in turn creates a new waveform, with new peaks (or added harmonics), that provides a characteristic “ripping” or “tearing” sync tone. When the SYNC is lit, OSC2 is slaved to OSC1, while the Pitch Envelope moves to the slave oscillator.
CROSS-MODULATION
Cross-modulation is a technique where 2 or more oscillators modulate each other. The output of one oscillator modulates the pitch of a second, which in turn modulates the first. This bi-directional modulation creates a complex waveform, rich in tone, that can reach dissonance very quickly. The AIRA SYSTEM-8 offers a dedicated CROSS MOD knob, which modifies the frequency of OSC1 according to the OSC2 waveform. This technique can be used to create interesting sound effects, or to really intensify a sound source. It is a very powerful technique that can produce extreme sonic results.
TIP #3: MIX SOME DEPTH TO YOUR SOUND WITH SUB-BASS AND NOISE
The mixer section of the SYSTEM-8 allows you to blend the level of OSC1 and OSC2 to create the right tonal and level balance. It also offers two additional sound sources to add dimension, complexity and tonal variation to your patch.
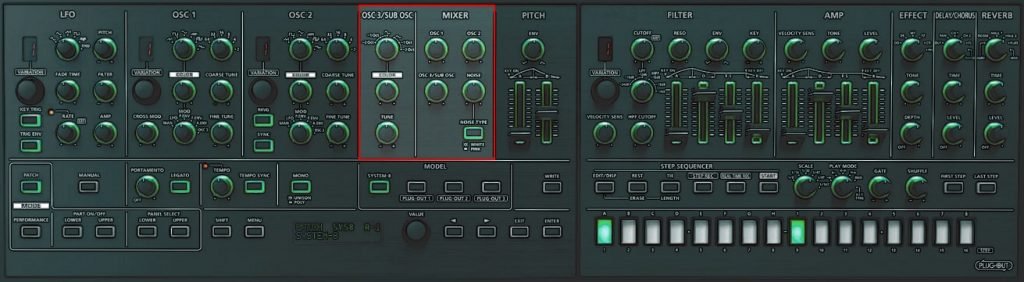
The SUB-OSCILLATOR features sine and triangle waveforms with two pitch options: -1 octave or -2 octave below OSC1, which is set using the OSC3/SUB OSC control knob. This oscillator hosts a COLOR knob of its own, allowing you to expand on the sine and triangle waveforms. It can also be assigned as a modulation source for the Color parameter of Oscillator 1. The sub-octave oscillator is best used to fill out the bottom end of a patch, but its broad octave range means it’s also capable of intervals, like fourths and fifths.
The NOISE source has a level control and [NOISE TYPE] where you can choose between pink or white. This sound source is useful for adding depth to a standard synth patch, and is particularly useful for percussive sounds. Use the NOISE source alongside the onboard sequencer to create interesting rhythm loops.
TIP #4: CONTROL YOUR SYNTH PATCH WITH THE MULTIMODE FILTER
The Voltage Controlled Filter section of the AIRA SYSTEM-8 has been greatly expanded, with heightened performance and control options. A dedicated ADSR envelope allows you to control the brightness, by modulating the CUTOFF FREQUENCY. The [ENV] knob controls the depth of inverted (-) and non-inverted (+) envelope shapes. The ADSR sliders allow you to shape the filter’s response to the incoming signal and also enables you to manipulate the characteristics of the filter’s cutoff and resonance response. Try a slow attack for a sound that gradually raises the cutoff frequency over time.
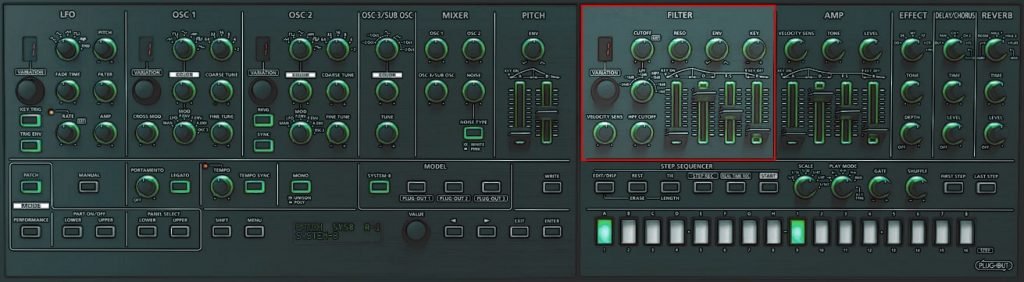
High RESONANCE settings boost the signal around the CUTOFF frequency. At full RESONANCE, the boost is so powerful that the VCF can produce its own sine wave-like tone. This can be used to great effect in layering a pitched tone from the VCF on top of melody/sequencer lines.
The [KEY] knob (KEYBOARD FOLLOW) uses the pitch of the notes to control the CUTOFF FREQUENCY. By turning the knob to the right, the CUTOFF frequency becomes higher with the higher notes. When the knob is turned to the left, the opposite occurs and the CUTOFF frequency becomes lower with the lower notes. The SYSTEM-8 also offers a separate non-resonant high pass filter for further control, sound shaping and performance options. Controlled by the HPF CUTOFF knob, use this filter to remove unwanted bass rumble and ensure your synth patch cuts through the mix.
The SYSTEM-8’s VCF section offers high resolution Griffer knobs and has three variation modes to shape and control your synth sound. Each mode has distinct characteristics that make them useful for a wide range of filtering purposes. Mastering these modes and their associated controls gives you a range of expression on the timbre of your patch and is a skill that synthesists spend years perfecting.
The Variations
Variation 1 operates in either resonant lowpass or highpass mode, with options for 12dB, 18dB and 24dB/octave slopes for each. The 18dB/octave lowpass mode can be used effectively to recreate the famed Roland TB-303 “acid” bass sound.
Variation 2 is based on the “side-band” filter that originally appeared on another Roland icon, the V-Synth, with 6 different modes that have their own unique character. Savvy listeners will immediately recognize Variation 2’s filters as sophisticated comb-filter arrays that can be used for flanging effects.
Variation 3 is derived from the original System-1 and -1m synthesizers and offers more aggressive low pass characteristics. This variation does not include the high pass options, but there is a new additional 18 dB/octave mode.
TIP #5: USE THE AMP ENVELOPE TO SHAPE THE VOLUME OF EACH NOTE
Every instrument, from mallet-based xylophones to the bowed strings of a violin has a characteristic “shape” to its volume when played. Studying the attack, decay and release of different sounds will give you ideas about how to use an amp ADSR envelope to shape the volume of each note or chord played on the AIRA SYSTEM-8 synthesizer. This is the last step in creating perfect tone!

An envelope requires a TRIGGER or GATE signal to begin the ADSR cycle. In the SYSTEM-8 synthesizer, each time a key is pressed (or note played on the arpeggiator), a GATE signal is sent to the amp envelope. When the key is down, the GATE is on and the ATTACK, DECAY and SUSTAIN phase of the ADSR shapes the amplifier volume. When the key is released, the GATE is off and the RELEASE phase of the ADSR finishes the volume modulation.

The AMP envelope, alongside Pitch and Filter envelopes, can all be triggered simultaneously from the LFO. This feature can be used to create interesting rhythmic and pulsing effects.
TIP #6: CREATE SPACE, MOVEMENT AND TEXTURE WITH EXPANDED ONBOARD EFFECTS
The AIRA SYSTEM-8 synthesizer contains 3 effects sections to provide space and texture to your synth patch. Each section offers 6 different types of processing that can be shaped and customised using the onboard controls of Type, Tone, Time and Level.
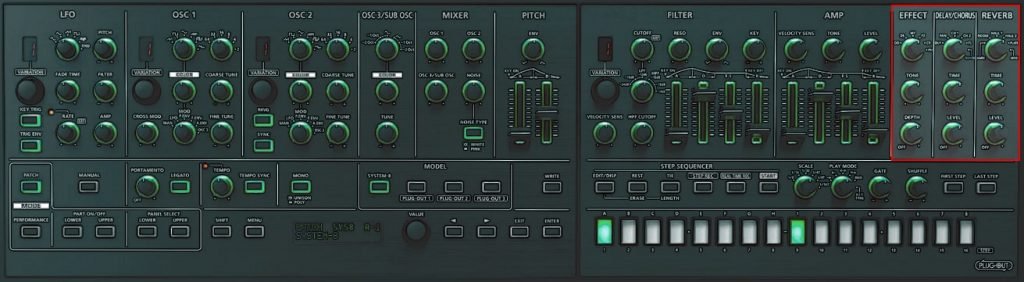
Type control allows you to move between different effects, offering a range of popular and useful reverb and delay types. Tone and Time controls can be customised further, and using the menu and display screen makes the process easy. Access the effects options via the PATCH EFFECTS MENU. All customisations can be saved to your patch.
The Delay/Chorus section offers 6 different types – Delay (DLY), Panning Delay (PAN), Chorus1 (CH1), Chorus2 (CH2), Flanger (FL) and Delay+Chorus (DLY+CH). These time-based effects can add much character to your synth sound. Explore these broad options to get the most from your synth patch.
The Reverb Section
The Reverb section also offers 6 variations, from Ambience (AMBI), Room (ROOM), Hall1 (HALL1), Hall2 (HALL2), Plate (PLATE) and Modulations (MOD). These luscious reverb effects will take your sound to the next level. Customise each parameter for your own unique sound!
An additional effects section offers new effects for further sonic exploration and exploitation. Choose from OverDrive (OD), Distortion (DS), Metal (MT), Fuzz (FZ), Crusher (CR) and Phaser (PH), for varying and textured effects.
Use the OverDrive, Distortion or Fuzz for added grit and dirt. These effects revel in the power of BOSS compacts, past and present. The CRUSHER creates a textured effect from digital bit-depth/sample-rate reduction. This effect allows for tuning to emphasise certain harmonics in a melody, or can be taken to the extreme for complete disharmonic destruction.
TIP #7: MASTER MOVEMENT WITH LFO MODULATION
As demonstrated in Tip #2, the LFO of the AIRA SYSTEM-8 is great for modulating the width of the oscillator waveform for dynamic tone shifts. However, the LFO can also modulate multiple parameters simultaneously. Understanding how the LFO can be used to add expression to your patch, is key to mastering synthesis.
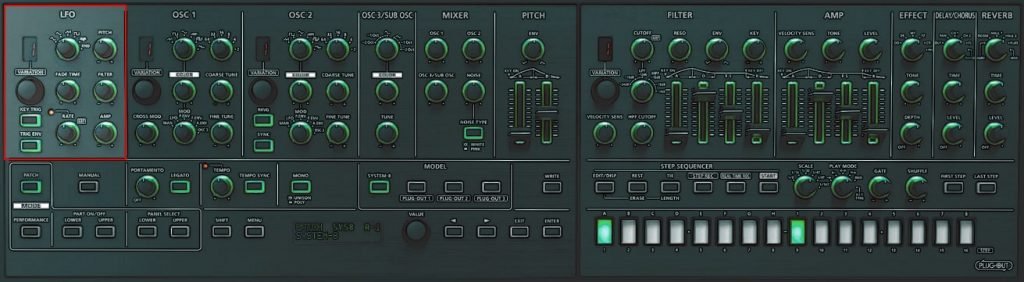
The LFO has six waveforms available with a wide RATE range that goes up into audio rate to create tones reminiscent of ring modulation and FM synthesis. The LFO waveforms include:
- Sine
- Triangle
- Sawtooth
- Square
- Sample & Hold
- Random (smooth S&H)
Modulation of OSC 1 and OSC 2, VCF and VCA via the LFO allows for PITCH (vibrato), FILTER (cutoff sweep) and AMP (tremolo) effects, or a combination of each. Turning the PITCH, FILTER or AMP knob to the right controls the depth of modulation. Turning the knob to the left uses an inverted LFO waveform, with depth increasing at the knob’s minimum. Using a mix of inverted and standard LFO modulation adds another dimension to the movement of your patch.
The Variations
The AIRA SYSTEM-8 offers 3 LFO variations that enables you to access the full power of its engine. Variation 1 works as the standard LFO configuration, with options for Sine, Triangle, Rising Sawtooth, Square, Sample&Hold, and Random, as discussed above. Variation 2 is a dual LFO, created using a second separate LFO. The second LFO is comprised of a sine wave, 5 octaves lower. The waveform options are the same as Variation 1, with the LFO rate modulated by the second LFO.
This mode produces some really interesting, less typical results and is great for sound effects or radical synth patches that push the limits of sonic synth exploration. Variation 3 is a pulse waveform with resonance, and can be used similarly to a modular style LFO. This LFO is in fact a sine wave, with its depth modulated by a separate sawtooth. The result is a pulse of modulation, where the waveform selector determines the frequency of resonance.
The AIRA SYSTEM-8’s LFO can be applied to up to 5 different destinations simultaneously, in varying amounts. This makes it an incredibly powerful modulation source and will bring life to your synth patch.
TIP #8: ADD EXPRESSION TO YOUR NOTES WITH PITCH MODULATION
The AIRA SYSTEM-8 offers numerous features to provide pitch movement to your notes. Envelopes, pitch wheel, and portamento are just a few functions and techniques for you to master in order to add your own style to your sound.
PORTAMENTO
Portamento is used to create a smooth change in pitch, between one key and the next key played. The [PORTAMENTO] knob adjusts the time required for the pitch change. Legato provides further control over “pitch glide”. The [LEGATO] button applies portamento only when you play legato (i.e., when you press the next key before releasing the previous key). Using a combination of the two provides expressive pitch control to your playing.
PITCH ENVELOPE
Another method to alter the pitch while playing is by using the PITCH ENVELOPE. Pressing any key/s triggers the Attack-Decay envelope. When turning the [ENV] knob toward the right, the pitch initially becomes higher and then returns to the pitch of the pressed key. When turned to the left, the pitch drops, then returns to the initial pitch. The ATTACK and DECAY sliders shape the depth of modulation.
PITCH BEND
The BENDER provides control over pitch expression for your left hand while playing. The BENDER springs back to its centre position with no pitch modulation. When turned to the right, it increases the pitch and when turned to the left, decreases pitch. Set the BEND range in the Menu and tailor the bender to suit your playing style.
OCTAVE SHIFT BUTTONS
The OCTAVE [DOWN] [UP] button shifts the range of the keyboard in steps of one octave. The button is lit for the 1 octave setting; the button is blinking for the 2 octave setting, and blinks faster for the 3 octave setting. If you press the [DOWN] [UP] buttons simultaneously, the keyboard will return to its normal pitch range.
TIP #9: USE CHORDS & ARPEGGIOS TO EXPAND YOUR PERFORMANCE
The AIRA SYSTEM-8 features an Arpeggiator section, a tool that allows you to play the notes of a chord one at a time. Arpeggios are a popular performance technique in all styles of music and are found on both vintage and modern synthesizers.
There are 4 modes that dictate the order of the chord sequence; Up, Down, Up & Down and Random, as well as the choice of one to four octaves. The [ARP STEP] knob specifies the note value length. Choose between Quarter note, Eighth note, Sixteenth note, Quarter-note triplet, Eighth-note triplet and Sixteenth-note triplet. Each division will have a vastly different impact on the sound and effect of your arpeggio, so experiment with all types to find the right one for your sound. To access the arpeggiator, press the [ARPEGGIO] button.
The ‘Key Hold’
Use the [KEY HOLD] button to hold the chord you have just played and the arpeggio will continue. This is a handy feature for live performance, leaving your hands free to shape and control other parameters of sound. As you play a different chord, the [KEY HOLD] will capture that chord and the arpeggio will also change.
Chord memory is also offered on the AIRA SYSTEM-8, which is a useful tool for studio compositions and live performance. Use the [CHORD MEMORY] button to store chords of up to 8 notes! Layer notes one by one for a slow but powerful build up, or use the on/off function to recall powerful chords mid-performance. Activate chord memory by pressing the [CHORD MEMORY] button. When the button is lit, the chord will be recalled. Hold the [CHORD MEMORY] button to enter notes, and save one chord memory for each patch!
TIP #10: BRING YOUR SOUNDS TO LIFE WITH THE POWERFUL STEP SEQUENCER
The AIRA SYSTEM-8 offers an impressive polyphonic step sequencer that’s intuitive and easy to use. However, under its relatively simple exterior lies a complex and incredibly powerful sequencer that elevates the SYSTEM-8 to extraordinary levels of versatility.
The sequencer features 16 physical steps, but offers up to 64 steps of polyphonic sequencing. The display screen indicates which bank of steps you are operating (1-64). These steps light up green when active, and show blue to indicate where the playhead is on the sequence.

Creating Sequences
Sequences can be entered manually or recorded as a live performance. In [STEP REC], entering sequences manually is made easy with large, brightly lit step buttons. To enter note information, simply press the [STEP REC] button, and play a note on the keyboard. The sequencer will automatically advance to the next step. You can also capture a live performance in [REAL TIME REC] mode, which allows you to bring your sequences to life, and is a great way to record ideas on the fly. You can start recording as soon as the first key is pressed by holding [SHIFT] and pressing [REAL TIME REC].
Sequencing live is particularly easy with dedicated buttons for real-time record, step record, rests, ties and various other editing functions. Furthering editing parameters, like Copy-and-Paste and note length, can be accessed via the STEP SEQ MENU. TRANSPOSE allows you to easily pitch shift the entire sequence, and you can use the ERASE function to easily edit your sequences, deleting knob movements, notes, or both.
Onboard Controls
Onboard controls for First and Last steps allow you to manually set the point from which the sequence should start and end. To set the first step, hold down the [FIRST STEP] button, press the step button (1-16) on the sequencer. You can use this operation to make it play from any desired step. Last step is usually specified by the STEP LENGTH setting. You can use the [LAST STEP] setting to make the step sequencer use a different step as the final step. Changing the First or Last step while maintaining region length allows you to shift you sequence, creating dynamic and inspiring new results.
Parameter automation is also possible with the SYSTEM-8’s onboard sequencer, and it’s the perfect way to add depth and dynamics to your sequence. Automation is entered either by recording in real-time, or entering parameter locks per step of the sequencer. Entering parameter automation manually allows you to create calculated modulations per step and is a great way to create really detailed sequences. To enter parameter information manually, simply hold down the [STEP] button and turn the knob to the corresponding parameter.
USB & MIDI
The SYSTEM-8’s sequencer works with both USB and standard MIDI connections, allowing you to send sequences from your DAW. Furthermore, the CV and Gate outputs on the rear make it possible to sequence Eurorack or CV-dependent synthesizers from the SYSTEM-8. Use one sequencer layer to send CV/Gate information to an external synthesizer, whilst using the second sequencer layer for the SYSTEM-8’s internal sounds.
The sequencer responds well to incoming clock, allowing your external gear to drive the onboard sequencer. Use the MIDI or USB input and set the MIDI IN via the SYSTEM MENU. Alternatively, use the TRIGGER IN jack on the rear panel to advance through steps of the step sequencer, by sending a trigger from an external device, like a rhythm machine. When a plug is connected to the TRIGGER IN jack, the sequencer will automatically be disconnected from the internal clock, and will await an incoming trigger signal. You can also set the tempo of the sequencer and arpeggiator internally, via the [TEMPO] knob.
SPLIT and DUAL Modes allow you to access different sequences for each split or layer, making for an amazingly dynamic and powerful machine. This is great for easily harmonizing two separate sound patches, and allows for more complex sound design and composition. When the sequencer is not being used, the 16 dedicated step buttons become a means for Patch Recall.
TIP #11: GET VOCAL WITH THE VOCODER
The Vocoder is a special addition that takes the SYSTEM-8 to a new level, opening a new world of possibilities for vocalists or even those of us who just like to experiment with the human voice.
Found on the rear of the AIRA SYSTEM-8, the Vocoder’s audio input works as the modulator and the synth as the carrier, when in Vocoder Mode. The Vocoder microphone input is monophonic, using the left channel exclusively. The input gain is set with the [INPUT] knob on the front panel, and the incoming signal is indicated with the PEAK light. Alternatively, you can skip the Vocoder, switch the input from mic level to line level and utilise left and right inputs for external instruments, drum machines or other synths. This means you can send external audio through the SYSTEM-8’s onboard reverb, delay and chorus effects.
Additional control of the Vocoder comes in the form of a fine-tuning formant parameter and a high pass tool used to shape consonant behaviour, both of which are accessed via the PATCH EFFECTS MENU.
TIP #12: STEP BACK INTO ROLAND’S HISTORY AND PLUG OUT AN ICONIC SYNTHESIZER
The AIRA SYSTEM-8 improves on the PLUG-OUT capability of the SYSTEM-1, and offers hosting of up to 3 models simultaneously. Performance modes allow you to split or layer 2 sounds at once, allowing you to fully maximise use of your PLUG-OUTS. Now you can hear what a JUPITER-8 would sound like when layered with a JUNO-106, all on the same synth!

Through new PLUG-OUT technology, the AIRA SYSTEM-8 can control and host software reproductions of legendary Roland synthesizers. To access the PLUG-OUT mode, simply press one of the three [PLUG-OUT] buttons on the SYSTEM-8’s front panel. All controls that do not relate to that particular PLUG-OUT will “black out”, making it easier to shape your PLUG-OUT sounds.
A Contemporary Recreation
The JUPITER-8 PLUG-OUT is a contemporary recreation of the iconic JUPITER-8 Synthesizer. ACB (Analog Circuit Behaviour) technology faithfully reproduces both the sound and behaviour of the original synth. True to the original, the JUPITER-8 offers all the modes – Poly 1, Poly 2, Mono and Unison. Performance mode also makes it possible to stack and split the keyboard, as seen on the original JUPITER-8.
The PLUG-OUT software gives you the freedom of hardware gear, alongside the reliability and the flexibility of software. You now get the sound of the original JUPITER-8, with more control and additional features like reverb, chorus, delay, and other effects, which were not present in the original design. You can use these effects to take the JUPITER-8 sound into incredible new places. Access the JUPITER-8/SYSTEM-8 Parameter Correspondence Table here.
The JUNO-106 PLUG-OUT is a modern reproduction of the legendary 1984 analog polysynth. This software synthesizer perfectly integrates into the SYSTEM-8 hardware. In the software, connecting cables between the patch points enables you to alter the signal path and modulate various parameters. The new Pin Routing Matrix provides a visual representation of the connections, making it easier and quicker to patch away. Access the JUNO-106/SYSTEM-8 Parameter Correspondence Table here.
Discover the other PLUG-OUTS like the SH-101 Software Synthesizer here.
TIP #13: SAVE, EDIT AND RECALL UP TO 256 KILLER SYNTH PATCHES
The [MANUAL] button provides a start point from which you can create new patches. If you are the type to avoid presets, this is where you should begin! It can be particularly handy for live performances, if you want to create a new patch on the fly.
You can then save your custom sound to a new user bank, by holding down the corresponding memory button (1-8). The AIRA SYSTEM-8 has 8 banks, with 8 presets in each bank, allowing you to store up to 64 patches! To access these banks, hold the [SYSTEM-8] button and then select a User Bank from 1-8. Your selected bank will quickly flash, and once the [SYSTEM-8] button is released, you are able to use memory buttons 1-8 to select a preset.
Experiment with the Sound Combinations
The saved PLUG-OUT synths also have 8 banks of 8 presets, giving you a total of 256 monophonic and polyphonic sounds available at the press of a button. 3 PLUG-OUTs can be saved onto the SYSTEM-8 at a time, so make sure to experiment with all the different potential combinations!
All your synth related data can be backed up or exported to an SD card and later restored. From the UTILITY MENU, you are able to access options for Backing Up Data, Restoring Data, Exporting Sound Data and Importing Sound Data.
Exporting allows you to export specific Patches and Performances, which can then be imported at a later time. When restoring, all data and settings are rewritten, so take care before you use this feature. This makes the AIRA SYSTEM-8 a great option for touring and live performance, where reliability and ease is key. Just insert your SD card into a new SYSTEM-8 to load up all your sounds and sequences.
TIP #14: MIDI and CV ARE THE KEY TO MASTERING YOUR SYNTH RIG
Using your AIRA SYSTEM-8 to control other pieces of your synth setup or DAW is possible through MIDI. You can also control all values on the SYSTEM-8 from an external source via MIDI. Use the various SYSTEM MENU settings to configure the MIDI setup that best suits your needs! USB connectivity allows you to use the SYSTEM-8 as a 24bit/96kHz Audio Interface, recording the output of the SYSTEM-8 directly into your DAW. You are also able to send MIDI information from your DAW to the SYSTEM-8 via the USB connection.
You can synchronise the AIRA SYSTEM-8 to the MIDI Clock of another external device through the MIDI IN at the rear. Alternatively, you can use the SYSTEM-8 as the Master Clock, from which you can sync external gear. MIDI settings for transmit/receive channel, Modes, Patch, Performance and more are all accessed in the MIDI MENU.
CV/GATE Outputs
CV/GATE Outputs further elevate the versatility of the SYSTEM-8. You can now use the SYSTEM-8’s keyboard or sequencer to send Pitch and Gate information to external sequencers, like a Eurorack modular. These connections are particularly useful for machines that rely solely on CV. This also means that the SYSTEM-8 can operate as a MIDI-CV converter, and is a great way to send MIDI information from your computer to synths that utilise CV. CV/GATE behaviour is set via the SYSTEM MENU and includes settings for Keyboard, Sequencer, Scaling, Fine Tune, Bend Range, Portamento and MIDI behaviour.
The power of MIDI lets this synth come to life! To get the most out of the SYSTEM-8, spend some time working out these different configurations and how they can be applied to your studio or live performance.
TIP #15: CUSTOMISE YOUR KEYBOARD WITH MODES
The AIRA SYSTEM-8 operates around 2 different modes – PATCH MODE and PERFORMANCE MODE. These modes have dedicated buttons on the front panel, so you can easily move between them. PATCH MODE is the SYSTEM-8’s basic mode, allowing you to play one patch at a time. In this mode, the synth operates with a maximum of eight notes of polyphony. Sequencer, Arpeggio and Chord Memory data are saved within each patch.
PERFORMANCE MODE allows you to assign a patch to each of 2 parts – upper and lower. Pressing the [UPPER] or [LOWER] button selects the part that will be affected by the panel controls. PERFORMANCE MODE offers SINGLE and DUAL settings, which dictate how the keyboard will operate. In SINGLE mode you perform using either the upper part or the lower part. The part you play has a maximum polyphony of eight notes.
DUAL mode, allows you perform using both the upper and lower parts. In this mode, each part has a maximum polyphony of 4 notes. Parts can be layered or split, which provides endless possibilities for sound design, especially with the extended Plug-Out engine.
In PERFORMANCE MODE, different Arpeggio and Sequencer settings can be applied separately to both upper and lower parts. These setting can be access via the PERFORM EDIT MENU. This is where the SYSTEM-8 can get really interesting, especially when vintage analog-style sounds of the PLUG-OUTS are layered together with the futuristic sonics of the SYSTEM-8.
Poly, Mono and Unison Modes
Poly, Mono and Unison modes are offered for voice assignment, which are accessed via the [MONO] button. When the button is lit, Mono mode is activated and the keyboard will sound notes monophonically. Unison mode plays all sounds together and is active when the [MONO] button is flashing. Poly is represented by an unlit button. Understanding how these various modes work together is imperative to fully mastering the SYSTEM-8 and using it to is fullest potential.
The CONDITION setting is another way to experiment with and customise each synth patch on the SYSTEM-8. It is accessed via the MAIN MENU and is saved as a patch parameter. The CONDITION setting controls the way the SYSTEM-8 replicates the character sound of an ageing synthesizer as it degrades of time. You can determine the intensity of the effect, and apply it specifically per patch.
The AIRA SYSTEM-8 offers a detailed level of customisation, inherent in the various modes but also found in its numerous MENU settings. Utilise these parameters and modes to customise your SYSTEM-8 to best fit your sound and need!
PRO TIP: Further customisation comes in the form of velocity control, accessed via the SYSTEM MENU. Change the feel of the keyboard with Key Velocity Curve and Velocity Offset.