Here are 10 essentail tips for starting to learn piano that will have you playing better straight away!
Learning to play the piano doesn’t have to be hard. The following series of lessons put together by Roland and Pianist Magazine’s Tim Stein will show you a wealth of practice techniques and exercises that will help beginner pianists refine and perfect their performance.

 The correct hand shape should feel natural. It should not be uncomfortable or feel like something is wrong. Your arms, wrists and hands should create a nice line.
 Not everyone follows the fingering guides; however, they can be very useful especially for beginners. The fingering system is usually marked on the score as a guide to make your practice easier. When you first start practicing a piece it is a good idea to start by following the suggested fingering. If, at a later stage, you decide that the fingering listed doesn’t work for you, then that’s OK too.
 You can start by calling out the names of the fingers as you hit the piano key. For example, you can say “right hand 4th finger” and then hit any note on the piano with the right hand 4th finger. By doing this, you are training your brain to remember the fingering. After a while, you should start to recognise the fingers with the correct numbers and you won’t have to call them out to remind yourself anymore.
If you want to use your own fingering it’s a good idea to write it on your score in pencil so that you can change it if you need to. This way you can follow your notes as you play. If you are constantly changing the fingering each time, it will negatively affect the quality of your practice and performance.
You can start by calling out the names of the fingers as you hit the piano key. For example, you can say “right hand 4th finger” and then hit any note on the piano with the right hand 4th finger. By doing this, you are training your brain to remember the fingering. After a while, you should start to recognise the fingers with the correct numbers and you won’t have to call them out to remind yourself anymore.
If you want to use your own fingering it’s a good idea to write it on your score in pencil so that you can change it if you need to. This way you can follow your notes as you play. If you are constantly changing the fingering each time, it will negatively affect the quality of your practice and performance.
 Begin by keeping your fingers close together and playing the notes grouped in two (red brackets) using just the left hand. Start at the bottom of the keyboard (lowest notes) and work yourself up to the top. Then come back down. Now use the right hand and play the notes grouped in three (blue brackets) and go up the keyboard from left to right, and then right to left. Once you feel comfortable, you can close your eyes, repeat the same exercise. There are other exercises you can try in this video to develop a good sense of where you are and move confidently and freely. Watch the video below to see more exercises.
 You can develop hand and finger independence by practicing the 5 finger exercise that Tim mentions in the video below. Start this exercise by playing the first 5 notes of the C major scale (C-D-E-F-G) but play the left hand staccato and right hand legato, then swap them over so that the left is playing legato and right is playing staccato.
Calling out the notes as you do this exercise can be beneficial.
You don’t necessarily need to be at your piano to practice hand and finger independence. You can practice Tim’s 5 finger exercise on your desk, floor… anywhere you like. Just tap away and get used to moving your hands and fingers independently.
You can develop hand and finger independence by practicing the 5 finger exercise that Tim mentions in the video below. Start this exercise by playing the first 5 notes of the C major scale (C-D-E-F-G) but play the left hand staccato and right hand legato, then swap them over so that the left is playing legato and right is playing staccato.
Calling out the notes as you do this exercise can be beneficial.
You don’t necessarily need to be at your piano to practice hand and finger independence. You can practice Tim’s 5 finger exercise on your desk, floor… anywhere you like. Just tap away and get used to moving your hands and fingers independently.
 Music is full of scales and arpeggios. As well as improving your technique, knowing your scales and arpeggios helps to get your head around the geography of the keyboard.
Scales and arpeggios are useful for judging the distances between notes. As an example, look at the C Major scale – C-D-E-F-G-A-B-C.
One of the most common difficulties that beginners face when playing scales and arpeggios is turning the finger under the hand. When you are playing the C major scale with your right hand, you play the first group of 3 notes (C-D-E) with your 1st (C with your thumb), 2nd (D with your index) and 3rd (E with your middle) fingers.
Then, to play the next group of 4 notes (F-G-A-B), you use the 1st (F with your thumb), 2nd (G with your index), 3rd (A with middle) and 4th (B with ring) fingers.
Instead of playing the first 3 notes, then jumping the thumb to play the 4th note with your thumb, you need to bring the thumb under the hand like the picture to the right. Try not to ‘push’ under the thumb because it creates tension in your hands. Keep your hand relaxed.
Music is full of scales and arpeggios. As well as improving your technique, knowing your scales and arpeggios helps to get your head around the geography of the keyboard.
Scales and arpeggios are useful for judging the distances between notes. As an example, look at the C Major scale – C-D-E-F-G-A-B-C.
One of the most common difficulties that beginners face when playing scales and arpeggios is turning the finger under the hand. When you are playing the C major scale with your right hand, you play the first group of 3 notes (C-D-E) with your 1st (C with your thumb), 2nd (D with your index) and 3rd (E with your middle) fingers.
Then, to play the next group of 4 notes (F-G-A-B), you use the 1st (F with your thumb), 2nd (G with your index), 3rd (A with middle) and 4th (B with ring) fingers.
Instead of playing the first 3 notes, then jumping the thumb to play the 4th note with your thumb, you need to bring the thumb under the hand like the picture to the right. Try not to ‘push’ under the thumb because it creates tension in your hands. Keep your hand relaxed.
 A good way to practice turning is to repeat the transition by only playing the notes E-F-G. Once you are feeling more comfortable with the finger turn, you can start practicing the full scale.
 Before you even touch the piano keys, one of the useful exercises to try is to tap out the tempo on the piano lid or desk for both the right hand and left hand parts. If tapping both hands together is difficult, try it separately first then later put both hands together.
Other tips include:
►Looking out for difficult parts and concentrate on getting them right
►Counting out the rhythm aloud
►Practice over the bar line to train your brain to not to stop at bar lines
►Write in the fingering that makes sense – use as many notes as possible without moving your hand position
Before you even touch the piano keys, one of the useful exercises to try is to tap out the tempo on the piano lid or desk for both the right hand and left hand parts. If tapping both hands together is difficult, try it separately first then later put both hands together.
Other tips include:
►Looking out for difficult parts and concentrate on getting them right
►Counting out the rhythm aloud
►Practice over the bar line to train your brain to not to stop at bar lines
►Write in the fingering that makes sense – use as many notes as possible without moving your hand position

Index
1: Seating and Posture 2: Hand Shape and Hand Position 3: Piano Fingering for Beginners 4: Geography of the Keyboard 5: Simple Warm Up Exercise 6: Hand and Finger Independence 7: Fingering for Scales and Arpeggios 8: Piano Tone and Sound 9: How to Start Practicing a Piece 10: Sight-ReadingTips for Learning Piano #1: Seating and Posture
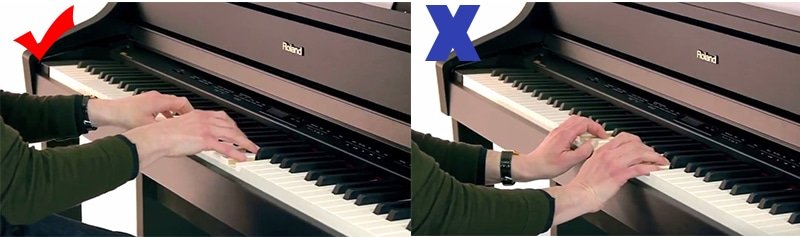
It’s important to have the correct posture and seating position when you are sitting at the piano. You could even be saving yourself from an injury. Check out the video below for an example of correct seating and posture.Tip #2: Hand Shape and Hand Position
Hand shape and hand position can dramatically affect the way you play the piano. Having the wrong hand shape and position can cause unnecessary strain on your fingers, hands, arms and shoulders. It can also make the playing much harder for you. Take a look at the comparison of ‘good’ and ‘bad’ hand positions in this example and see the difference.
The correct hand shape should feel natural. It should not be uncomfortable or feel like something is wrong. Your arms, wrists and hands should create a nice line.
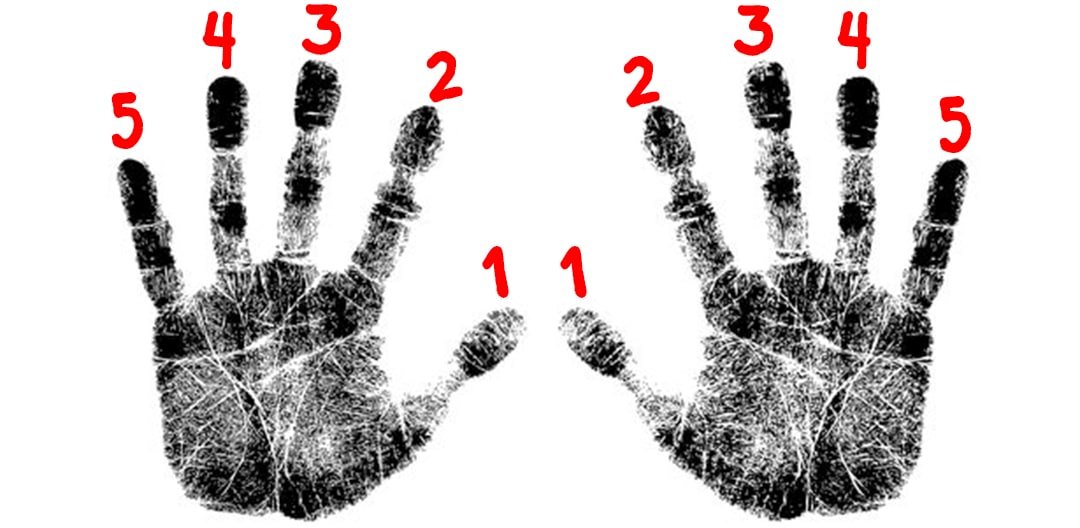
Tips for Learning Piano #3: Piano Fingering for Beginners
Have you ever noticed little numbers on top of the notes on your score? These are known as fingering guides.
Not everyone follows the fingering guides; however, they can be very useful especially for beginners. The fingering system is usually marked on the score as a guide to make your practice easier. When you first start practicing a piece it is a good idea to start by following the suggested fingering. If, at a later stage, you decide that the fingering listed doesn’t work for you, then that’s OK too.
You can start by calling out the names of the fingers as you hit the piano key. For example, you can say “right hand 4th finger” and then hit any note on the piano with the right hand 4th finger. By doing this, you are training your brain to remember the fingering. After a while, you should start to recognise the fingers with the correct numbers and you won’t have to call them out to remind yourself anymore.
If you want to use your own fingering it’s a good idea to write it on your score in pencil so that you can change it if you need to. This way you can follow your notes as you play. If you are constantly changing the fingering each time, it will negatively affect the quality of your practice and performance.
Tip #4: Geography of the Keyboard
You can’t look at your hands and keys as well as the score while you are playing the piano. Developing a good sense of where you are on the keyboard is crucial. Getting to know the layout of the keyboard and the distance between the keys is very important. Knowing the geography of the keyboard allows you to play the piano without having to look down at the keys. To develop a better sense of the notes, start by knowing the position of the black keys and learning the keys around them. Black keys are grouped in two and three as pictured below:
Begin by keeping your fingers close together and playing the notes grouped in two (red brackets) using just the left hand. Start at the bottom of the keyboard (lowest notes) and work yourself up to the top. Then come back down. Now use the right hand and play the notes grouped in three (blue brackets) and go up the keyboard from left to right, and then right to left. Once you feel comfortable, you can close your eyes, repeat the same exercise. There are other exercises you can try in this video to develop a good sense of where you are and move confidently and freely. Watch the video below to see more exercises.
Tips for Learning Piano #5: Simple Warm Up Exercise
Playing a piano is like going to the gym – you wouldn’t start lifting heavy dumbbells right at the beginning or run a marathon without some warm up beforehand. Before you begin your practice or performance sit comfortably at the piano and relax. Be conscious of your posture and hand positions – shoulders down and open without tension. To help you free up your arms and shoulders, you can first try a simple exercise that Tim calls “Footsteps in the Snow” and “Run and Jump”. Watch the video below and learn the simple warm up exercises.Tip #6: Hand and Finger Independence
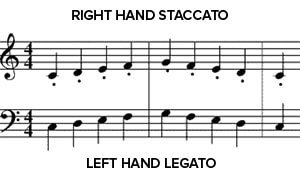
Many piano pieces require you to use hands and fingers independently. There will be times when one hand is doing one thing and the other hand is doing something completely different. For example, the left hand could be playing staccato (jumpy bouncy notes) while the right hand is playing legato (smooth notes).
You can develop hand and finger independence by practicing the 5 finger exercise that Tim mentions in the video below. Start this exercise by playing the first 5 notes of the C major scale (C-D-E-F-G) but play the left hand staccato and right hand legato, then swap them over so that the left is playing legato and right is playing staccato.
Calling out the notes as you do this exercise can be beneficial.
You don’t necessarily need to be at your piano to practice hand and finger independence. You can practice Tim’s 5 finger exercise on your desk, floor… anywhere you like. Just tap away and get used to moving your hands and fingers independently.
Tips for Learning Piano #7: Fingering for Scales and Arpeggios
Music is full of scales and arpeggios. As well as improving your technique, knowing your scales and arpeggios helps to get your head around the geography of the keyboard.
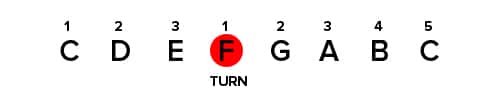
Scales and arpeggios are useful for judging the distances between notes. As an example, look at the C Major scale – C-D-E-F-G-A-B-C.
One of the most common difficulties that beginners face when playing scales and arpeggios is turning the finger under the hand. When you are playing the C major scale with your right hand, you play the first group of 3 notes (C-D-E) with your 1st (C with your thumb), 2nd (D with your index) and 3rd (E with your middle) fingers.
Then, to play the next group of 4 notes (F-G-A-B), you use the 1st (F with your thumb), 2nd (G with your index), 3rd (A with middle) and 4th (B with ring) fingers.
Instead of playing the first 3 notes, then jumping the thumb to play the 4th note with your thumb, you need to bring the thumb under the hand like the picture to the right. Try not to ‘push’ under the thumb because it creates tension in your hands. Keep your hand relaxed.
A good way to practice turning is to repeat the transition by only playing the notes E-F-G. Once you are feeling more comfortable with the finger turn, you can start practicing the full scale.
Tip #8: Piano Tone and Sound
You need to do more than just memorise the notes to play with beautiful tone. Playing expressively requires practice of technique as well as a feel for the rhythm and dynamics of the music. One of the exercises that Tim mentions in the video below is the “Bouncing Ball” exercise. This is where you test the different sounds; from loud to soft, to get a feel for what it takes to create different dynamics. You can also try different fingers as well. Experiment with different sounds and tones that you can produce – experimentation is a must! Think about how much pressure you need to apply to one note. Also keep in mind that the strings are thinner towards the top of the keys (higher range) and thicker towards the bottom of the keys (lower range) so you may need to compensate with differing finger/hand pressure.Tips for Learning Piano #9: How to Start Practicing a Piece
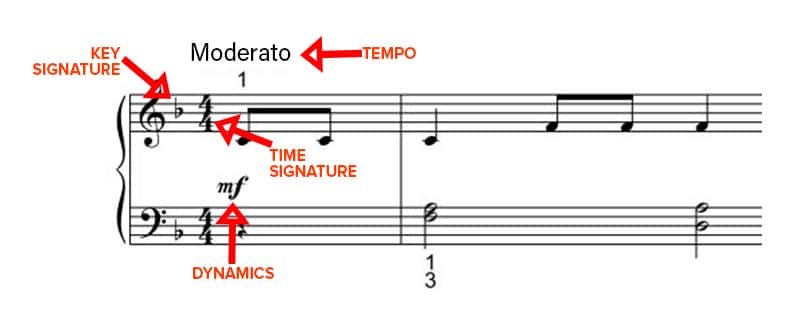
Before you start to play or practice a new piece of music you need to look at the first bar of the score. Check the tempo marking to find out how fast or slow the piece will be as well as the time and key signature.
Before you even touch the piano keys, one of the useful exercises to try is to tap out the tempo on the piano lid or desk for both the right hand and left hand parts. If tapping both hands together is difficult, try it separately first then later put both hands together.
Other tips include:
►Looking out for difficult parts and concentrate on getting them right
►Counting out the rhythm aloud
►Practice over the bar line to train your brain to not to stop at bar lines
►Write in the fingering that makes sense – use as many notes as possible without moving your hand position
Tip #10: Sight-Reading
It doesn’t matter what level you are at. Sight reading is one of the most important skills in your arsenal. So keep practicing! As your sight reading experience increases it will become far easier and quicker for you to learn new pieces. Always practice at a skill level below your current level – for example, if you are at grade 3, you should practice sight reading with grade 2 pieces. If you are at 5th grade, you should use 4th grade. Always work out the rhythm first, look at the time signature. Look for the repeated rhythmic patterns and practice the difficult rhythms by tapping on the piano lid first before touching the keyboard. The most important thing with sight reading is not to stop. Stretch out the timing if necessary for tricky parts but don’t stop!Get Playing!
Congratulations, you are now armed with the tools you need to practice effectively. Now all you need to do is get practicing.RELATED PRODUCTS


