FANTOM is the pinnacle of Roland synthesizer sound quality and design. It is built from metal and premium materials, and the all-new aftertouch-enabled keyboard is the best Roland has ever made. The layout is easy to navigate with plenty of knobs and sliders that let you control and easily edit your sounds, whether you’re producing in the studio or performing on stage. When the creative juices are flowing, there should be no barriers. With FANTOM, you won’t compromise your sound or suffer workarounds due to outdated technical limits. And forget worrying about what features work in which mode. FANTOM is always in full-on creative mode and your workflow stays consistent, no matter what. So before we discover FANTOM’s possibilities, let’s take a quick look at FANTOM’s heritage…
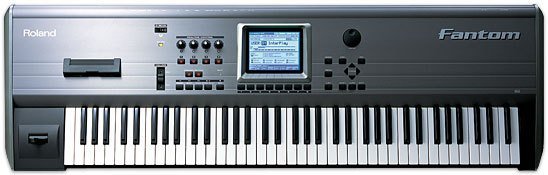
In 2001, the original Roland Fantom was heralded as a new breed of workstation. It had a large graphic LCD and centralized control of its many different functions. This 76-key workstation featured professional quality sounds from the XV-5080 which had the highest performance sound generator of its time and a wide range of realtime performance functions. It boasted an expandable sound engine and digital outputs and at the time had everything you could ever want in a workstation keyboard.
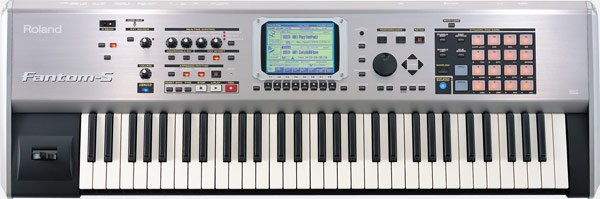
Then in 2003, theFantom-S offered seamless integration of audio and MIDI with advanced sampling features plus mastering effects, and USB file exchange.
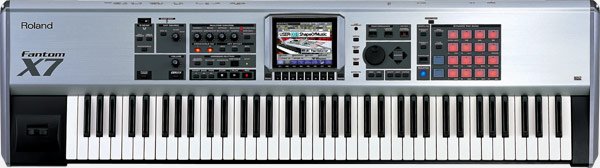
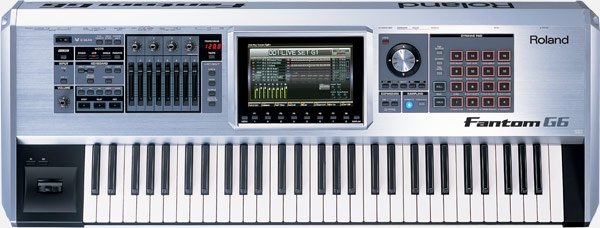
Then only twelve months later in 2004 the Fantom-X7 was the first “Giga-Workstations,” providing nearly 1GB of wave memory when fully expanded with four SRX cards. They also offered 128-voice polyphony, eight stereo audio tracks, and a large color LCD. Then after the affordable Fantom-Xa in 2004 came the heralded Fantom-G series in 2008. It came with ivory feel weighted keys on the G8 along with an advanced sound engine, revolutionary ARX SuperNATURAL expansion bay, large-sized colour LCD, powerful audio/MIDI sequencer, and more.

Now, ten years later, we enter a new era in FANTOM evolution. FANTOM is a new kind of creative hub, made for quick and straight forward music making and musically expressive performances. Inspiring onboard production tools and deep computer integration give you an experience that feels intuitive, natural, and full of possibilities. The expandable sound engine delivers our best electronic and acoustic sounds, with the depth and control to combine and shape them in exciting new ways. FANTOM is the fastest way to turn inspiration into creation.
NO MODES. JUST SEAMLESS WORKFLOW.
FANTOM has the acclaimed ZEN-Core synthesis system giving you a massive selection of sounds, which are expanding all the time. It can inspire you, and capture your ideas.
The new FANTOMs are instruments begging to be played and with so many ways to control the sound, and create new ones, first experiences can be a little overwhelming. How do I access the find the sounds I want? What is multi-sampling? What are Scenes? Where are the Zen-Core sounds and for that matter, what is Zen-Core?
That’s why I have put together THE ULTIMATE GUIDE TO THE FANTOM. These tips will answer all of your questions and help you to get straight into making new sounds and great music. The FANTOM is a benchmark in modern synth production instruments and has so much to offer, and will continue to do so, that this guide is and will continue to be a large reference document. Make sure to check in regularly, as we will update this list with more tips as the Roland FANTOM continues to expand.
Table of Contents
Fantom – The panel overview.
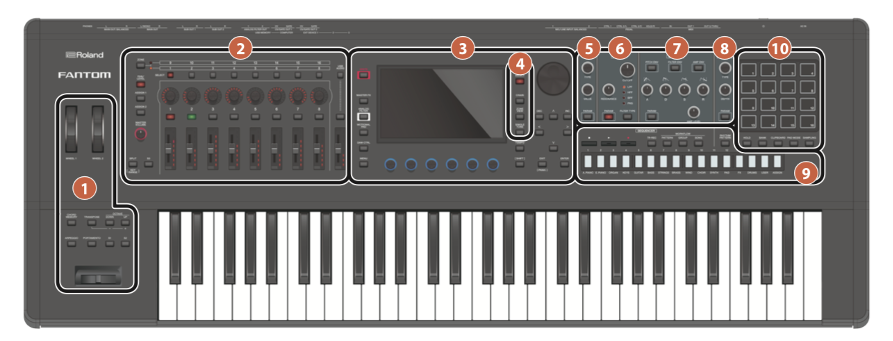
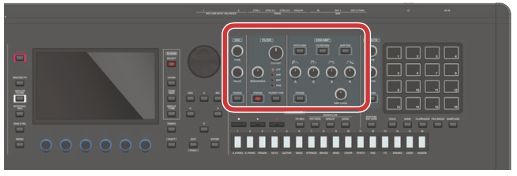
The controller section
FANTOM’s controller section gives you plenty of ways to control and adjust your sounds. Wheels 1 & 2 let you assign various parameters or functions to these wheels like filter or modulation for example. If you move the wheels while holding down the [SHIFT] button, the setting screen appears and you can choose different options from the main screen. You’ll also find buttons to turn the following on or off.
Here you also find the Chord Memory, Arpeggio and Portamento switches which I’ll discuss in depth later in this article.
TRANSPOSE. If you hold down the TRANSPOSE button you can use the OCTAVE [DOWN] [UP] buttons to raise or lower the pitch range in semitone steps. If you just press the OCTAVE [DOWN] [UP] buttons you can raise or lower the pitch range in octave steps.
Roland’s acclaimed pitch bend/modulation lever bends the pitch of your notes up or down or increases modulation the more you push the lever forward, fairly basic info here but as a side note, something I find very musical to use in performance..
Last but not least. the S1 and S2 buttons can have various parameters or functions assigned to them.If you hold down the [SHIFT] button and press one of these buttons, it will access a screen that lets you assign different functions of your choosing.
The Zone section
The Zone section is an incredible “Master Keyboard Controller” area with many possibilities! You’re controlling 16 zones internally and 16 zones externally here. (I’ll get into more in-depth explanation of this in a later chapter) There’s obviously 8 faders and knobs here so to swap to zones 9 through to 16, press the ZONE button on the top left hand side of this area. When you activate the PAN/LEVEL button just below, you can alter the volume and panning of the active zone.
With ASSIGN1 and ASSIGN2, you have freedom to choose what the sliders and knobs do for your FANTOM. ASSIGN1 assigns parameters that you set for a scene, and ASSIGN2 assigns parameters that you edit in system settings. Hold down the [SHIFT] button and press one of these buttons to access a screen that lets you assign a function. Holding down [SHIFT] is a consistent function throughout most Roland gear and a quick and easy way to access the parameters you need to change!
The S3 button can have various parameters or functions can be assigned to it. Again, just hold down the [SHIFT] button and press it to access a screen that lets you assign a function.
The [SPLIT/KEY RANGE] button turns the split function on/off. If you hold down the [SHIFT] button and press this button, the key range setting screen appears. As an example this is super handy way to assign a bass sound to the left hand side of the keyboard and an electric piano sound to the right hand side of the keyboard!
The CONTROL knobs [1]–[8] can have various parameters or functions can be assigned to these knobs. The parameters that can be controlled depend on the function select buttons located at the left.
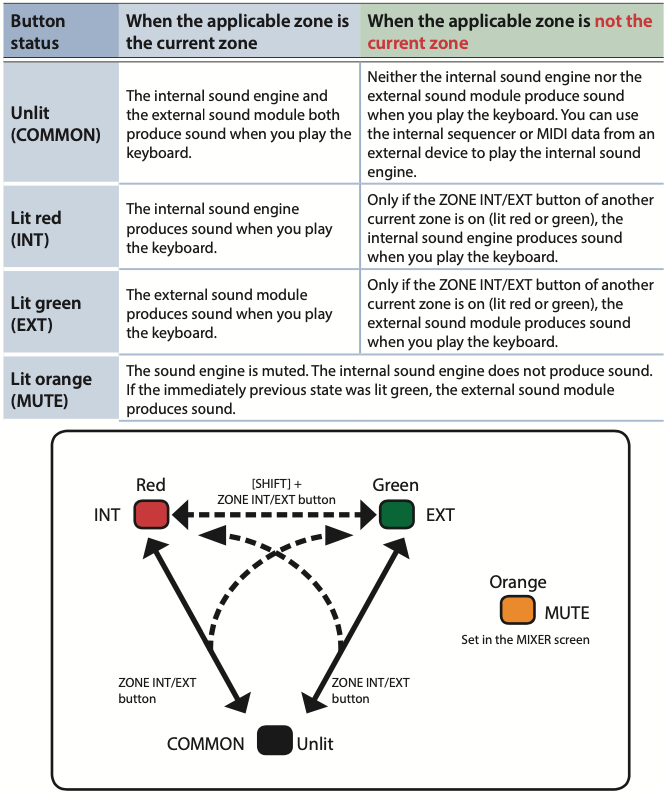
The buttons numbered 1 though 8 positioned just above the eight faders are the ZONE INT/EXT buttons. These can have different options and will present these options via different coloured lights. They specify whether the applicable zone does sound or does not sound when you play the keyboard. In conjunction with the current zone, this determines how the internal sound engine (external sound module) produces sound. The best way to understand this is to refer to this chart below.
Of course there is also the buttons and one slider here for the USB Audio. If you press the [USB AUDIO SELECT] button, the USB AUDIO setting screen appears. The [USB AUDIO IN/OUT] button switches the function of the USB AUDIO slider between input and output, or turns the USB AUDIO function off and of course the slider is for USB levels, both input and output.
The common or main section
The common section is fairly self explanatory but here’s a brief run down of what is offered in this section.
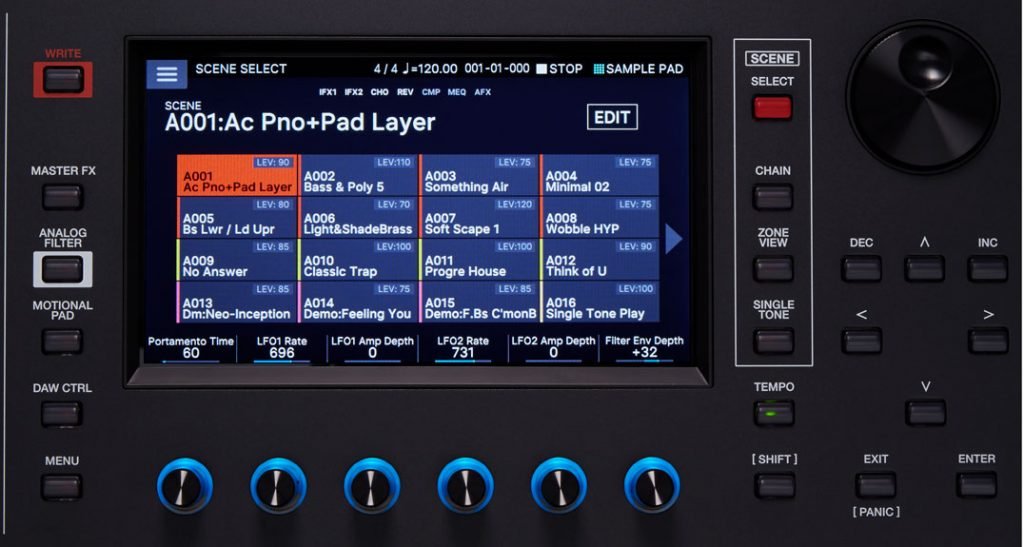
The [WRITE] button will select the WRITE screen and is for saving scenes or tones.
[MASTER FX] button causes the MASTER FX screen to appear and if you hold down the [SHIFT] button and press this button, the MASTER EQ editing screen appears.
The buttons such as [ANALOG FILTER] [MOTIONAL PAD] [DAW CTRL] and [MENU] opens their corresponding screen on the multitouch display.
The knobs below the screen modify the functions or parameter values that are shown in the screen and are sometimes user programmable. Pressing a knob has the same result as a button operation but sometimes also shows alternative functions.
The other buttons on the right here are for selecting Tempo (tip, you can set the tempo by tapping this button) [DEC] [INC] buttons for changing values, (tip, if you press one of these buttons while holding down the other, the value changes more rapidly. If you press one of these buttons while holding down the [SHIFT] button, the value changes more greatly.) and cursor, EXIT and ENTER buttons, as well as the VALUE dial are all fairly self explanatory.
The Scene section
The SCENE section within the white rectangle provides the following.
By pressing the [SCENE SELECT] button you can select different scenes. The [SCENE CHAIN] button lets you recall scenes in a specified order and there will be more on this in a seperate chapter.
[ZONE VIEW] let’s you see what’s going on in the different ZONES and adjust the parameters for each one.
Then at the bottom is the [SINGLE TONE] button which when pressed, recalls a piano sound to zone 1. and the other zones are turned off. NOTE! When you press this button, unsaved scene settings are lost.
The Synth Area
This are of the FANTOM has the following sections.
- The Oscillator area
- The Filter area
- The Envelope section
- The Effects section
- The Sequencer section
- The Pad buttons

The OSC Oscillator section is where you can choose different oscillator types using the TYPE button, change settings related to the oscillator with the VALUE knob and access the TONE EDIT ZOOM screen with the PARAM button where you can access the oscillators settings.
In the FILTER section, you have the knobs for adjusting the filters cutoff frequency and the amount of resonance affecting the filter. There is a button to select what type of filter you want as well as the PARAM button, which accesses the FILTER setting screen of the TONE EDIT ZOOM screen.
The envelope and amplitude section ENV/AMP is every synth tweeters favourite section!
The knobs here are for your standard Attack, Decay, Sustain and Release times of the envelope. There’s also buttons to select wether this envelope is for Pitch, Filter or Amplitude as well as for level or amplitude of the Envelope.
The PARAM button takes you straight to the TONE EDIT screen where you can see these parameters and in fact manipulate the ADSR settings by touching and dragging on the multitouch screen.

The EFFECTS section gives you quick access to the type of effect (MFX) you’re working with on the ZONE that you have selected, as well as a knob for the amount or DEPTH of effect. The PARAM or parameter button opens the MFX screen of the EFFECT EDIT page on the touch screen.
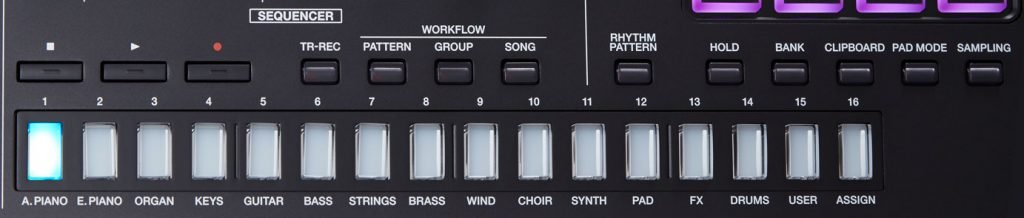
This area is called the SEQUENCER section but in fact, also doubles as a very handy instrument category selector as well! Beneath the TR-REC buttons you will see different instrument types. A.Piano, E.Piano, Organ etc… These buttons select tones in each category but depending on the situation, these buttons are also used for other things such as TR-REC input when you’re programming music or as a selector for the SCENE CHAIN function.
Above these buttons are the usual STOP, PLAY and RECORD buttons as well as other buttons for Sequencer and Song Pattern management which will be covered in depth in the Sequencer Chapter. RHYTHM PATTERN is also found here to bring up the screen for selecting different drum and percussion patterns.
The last front panel section for discussion here is the PAD section. The pads here are initially for playing samples stored in the FANTOM but in fact serve many different purposes which we will cover later in this article.
The [HOLD] button turns hold on/off when you are triggering samples from the pads, allowing the sound to continue even after you release the pad. The [BANK] button switches the pad bank. The [CLIP BOARD] button lets you move or copy a sample from one pad to another.
The [PAD MODE] button is very important for the PADS themselves as it gives you many options from choosing and muting oscillators when programming new sounds to controlling Logic on an external computer!
The Rear Panel
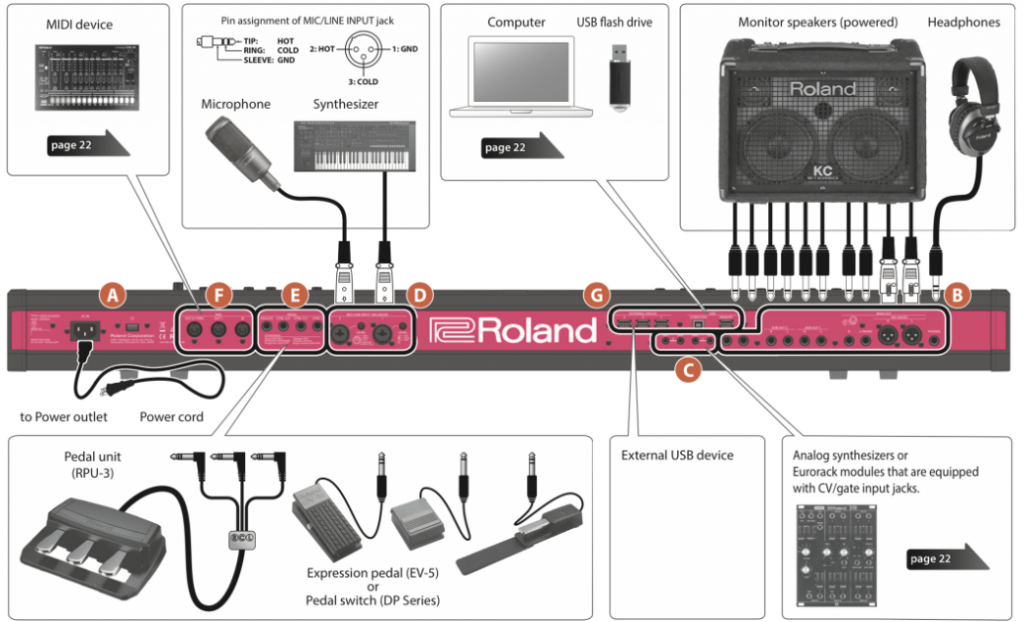
Most things are fairly straight forward here but will be referred to in other chapters as required.
How to assign pedals, knobs, sliders and wheels.
In the back of your FANTOM you have four PEDAL jacks – CTRL 1, CTRL 2/L, CTRL 3/C and HOLD/R.
If you connect a Roland DP series pedal switch (sold separately) to the HOLD/R jack, you can use it as a damper pedal. If you press the [SHIFT] button and depress or squeeze the pedal, the pedal control window will appear on the screen. Here you can assign different functions to the pedal. If you press enter when the”PEDAL 1″ line is selected, a drop down menu with all of the parameters that you can choose for that particular pedal. Scroll through and choose the function or parameter you want and press enter and then exit. Now you can save this to the SCENE you’re working on. Press the [WRITE] button, and now press [SCENE] on the screen and save this new pedal function to always be there every time you select this particular SCENE!
You can also assign various functions to other pedals that are connected to the other pedal inputs, CTRL1, CTRL 2/L, and CTRL 3/C jacks.
Use only the specified expression pedal as some other brands have a different polarity which means the pedal will actually work in reverse, not what you want and you risk causing problems.
In the back of your FANTOM you have four PEDAL jacks – CTRL 1, CTRL 2/L, CTRL 3/C and HOLD/R.
If you connect a Roland DP series pedal switch (sold separately) to the HOLD/R jack, you can use it as a damper pedal. If you press the [SHIFT] button and depress or squeeze the pedal, the pedal control window will appear on the screen. Here you can assign different functions to the pedal. If you press enter when the”PEDAL 1″ line is selected, a drop down menu with all of the parameters that you can choose for that particular pedal. Scroll though and choose the function or parameter you want and press enter and then exit. Now you can save this to the SCENE you’re working on. Press the [WRITE] button, and now press [SCENE] on the screen and save this new pedal function to always be there every time you select this particular SCENE!
You can also assign various functions to other pedals that are connected to the other pedal inputs, CTRL 2/L, and CTRL 3/C jacks.
Th process is exactly the same for WHEEL 1 & 2. Just hold down [SHIFT] and move the wheel you want to reassign and the WHEEL1/2 Assign window will appear. Here again you can select what function you want to be activated for each wheel, and save it to the particular SCENE you’re working on!
Same again for the S!, S2 and S3 buttons but here you also have the options for “LATCH” or “MOMENTARY”. Latch will hold the function with one push of the button and stay that way until you press the button again. Momentary will activate the parameter only while you hold the button down. The function or parameter will stop once you release the button. Some examples of this in use would be in LATCH mode, you could assign the rotary speaker to activate or speed up and stay that way until you press the button again, and it returns to a slow rotary effect or in fact off. With momentary an example would be to assign vibrato or modulation to the switch, and the sound will have a vibrato effect only when you hold down the button.
Again, if you press the ASSIGN 1 or ASSIGN 2 buttons, then you can turn one of the knobs or move one of the sliders to activate the assign screen and assign one of the menu select parameters to the knob or slider you choose!
Please note, only use the specified expression pedal as some other brands have a different polarity which means the pedal will actually work in reverse, not what you want and you risk causing problems.
Fantom Sound Structure
Scenes
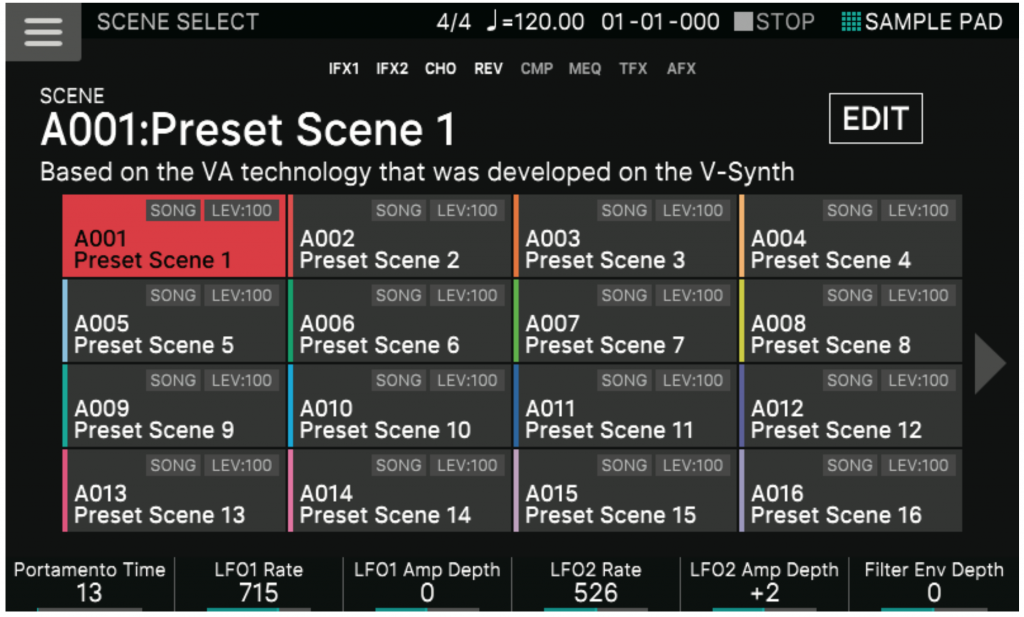
FANTOM comes preloaded with over a thousand presets, all fully customizable. These sounds are from or combinations of three different parts; Tones, Zones, and finally, Scenes. Tones are individual sounds such as a piano or bass, which are stored in Zones. You can have up to 16 tones for each Zone. Finally, each Zone and its included settings like effects, volume, and mix, are saved as a Scene. Sequencer and song data are saved within Scenes, as well. In this chapter, I’ll give you a brief overview and understanding of the structure of FANTOM’s way of dealing with sounds. When you first turn FANTOM on, you see a section of 16 coloured rectangles with names and numbers and in different colours. These are called SCENES. A scene contains a favorite performing state, including settings for each zone (tone, MFX, volume, etc.), settings common to all zones (Reverb, Chorus, IFX, Analog Filter, etc.), and sequence data for each zone as well. To select one, just touch it on the screen. There’s arrows on the left and right hand side of the screen as well that will take you to the next or previous bank of Scenes.
(Tip, press the ENTER button when you’re in this screen and you will see the option to choose A,B,C or D, taking you to the four different banks of scenes.)
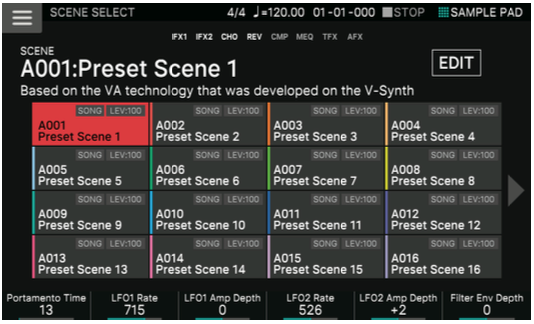
You can store an idea for a song or phrase as a scene, and manage scenes by switching them for each song and you can easily recall saved scenes in the SCENE SELECT screen that appears after startup. As a point of interest, when FANTOM is shipped, the Orange scenes are performance patches that normally have a number of layers with effects playing at the same time. The Yellow Scenes have sequence clips data in them, so press play on the sequencer and you will here a short four bar phrase. Then there is the Purple and Blue scenes. These are complete songs, so press the play button and sit back and listen while FANTOM performs for you.
What does "Modeless" mean?
How to edit Scenes
How to use Search Function to Find Scenes
Tones
A “tone” is similar to what people in the synth world call a “patch”.
There are different types of Tones. ZEN-Core, which produces the sound of an individual instrument like a synth, Drums, Supernatural Sounds and V-Piano. V-Piano tones can only be used in Zone 1.
The ZEN-Core engine is made of up to four oscillators or what Roland calls partials. They are called this because each partial can be either a virtual analogue oscillator, i.e. a saw wave, a mono or stereo PCM file, or now since version 2.0 a sample or even a multi-sample. A tone consists of the combination of the ZEN-Core sound engine and effects (MFX+EQ).
Some tones are “drum kits” which provide a collection of percussion instrument sounds. In a drum kit, different percussion instrument sounds are heard depending on the key (note number) that you play.
You can see the Sound List for the full list of Tones available on the Fantom here.
Zones
To play a tone, you assign it to a zone. For each zone, you can specify whether it is connected to the keyboard, and make settings such as its key range, volume, pan, and controller reception.
There are 16 zones; by combining zones you can create sounds that consist of multiple tones, or create specific performance settings for each song. You can also use specific zones to control an external sound module (EXT ZONE) instead of the internal sound engine.
Performing
How to select a Scene
To select a Scene, press the [SCENE SELECT] button and the SCENE SELECT screen will appear.
Touch the scene icon in the screen to select the one that you want and it will fill with colour letting you know that you have selected that particular scene.

Just as a reminder, there are sixteen scenes visible at any one time which are arranged in the screen as a 4 x 4 grid. You can select one of these scenes. By touching the < or > icons located at the left or right edge of the screen, you can choose from the previous or next 16 scenes. There’s 128 scenes per bank and there’s banks A, B, C & D.
How to select a Tone
There’s a few ways to choose individual Tones. In this example I’ll show you how to do this by pressing the ZONE VIEW button on the front panel.
Press the [ZONE VIEW] button and the ZONE VIEW screen appears.
There is four types of Zone view displays. The active Zone by itself, a four zone view, an eight zone view and finally all sixteen zones. Each time you press the [ZONE VIEW] button, the VIEW number (the number of zones shown simultaneously) alternates through the cycle, just like this following graphic.

Press a ZONE SELECT button [1]–[8] to select the zone that you want to control.
To select zones 9–16, use the [ZONE 1-8/9-16] button to switch groups, and then press a ZONE SELECT [1]–[8] button.
Press a tone category button [1]–[16] to select the type (category) of tone.
Move the cursor to the tone name (number), and use the [VALUE] dial or the [INC][DEC] buttons to select a tone. When the cursor is located at the tone name (number), pressing the [ENTER] button displays the “TONE LIST.”
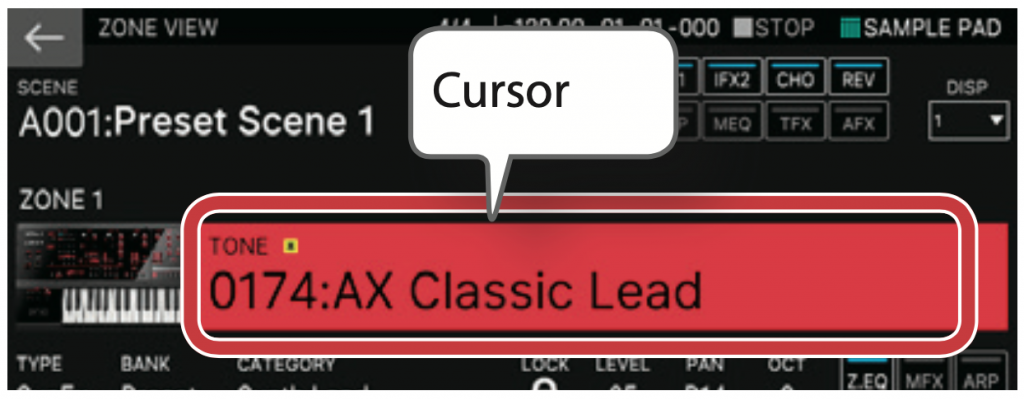
When the cursor is located at the tone name (number), pressing the [ENTER] button displays the
“TONE LIST.”
How to layer sounds (Zones)
Layering sounds is a creative way to create new sounds or just give something extra to your performance. To layer sounds in the FANTOM, just do the following.
Press the ZONE INT/EXT button of the zones that you want to layer, making them light red.
Of the zones that are lit, press the ZONE SELECT button of one zone to specify it as the current zone.
When you play the keyboard, the zones lit red are sounded as layers.
NOTE. Zones whose ZONE INT/EXT button is lit green are controlling an external MIDI sound module. To switch to the internal sound engine, once again hold down the [SHIFT] button and press the corresponding ZONE INT/EXT button to make the button light red (INT setting).
How to Split the keyboard
A lot of keyboard players like to play left hand bass and electric piano on with the right hand for example. Here’s how to set this up with the FANTOM.
Press the SPLIT button to make it light.
The high region plays the zone 1 tone, and the low region plays the zone 4 tone.To cancel split, press the SPLIT button to make it go dark. When you cancel split, the high and low regions (KEY RANGE) are reset, and return to the layer state.
Changing the Keyboard’s Split Point is easy to do. While holding down the SPLIT button, press the key that is to become the new split point. The split point is shown. When you release the SPLIT button, the previous display will reappear. The split-point key is included in the ZONE 1 section.
Please note that if you want to change the tone of the upper key range, press ZONE SELECT; if you want to change the tone of the lower key range, press ZONE SELECT then select a tone.
By using the KEY RANGE function you can freely specify the key range for each zone.
How to create a basic Layer Split Scene
How to create an advanced Layer Split Scene
How to use Keyboard Switch Groups
How to use the Arpeggiator
The arpeggiator has been around for a very long time and is a cool way to give melodic AND rhythmic movement to your track! The FANTOM’s arpeggiator is a great function that automatically produces an arpeggio based on the keys or chords that you press.
In ZONE VIEW, turn ARP “ON” for the applicable zone.
Press the ARPEGGIO button to make it light.
Play a chord on the keyboard.
According to the notes of the chord you play, an arpeggio starts playing for zones that are on.Move the cursor to “STYLE” and change the style. The arpeggio performance changes according to the selected style.
To turn off this function, press the ARPEGGIO button once again to make it go dark.
Please note that by using this in conjunction with the chord memory function, you can easily play a variety of arpeggio sounds using just one finger. There’s even other options of rhythmic guitar strumming and more. Just scroll through the different “Styles” to choose one that suits your music!
What is a keyboard switch group?
What is Chord Memory
Chord memory is a function that sounds a chord that has been preset when you play a single note on the keyboard and there can be a whole section of really cool chords to choose from!
Press the CHORD MEMORY button to make it light.
Play the keyboard and a chord sounds according to the selected chord form.
Move the cursor to “CHORD FORM” and change the the way it sounds OR the notes it actually chooses. The way in which the chord plays will change.
To turn this function off, press the CHORD MEMORY button again to make it go dark. Simple!
How to use the Rhythm Pattern generator
The Rhythm Pattern generator in the FANTOM can be a great way to start your song inspiration and give your a groove right from the start! There is a selection of styles and you can also select a different drum kit to experiment and mix it up!
To perform with the Rhythm Patterns, do the following!
Press the [RHYTHM PATTERN] button. The RHYTHM PATTERN screen appears.
Move the cursor to “RHYTHM GROUP.”
Use the [VALUE] dial to select a rhythm group.
Touch – to select the rhythm pattern that you want to play.
The rhythm pattern plays.
please note that to stop, touch the icon of the rhythm pattern that’s playing.
How to change the Tempo
1. Press the TEMPO button to access the TEMPO screen.
2. Use the VALUE dial to change the tempo.
MEMO – You can specify the tempo by pressing the TEMPO button at the desired timing (tap tempo). Press three times or more at quarter-note intervals of the desired tempo.
Using the Sliders and Control Knobs
Use the [ZONE 1-8/9-16] button to switch the zones (ZONE1– ZONE8/ZONE9–ZONE16) that you want to control.
Press a function select button to select the parameter that you want to control.
The control knobs adjust the pan of each zone, and the sliders adjust the volume of each zone.
You can use the control knobs and sliders to adjust the parameters that are assigned in advance to the scene or the system. ASSIGN1 lets you adjust the parameters that are assigned for each scene. ASSIGN2 lets you assign the parameters that are assigned for the system.
Move the control knobs and sliders and the sound changes according to the assigned function (such as pan or volume)
What is Chord Memory?
An introduction to the Arpeggiator
How to use FANTOM's Analog Filter
This FANTOM has a stereo analog filter built in!
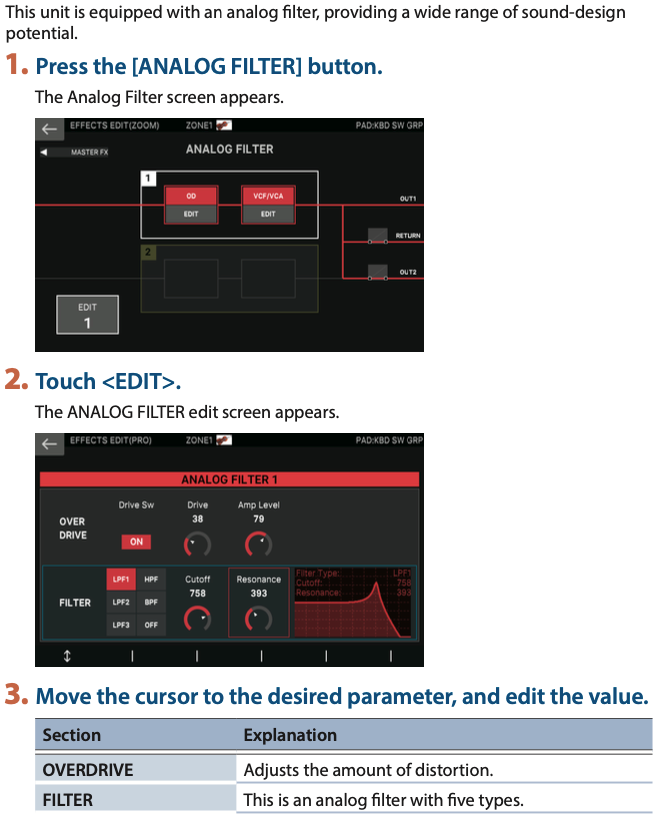
What is the Motional Pad?
The motional pad function lets you simultaneously modify the volume of four zones by dragging in the screen. By using the motional pad function, you can produce diverse tonal changes with a single finger.
To activate the Motional Pad, press the MOTIONAL PAD button and the MOTIONAL PAD screen appears.
The numbers of the zones being used with the motional pad function are shown in the zone number areas at the four corners of the screen. If a zone is off, press the ZONE INT/EXT button [1]–[8] to turn the zone on.
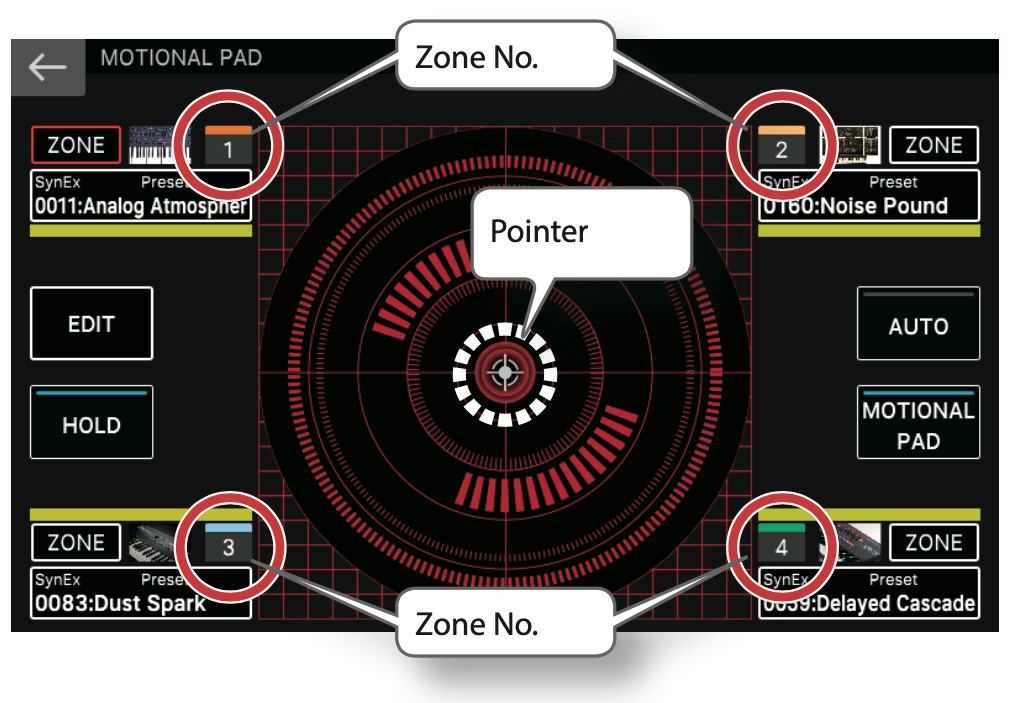
Now, with your finger, drag the circle (pointer) in the center of the screen to change its position. The volume balance of the four zones changes according to the position of the pointer, and the sound changes in real time.

Editing your sounds
How to edit a Zone
The FANTOM has 16 zones, giving you creative freedom to layer sounds and splits and where you can specify settings such as volume, equalization and key range for each zone.
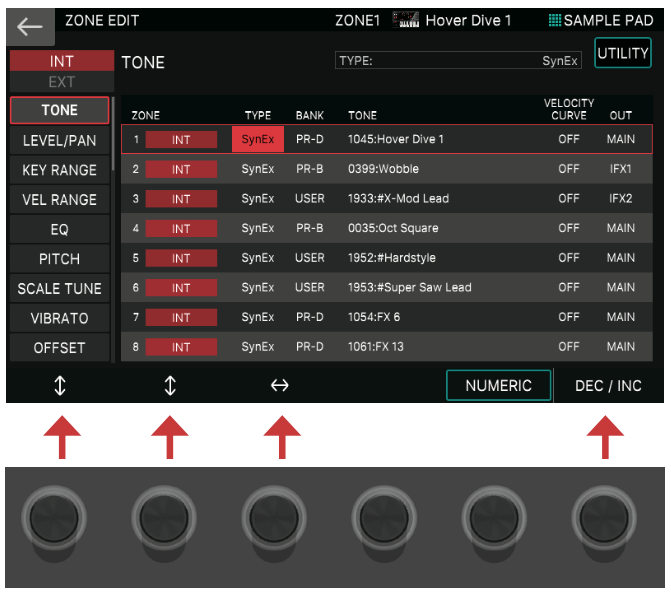
One way to edit zones is to start by selecting the Scene that you want to edit from the Scene view. Then, press the MENU button and the MENU scree will appear. Now touch ZONE EDIT on the screen and the ZONE EDIT screen will now show on the display.
Press the ZONE SELCT button (1 through to 8) and select the zone that you want to edit or control. Don’t forget that if you want to edit zones 9 through to 16 you need to push the ZONE button at the top left corner of the Zone section to switch to those groups. Now you can move the cursor to the parameter you want to edit.
If you use the knobs below the screen you can scroll between tabs, move the cursor around and change values to edit different parameters.
Please note that changes that you make to the zone settings are temporary and if you turn off the power or select another zone, the changes are lost. If you want to keep the edited settings, save the scene.
There will be more detailed information and details on the parameters in stage 2 of this guide, but in the meantime please refer to the “Parameter Guide” available here on the Roland website.
How to edit a Tone
Here’s how to edit a tone. Now using the same procedure as “Selecting a Tone” , select the tone that you want to edit.
Press the MENU button and the MENU screen appears.
Now touch <TONE EDIT> on the display and the TONE EDIT ZOOM screen appears.
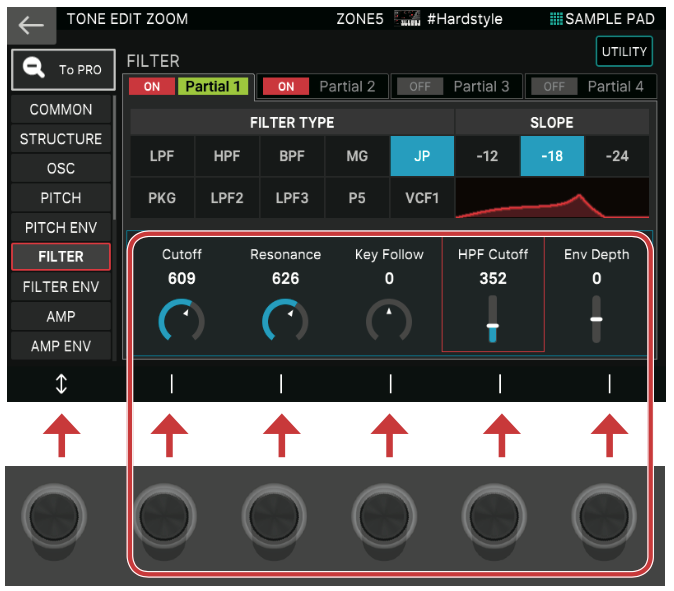
Now move the cursor to the parameter you want to change and edit the value. You can use the knobs below the screen to scroll between tabs and directly edit parameters.
Please note that the TONE EDIT ZOOM screen differs depending on the tab that’s selected.
For more detailed editing, use the TONE EDIT PRO screen. There will be more in depth information here in stage 2 of this guide but in the meantime please refer to “Reference Manual” here on the Roland website.
For details on the tone parameters, refer to “Parameter Guide” here.
In addition to editing in the TONE EDIT ZOOM screen, you can also edit a tone directly by using the knobs and buttons of the OSC section, FILTER section, and ENV/AMP section located at the right of the panel.
How to edit the Tone's effects
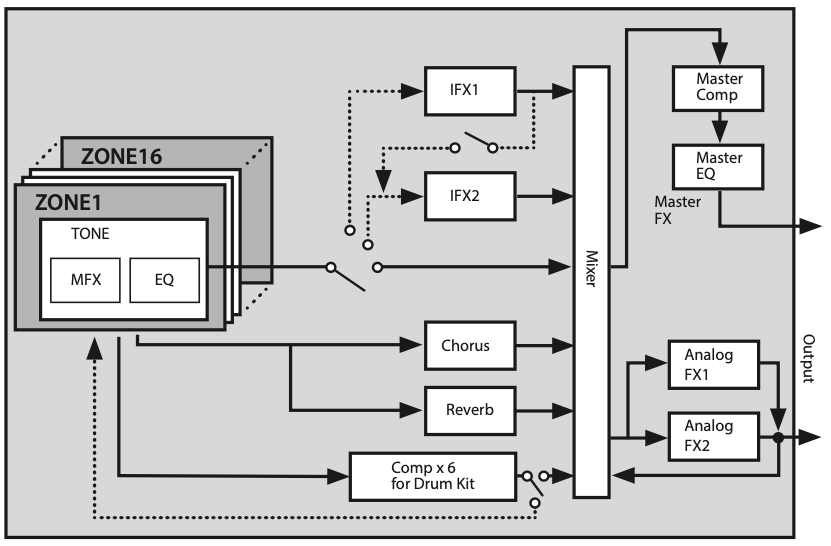
The FANTOM comes with a variety of effects, including an effect for each tone called MFX, effects that can be specified for each scene which are called IFX1, IFX2, Chorus and Reverb, and effects that can be specified for the system which is called the Master FX.
CLICK HERE to open a tab of a list of all 90 MFX/IFX effects and their parameters for editing your own unique sound. You can download this as a PDF to keep handy for reference.
Also, here is a schematic to help you understand the effects routing.
Here’s how to edit each tone’s effect which is called MFX.
First press the MENU button and the MENU screen appears. Now touch EFFECTS EDIT on the screen and now the EFFECTS EDIT screen appears on the display. If you want to turn off the effect, in the screen, touch the blue MFX on screen button to turn it off.

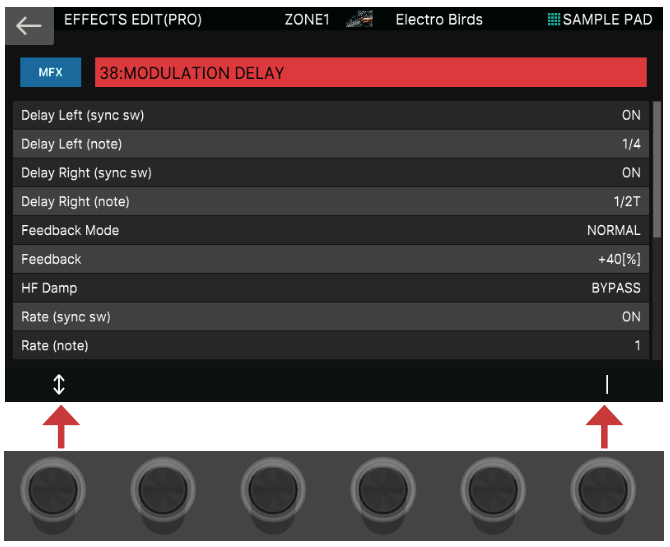
Editing the MFX parameters
In the MFX section, touch on the screen and the EFFECTS EDIT (ZOOM) screen appears. Now touch the EDIT on screen button next to it and the EFFECT PRO EDIT screen for the MFX effect appears. Move the curser around to choose and edit the parameters you want to change. You can also use the knobs below the screen here to edit as well.
How to assign Rotary Simulator to Switch, Wheel, and Pedal
Saving your Scene's and Tones
The edited zone and tone settings, and the recorded data, are temporary. They will be lost if you turn off the power or select another scene or tone. If you want to keep your edited settings or recorded data, save them as follows and don’t forget always backup in case you want to go back to your original sound.
To save a Scene, press the WRITE button and the WRITE MENU screen appears on the display.
Now touch the item that you want to save. As an example, if you touch SCENE, the SCENE WRITE screen appears. If you want to change the name, touch <Rename> and edit the name. After you’ve changed the name, touch <OK> to close the window.
Now use the VALUE dial or the [DEC][INC] buttons to select the save-destination and touch <OK> and a confirmation message appears. If you decide to cancel, touch <CANCEL>. Touch <OK>. The data is saved.
How to Import Tones
How to Export Tones
What is the ZEN-Core Synthesis System?
Roland developed a new system-on-a-chip called BMC, which stands for Behavior Modeling Core. Roland’s BMC chip contains a large group of DSP and CPU which is incredibly powerful.
ZEN-Core, Roland’s new synthesis system which lives in these chips, is an expandable and customizable synthesizer engine running on BMC, and is the heart of the new JUPITER, FANTOM, RD-88, AX-EDGE (updated) and MC-707 & MC-101. The combination of BMC and ZEN-Core are like a highly tuned F1 racing engine for sound synthesis.
At the base level, ZEN-Core integrates next-generation PCM and Virtual Analog, with advanced features such as new Virtual Analog oscillators, precisely modeled filters, ultra-fast and smooth envelopes and LFOs, high-resolution parameters, and expandability and product-specific expansions to ZEN-Core like the V-Piano.

The ZEN-Core synth engine
The ZEN-Core Synthesis System works across hardware and software, delivering decades of genre-defining sounds with the power to shape them in new and exciting ways. It works in your DAW as well as ZEN-Core compatible Roland hardware, so you can use your favorite sounds in the instrument that inspires you most. And whether you want to explore new styles or just hit the ground running, ZEN-Core’s steady stream of sound packs and engine expansions help keep your music fresh.
Whether you create in software, hardware, in the studio, on the road, casually, or obsessively, ZEN-Core lets you use your favorite Roland sounds whenever and wherever you want. ZEN-Core sounds can be shared between different Roland hardware—and even between hardware and software—so you can move freely between your studio, live gigs, jam sessions, or just creating on the go.
ZEN-Core unlocks sound from the confines of a single instrument or plug-in, and makes it yours to customize, share, and play in the instrument that inspires you most—whether it’s ZENOLOGY in your DAW, JUPITER-X in your studio, or FANTOM on stage. Quality is guaranteed so there’s no need to compromise on the instrument you play to get the sound you want. With ZEN-Core, your unique collection of tones is always ready, and can go with you to your next studio session or performance.
ZEN-Core’s sound compatibility lets you share your favorite synth bass with a friend or an effect-laden electric piano with bandmates or collaborators, so they can play the exact same sound on their ZEN-Core instrument or in their DAW. Not a programmer or just keen to start creating? Take advantage of the skills of professional sound designers and let ZEN-Core’s thousands of expertly crafted tones get you going.
Use hardware, software, or both
An instrument made for live performance may not excel at sound design in the studio. And a software synthesizer may not be as inspiring to play as a purpose-built hardware instrument. With ZEN-Core you can use the best tool for the job, with sounds that match your creative vision. Design a sound on hardware then put it in your DAW for instant recall and portability. Or take a sound from a song you’ve produced in your DAW and put it in hardware so you can play it live.
Roland's most advanced sound engine

The ZEN-Core Synthesis System is built on nearly fifty years of synthesizer research and development—and you can hear it right away. It recreates the sounds of our classic analog synths and our vintage and modern digital synths, while also offering new sounds never heard before. But what makes it sound so good? Well to cover all the bases, let’s break it down into four sections.
It has a brand new, modern synth architecture! ZEN-Core’s unique engine is based on discrete synth voices called partials. Each partial contains a versatile oscillator, multimode filter, amplifier, dual step-LFOs, and lush effects. You can have four partials per tone for rich complex sounds that move and inspire you. And it’s all designed with polyphony in mind, for big punchy stacks and intricate layers of evolving sound.
ZEN_Core is always growing! Currently it has Virtual Analog, advanced modeling, modern PCM, user sample oscillators and user multi sample oscillators and more….. to come!!
ZEN-Core leverages our long history of designing synthesizers, making it extremely flexible. Sound is top priority, spanning a wealth of vintage and modern tones. Precisely modeled oscillators and filters can be mixed and matched for unique combinations and the new PCM engine is capable of advanced cross modulation and even PCM oscillator sync. And ZEN-Core’s synthesis types can be mixed, layered—and even expanded—for new and evocative sounds.
The incredible and totally new ZEN-Core low-frequency oscillators add movement to static sounds. And more LFOs mean more modulation possibilities and more ways to explore new ground. ZEN-Core has two LFOs per partial for a total of eight available LFOs per tone. And ZEN-Core’s Step-LFOs have 16 steps of tempo-synced automation with 37 curve choices per step for long evolving passages, modular-style animated textures, and sounds with deeply intricate movement.
Last but by no way the least, the ZEN-Core effects! Roland effects are as revered as their vintage instrument counterparts, and ZEN-Core has a treasure trove of these built in. You get 90 effects to choose from including the CE-1 and JUNO-106 choruses, SBF-325 Stereo Flanger, Dimension D and Space Echo inspired effects, and many more. Effects can be applied to individual partials or to the entire tone for big spacious sounds that inspire you and grab the listener’s attention.
The V-Piano
In 2009 Roland released a new digital piano called the V-Piano which had a distinct advantage with physical modelling as its sound engine, as opposed to samples which have restrictions due to velocity switching, memory and looping.
Without samples, there are no awkward jumps in timbre between keyboard zones and dynamic layers and it sounds extremely smooth, and the overall piano timbre (modelled on classic grand pianos with additional innovative timbres) was attractive and convincing.
V-Piano now also lives inside the new Fantom. Benefiting from new coding and improved sound quality, it sounds amazing, vibrant, bright and open. The piano is infinitely customisable, offering users control of lid open/shut position, hammer, damper and key-off noise, resonance settings for string, damper, key–off, cabinet and sound board, and duplex scaling.
You can also change the volume level, tonal character (harder, or more mellow) and tuning of each key. This is very beneficial for players who write music in non-Western tunings, as well as the different styles of tunings for genres like jazz and classical!
How to edit V-Piano parameters
What are SuperNATURAL Acoustic Tones?
The SuperNATURAL Acoustic sound engine not only reproduces the sounds of acoustic instruments, but also provides the expressive power that is unique to acoustic instruments, such as the player’s performance phrases and the difference between chordal and melodic playing.
How to select SuperNATURAL Acoustic Tones
In the TONE LIST screen, select a category group and a category tab, then select a tone whose tone type is “SN-A.”
When you’re editing a SuperNATURAL Acoustic Tone, you can select the instrument and edit parameters that are specific to that instrument.
Please note that since firmware update 1.5, FANTOM’s SuperNATURAL Acoustic tones are added to the categories “Ensemble Strings”“Vox/Choir,”“Plucked/Stroke,”“E.Bass,” “Solo Strings,”“Solo Brass,”“Sax,”“Flute,” and “Wind.”
For details on the tone names and tone numbers, refer to “FANTOM Sound List”.
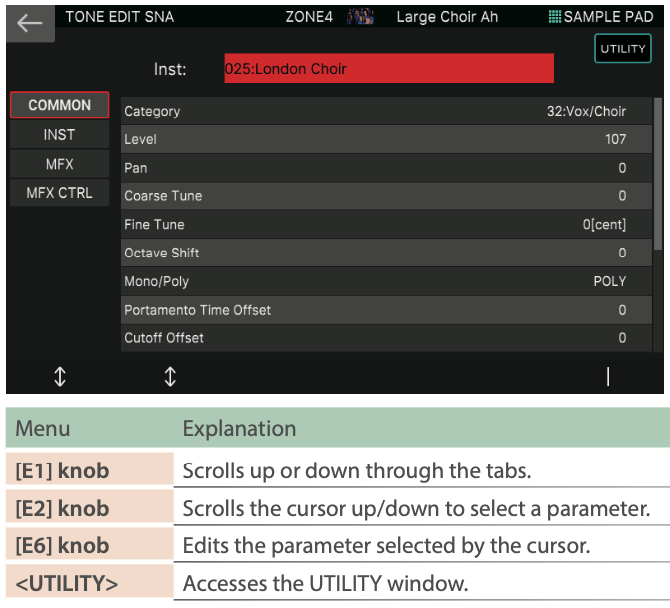
Select a tone whose TONE TYPE is “SN-A,” and then touch MENU button > . The TONE EDIT SNA screen appears then you can move the cursor to the desired parameter and edit the value.
The FANTOM Vocoder
What’s a vocoder? A “vocoder” is an effect that applies the character of a human voice to a synth sound, letting you produce sounds that give the impression that a person is singing where you play the keyboard to control the pitch. Compared to previous vocoders, Fantom’s vocoder adds the following functions, giving you more advanced vocoder sounds.
“Voice Character Control”
Settings for the bandpass filters (a maximum of 32 bands) that make up the vocoder can be easily controlled from the LCD panel, allowing you to obtain the vocoder sounds that you want.
Flexible carrier input gives you the ability to freely select multiple zones as the carrier input.
This lets you apply the vocoder to thick layered sounds that use multiple zones (or to some of the layers).
The performance from an external synthesizer etc. connected to the Input 2 jacks can also be included in the carrier signal. The “Stereo Switch” gives you huge spacious vocoder sounds which can be produced with the carrier tone’s sense of stereo.
Please be aware that the vocoder won’t make any sound if you are only singing into the microphone or only playing the keyboard. This means that in order to take advantage of the Vocoder, you have to play the keyboard and sing/talk/rap into the microphone at the same time.
Using the Vocoder
First, connect your microphone to MIC/LINE INPUT jack 1. IMPORTANT! Since the vocoder uses INPUT 1 and routing of INPUT FX, you must connect your mic to the MIC/LINE INPUT jack 1.
On the rear panel next to the Jack 1 input, you will find the LEVEL knob 1 to adjust the input volume of the microphone.
Here you can make the fine adjustments of the input volume after you select the sound. Its a good practise to set the knob to approximately halfway.
After you have made the connections and hooked up your microphone, make the following settings for the vocoder.
Select a scene that you want to use and edit.
Press the MENU button and the MENU screen appears.
Touch <EFFECTS EDIT> on the screen and the EFFECTS EDIT screen will appear. IMPORTANT!
Touch the <AUDIO IN> on the lower left of the screen. This actually turns the microphone input ON!.

Please note that there are some changes in the screen.
VOCODER and NS (Noise Suppressor) have been added to the INPUT FX. This means that you can sample your Vocoder and use the noise suppressor to eliminate unwanted noise!
Because the VOCODER and NS were added, the routing design has been redone. You can enter the EDIT screen of each effect from the newly added EFFECTS EDIT (ZOOM) screen.
The input level meter has been changed to a peak indicator and a level meter has been added so you can check the level of the signal that mixes the output of INPUT REV output with the INPUT FX output.
When you’re in the screen, touch the <VOCODER> icon to turn the vocoder on/off.
Please remember that audio from the microphone is not input if AUDIO IN is off, so turn this on!. (This is always off when you turn on the power.)
Also specify “LINE”/”MIC” and “PHANTOM” as appropriate for the type of mic that is connected.
For details, refer to the reference manual section “05: Sampler: Setting the input volume.”
What is Scene Chain?
Lorem ipsum dolor sit amet, consectetur adipiscing elit. Ut elit tellus, luctus nec ullamcorper mattis, pulvinar dapibus leo.
How to use Scene Ratings and Scene Chains
Scene Chains - How to open Expanded View and Markers
Scene Chains - How to Swap Scenes
The Sampler!
Since version 2.0 has been introduced, FANTOM’s sampler has had a huge upgrade! In this section you will learn how to use the different functions and processes in the new Sampler.
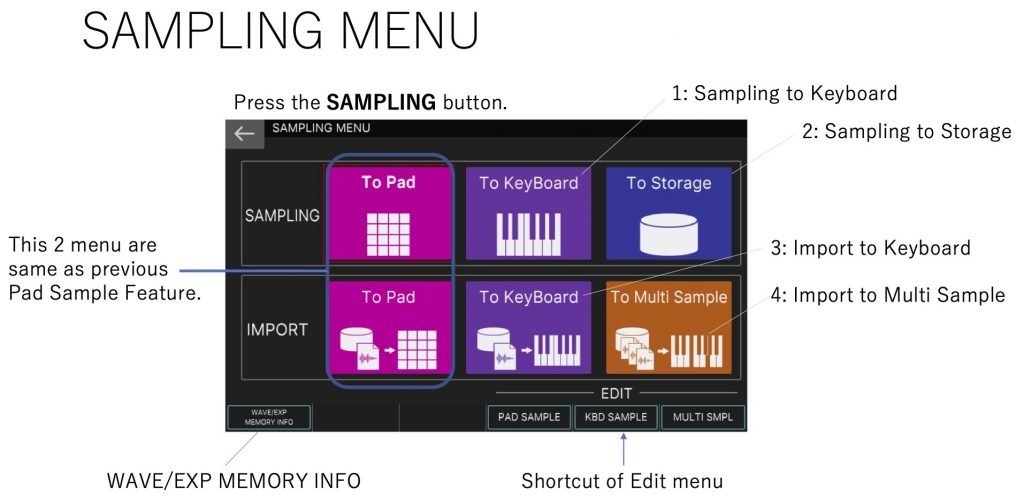
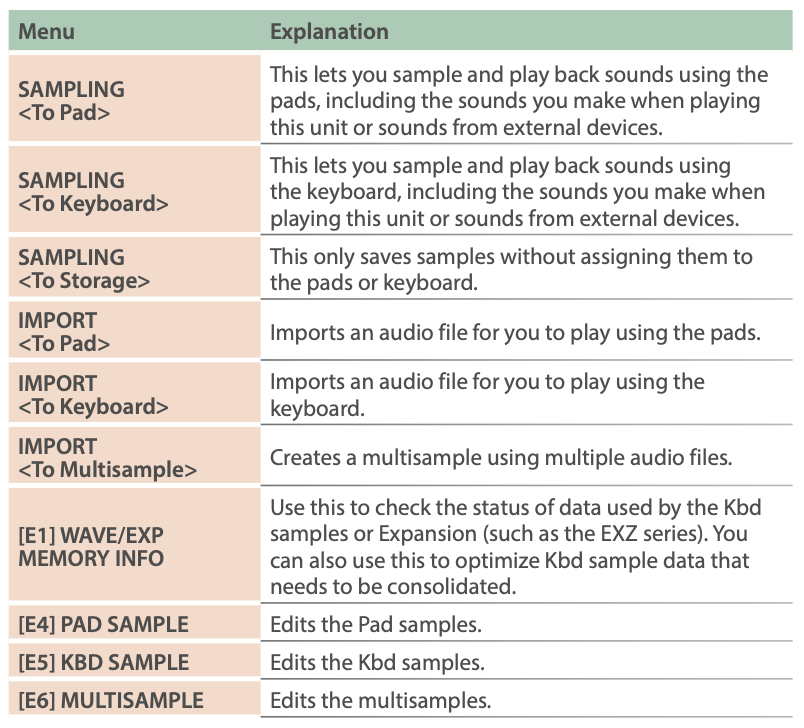
In addition to the existing Sample Pad feature that allows you to use the pads to play the samples you’ve recorded, FANTOM version 2.00 lets you bring in sampled sounds as waves that you can use in creating tones, and then play those sounds in different pitches across the keyboard, or assign multiple waves to the keyboard (using the multisample function).
User Sample – Data that you sample on the FANTOM or import as audio files is called “user samples.” There are two kinds of user samples: “Pad” samples and “Kbd” (keyboard) samples.
Pad Sample – Pad samples are effective for playing long phrases, adding sound effects and so on.
Kbd Sample – Kbd samples are effective for playing samples back in different pitches using the keyboard. Samples are treated as tone oscillators.
Multisample – Multisamples combine multiple waves, treating them as one sound.
Sampling
Different ways to sample your sounds
To start, press the SAMPLING button and the SAMPLING MENU screen appears on the display.
Use the icons on the screen and the FUNCTION knobs to navigate your way around the menus and change parameters.
Sampling To Keyboard
Here you can sample via a microphone or a recording another input like a guitar or modular synth!
Simply connect the device (audio device or mic) you want to sample to the MIC/LINE INPUT jacks 1 and/or 2.
If you’re wanting to sample in stereo, connect the left channel to MIC/ LINE INPUT jack 1, and the right channel to MIC/LINE INPUT jack 2.
Press the SAMPLING button and the SAMPLING MENU screen appears.
Touch SAMPLING on the display and the SAMPLING STANDBY (TO KBD) screen appears.
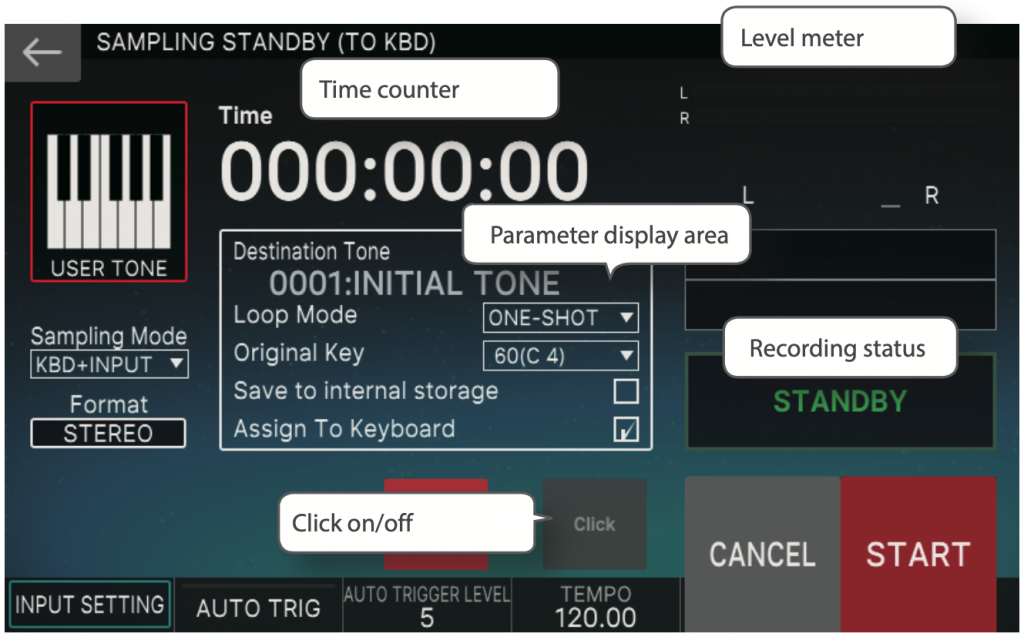
Touch <Sampling Mode> on the screen to select the where the input is coming from. Here you can just record FANTOM’s internal sounds, the inputs from the back or both at the same time!
Set the input volume as necessary using both the gain controls on the back and level settings in the INPUT SETTING and then configure the sampling settings.
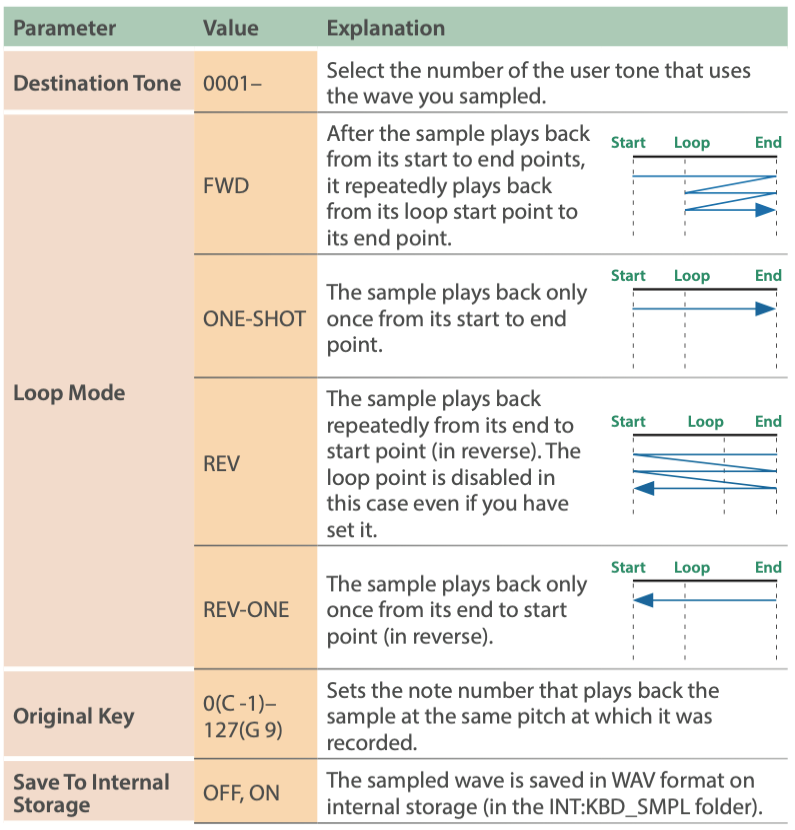
The parameters shown here were added to the SAMPLING STANDBY (TO KBD) screen.
The Sequencer
How the Sequencer is Structured
The FANTOM’s sequencer lets you record and play back using 16 tracks which correspond to the zones.
Each track can have up to eight patterns, and these variations are called patterns. For each individual track, you can switch the variation during playback.
Each pattern can be up to 32 measures long, and will play as a loop of the length that is specified for each pattern.
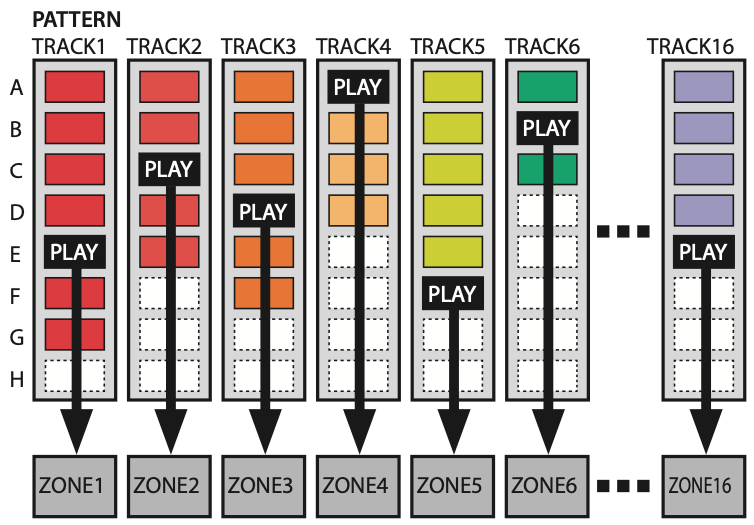
You can then combine these patterns into Groups, of which you can make many. This gives you the ability to combine patterns into groups that represent an “intro”, “verse”, “chorus” or even “fills”!
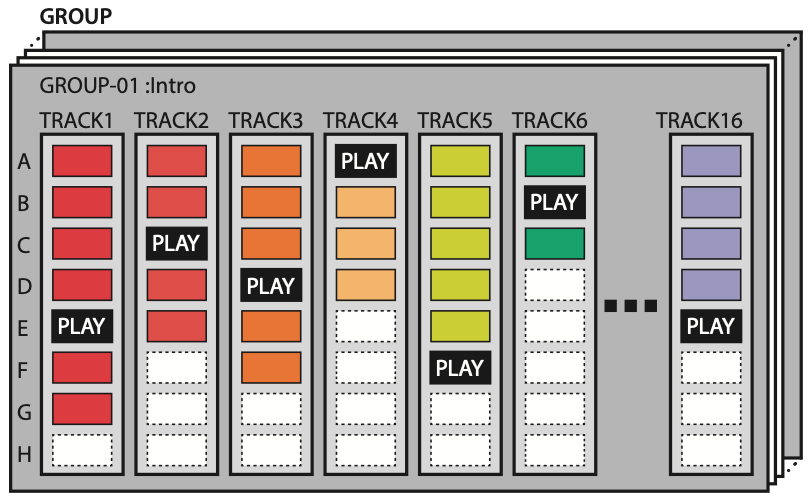
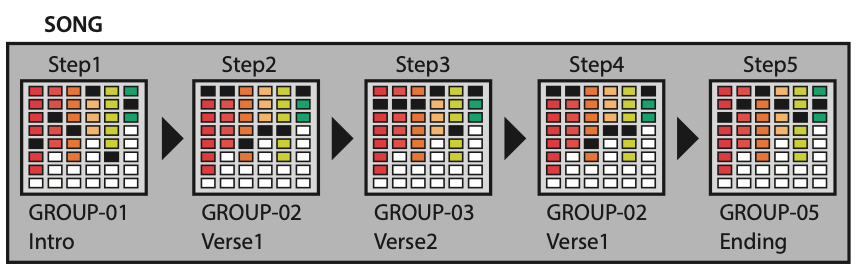
How to arrange your patterns to make a song
The final step in the arrangement is that groups that you’ve made can now be arranged into a playing order that’s called a song. Within the Song page, you can specify looping for individual groups. The great thin here is that patterns, groups and songs are all saved for each scene, meaning that each scene basically can have it’s own song as soon as you select that scene!
Playing the Sequencer
In this section I’m going to describe how to play patterns within a Scene, both individually and grouped.
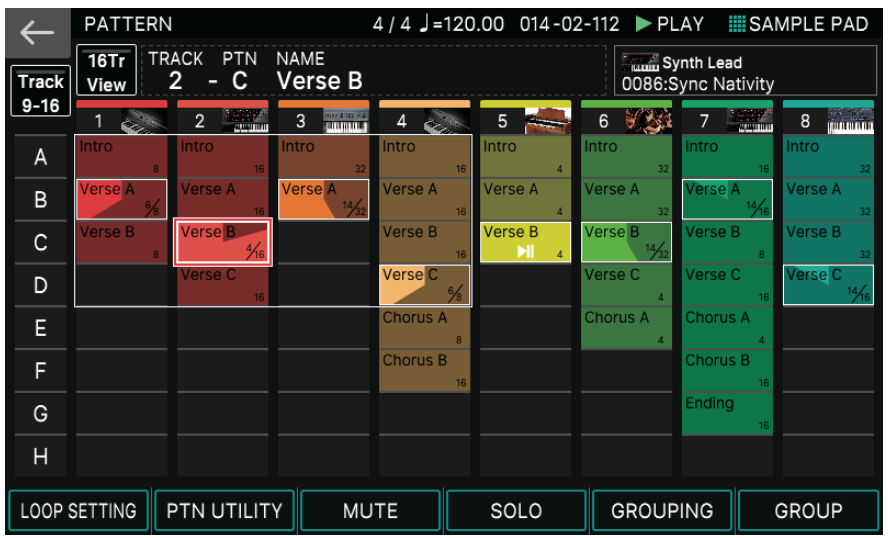
So firstly, select you Scene and press the PATTERN button in the SEQUENCER section to the right of the FANTOM. The PATTERN screen appears on the display.
Now this is important to note about how the playback of the patterns work.
A box in which a phrase is recorded (pattern box) is shown in color.
If you long-touch a track’s pattern box that’s already recorded, the pattern box is shown highlighted. This means that it’s in play-standby mode, and will play when you press the PLAY button. Only one pattern box for each track can be in play-standby mode.
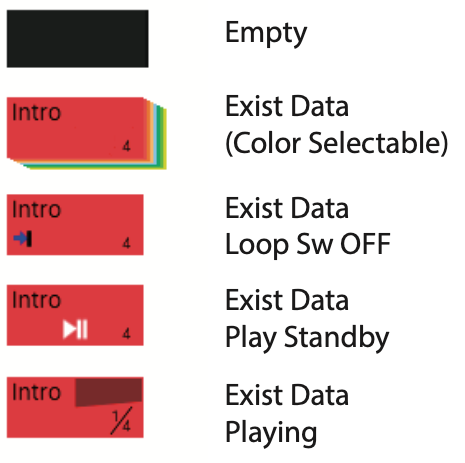
Press the PLAY button.
Each track’s pattern that’s in play-standby mode will play. If you touch a pattern box that’s not playing, the pattern you touch is played. By directly touching a colored pattern box in the screen, you can switch patterns for each track. If you press the STOP button, pattern playback stops for all tracks. If you touch a pattern box that’s playing, only the pattern that you touched stops.
If you switch or stop/start patterns while another pattern is playing, the change automatically happens at measure boundaries of the other playing pattern.
How to record a pattern
How to create basic beat and variations using TR-Rec
How to Sequence Drums using Pattern Sequencer and edit with TR Rec
How to use Piano Roll and Microscope to edit a Sequenced Drum Pattern
How to use plug ins (VST integration)
Install the plug ins for Logic Pro X and MAINSTAGE.
MainStage Intergration
How to select Scenes using Apple MainStage
How to send Program Changes to Apple MainStage using Scenes
How to save MainStage Patches in Scenes
Logic Integration
- Setting up Logic (info coming soon)
- Installing the driver (info coming soon)
How to record Audio via USB in Logic Pro X
How to record MIDI into Logic Pro X
How to use Roland Cloud with your FANTOM
What is Roland Cloud?
How to install Zen-Core Sound Packs, Wave Expansions, and SuperNATURAL Tones
Essential things you need to know
How to backup and restore your FANTOMS sounds and settings
How to do a Factory reset
Here’s how you can restore the FANTOM’s settings to its factory-set condition (factory reset). Sometimes you may want to start with a clean slate so this is what you do to bring FANTOM back to the way it left the Roland factory. NOTE – When you execute the Factory Reset operation, all data in this unit will be lost. If there is any data that you want to keep, back it up to a USB flash drive.
- In the MENU screen, touch .
- Touch . A confirmation message appears. To cancel, touch .
- To execute, touch . NOTE
Never turn off the power while the factory reset is in progress.


