First time setup is the most time consuming but once the rack is built, you can leave it setup and simply fold it if you need to move it, safe in the knowledge it will be ready to go next time.
Alternatively, you can remove the side poles and cymbal arms for packing down into a drum hardware traps case.
Follow these quick steps to setup the V-Drums rack!:
Lay the rack pipes and components down on the floor first along with the picture of the completed rack so you have everything within easy reach as you build.
Pay attention to ensure the 4 legs are at right-angles with relation to the floor for best stability.
Make sure the leg and rack pole bolts that attach to the main square front cross-frame are tight.
Once the rack is upright, position the accessories such as stool, kick pedal and components in the most comfortable position for you.
TIP: When packing the rack down for travel, leave the clamps in position for quick and easy setup back to your preferred positions.
Here, a seasoned pro, Craig Blundell of the Steven Wilson band shows his setup procedure and tips for good playing ergonomics with V-Drums.
Lefties welcome!-“Roland V-Drums for Left-handers too!”
The TD-17 setup for left-handers is a simple case of building the rack as a mirror image of the right-handed version and continuing in the same way for the trigger components.
CONFIGURING THE MODULE - TD-17 SETUP
The TD-17 module comes with several kit versions so the module is pre-configured to match each potential trigger combination.
You can change the TD-17 trigger types at any time and the trigger settings can also be extensively tweaked to suit your playing style and saved to the sound engine or SD Card.
Check and choose the trigger types that correspond to your setup. This is done in [SETUP]-Pad Settings
You can change how the triggers respond in the BASIC and ADVANCED PAD SETTINGS menus.
TIP: If you change a trigger setting and want to revert back to the original settings, simply switch to a different trigger type and back again to the correct one to automatically recall the factory trigger settings for that trigger type.
Each Roland V-Drums trigger component has a model number for easy identification.
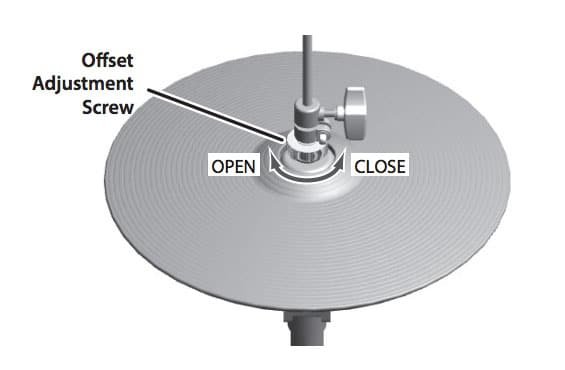
CALIBRATING THE V-DRUMS Hi-HAT – VH OFFSET ADJUSTMENT
The VH-10 hi-hat shipped with the TD-17KVX kit has a manual open/close adjustment on top which needs calibrating before use.
“Calibrating the V-Drums hi-hat or “offset adjustment” is vitally important.”
Hi-hat calibration ensures that the hi-hat responds with open and closed sounds and anything in between depending on your foot position.
Offset adjustment is a simple procedure that can be performed at any time.
It’s a good idea to carry it out a hi-hat calibration before performance especially if the kit has been moved.
Hi-hat calibration is a ‘Global’ setting that applies to all kits within the module.
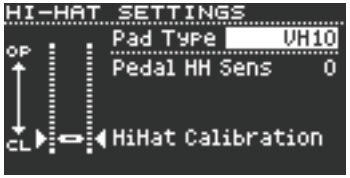
Make sure the correct hi-hat pad type is selected in the settings. [SETUP]-Hi-Hat Settings-Pad Type=VH-10
Hi-Hat Settings menu
2. Loosen off the mechanical hi-hat clutch on the top of the VH-10 so the top hat rests on the hi-hat controller.
3. Taking note of where the indicator is on the screen, turn the knurled knob on top of the hi-hat towards open or closed so that it lines up between the two arrows which will become highlighted when correctly adjusted.
4. When done, simply set your preferred hi-hat playing gap and exit out to the main screen.
CONNECTING THE TD-17 TO A SOUND SYSTEM
After you have completed the TD-17 Setup you are ready to connect it to a sound system.
The main left and right outputs are a copy of the headphone output.
As would be expected, the output level of the TD-17 is controlled by the ‘Main’ volume knob.
The sounds in the TD-17 are stereo recordings but it’s also possible to listen with both channels mixed together in mono. Connect the L (MONO) out when using the TD-17 with a mono amplifier.
Tip: When connecting the TD-17 to a stage box or balanced sound system, be sure to use two mono direct inject boxes or 1 stereo D.I box. See “Why do I need a D.I?” guide here.
Created by Roland V-Drums specialist Simon Ayton, these patches were designed using the internal factory sounds and many of the techniques covered in the TD-17 guide. Enjoy exploring the possibilities!
SIGN UP TO DOWNLOAD THIS TD-50 CUSTOM PATCHES
Created by Roland V-Drums specialist Simon Ayton, these patches were designed using the internal factory sounds and many of the techniques covered in the TD-50 guide. Enjoy exploring the possibilities!