Another of the really powerful features of the Roland TR-8S is the ability to assign different Effects to any of the Control Knobs on the 11 Instrument Tracks, and then Automate those Effects, so they change over the course of a Pattern. The Master FX, Reverb and Delay controls can be automated as well.
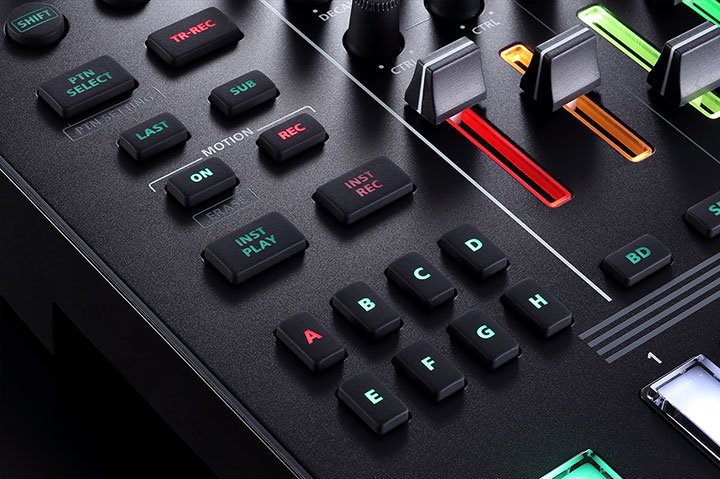
Automation in the TR-8S is called Motion Data, which is played and recorded using the Motion On and Motion REC Buttons, located on the left of the front panel, just above the INST Play and INST REC Buttons.
Let’s try recording some Motion for the Master FX, then for some Instrument FX. For a refresher on how to assign Master FX and Instrument FX in the TR-8S, take a look at the article in this series called Effective Use of Master FX and INST FX.
Automating the Master FX
- Hold the Motion On Button and press the Clear Button to erase any existing Motion Data in the selected Pattern Variation.
- Press the Start/Stop Button to play the selected Pattern.
- Press the INST Play Button, to enter INST Play Mode, that way you’ll avoid recording any unintended notes while recording your Motion Data.
- Press the Master FX On Button to turn on the Master FX.
- Turn the Master FX CTRL Knob to adjust the Master FX as the Pattern plays.
- To record your Master FX Automation, press the Motion REC Button then turn the Master FX CTRL Knob as the Pattern plays.
- Press the Motion REC Button again to exit Motion Record Mode.
- Press the Motion On Button to playback your recorded Motion Data.
- To erase the recorded Motion Data for the Master FX CTRL Knob only, hold the Motion On Button and turn the Master FX CTRL Knob. The Display flashes ‘FX CTRL Erased’ to indicate Motion Data for that CTRL Knob has been erased.
You can also automate the Master FX On Button, to turn the Master FX on and off over the course of a given Pattern Variation.
Automating the Reverb Level
- Press the Start/Stop Button to play the selected Pattern.
- Press the INST Play Button, to enter INST Play Mode, that way you’ll avoid recording any unintended notes while recording your Motion Data.
- Turn the Reverb Level Knob to adjust the Reverb as the Pattern plays.
- To record your Reverb Automation, press the Motion REC Button then turn the Reverb Level Knob as the Pattern plays.
- Press the Motion REC Button again to exit Motion Record Mode.
- Press the Motion On Button to playback your recorded Motion Data.
- To erase the recorded Motion Data for the Reverb Level Knob only, hold the Motion On Button and turn the Reverb Level Knob. The Display flashes ‘REV LVL Erased’ to indicate Motion Data for the Reverb Level Knob has been erased.
Automating the Delay
- Press the Start/Stop Button to play the selected Pattern.
- Turn the Delay Level Knob to adjust the Delay as the Pattern plays.
- To record your Delay Automation, press the Motion REC Button then turn the Delay Level Knob as the Pattern plays.
- Press the Motion REC Button again to exit Motion Record Mode.
- Press the Motion On Button to playback your recorded Motion Data.
- To erase the recorded Motion Data for the Delay Level Knob only, hold the Motion On Button and turn the Delay Level Knob. The Display flashes ‘DLY LVL Erased’ to indicate Motion Data for the Delay Level Knob has been erased.
Automating FX on Individual Instruments
- Press the CTRL Select Button to view the CTRL Select Screen, turn the Value Knob to select InstFX, then press the CTRL Select Button again.
- Press the Start/Stop Button to play the selected Pattern.
- Turn the CTRL Knob of the first Instrument for which you want to automate the FX as the Pattern plays.
- To record your FX Automation, press the Motion REC Button then turn the CTRL Knob of the Instrument for which you want to automate FX as the Pattern plays.
- Press the Motion REC Button again to exit Motion Record Mode.
- Press the Motion On Button to playback your recorded Motion Data.
- To erase the recorded Motion Data for a given CTRL Knob only, hold the Motion On Button and turn the given CTRL Knob. The Display flashes ‘CTRL Erased’ to indicate Motion Data for that CTRL Knob has been erased.
- Repeat steps 4 and 5 with the CTRL Knobs of other Instruments to record Motion Data and automate their assigned FX Parameters.
- Be sure the Motion On Button is lit to playback your recorded Motion Data
PRO TIP
When you want to isolate an individual Instrument to hear it by itself:
Hold the Shift Button and the Mute Button at the same time, then press the Instrument Select Button of the instrument you want to hear alone to Solo that Instrument.
To bring other Individual Instruments back in one at a time, hold the Mute Button and press the Instrument Select Buttons of the instruments you want to Unmute.
To Unmute all Tracks, hold the Mute Button and press the Clear Button.
Article written by Alex Marlowe
 Alex Marlowe is a Composer/Producer, Musician and Consultant based in Melbourne, Australia. Alex has placed music in numerous movies and TV shows, and toured worldwide as a keyboardist with major artists. As a Teacher and Consultant, Alex has worked with platinum songwriters, music editors, producers and composers, and conducted courses in Music Production and Music Software, including at the Songwriting School of Los Angeles. You can find more info, and contact Alex at: www.logicproanswers.com

