This guide to the AIRA SYSTEM-1m PLUG-OUT SYNTHESIZER breaks down each section of the synth and shows you how to get the most out of your SYSTEM-1m, both on stage and in the studio. If you are completely new to modular synths, our article “What is a Modular Synthesiser?” is a great place to start for a more general introduction into the wonderful world of modular synthesis.
In 1976, Roland took its first steps into the world of modular synthesizers with the release of the legendary SYSTEM-100. This semi-modular synth, comprising of 5 semi-modular components, was incredibly powerful and flexible for its time. The 101 module was the centre of the system and could be used independently, or alongside any of the additional modules. The various combinations of modules, heightened by the effective cable patching system, allowed for the complex creation and modulation of sounds.
Multi-Oscillator Modular Synthesizers
These synthesizers went on to develop into multi-oscillator modular synthesizers, which then shifted into the golden age of polyphonic analog synthesizers. The 80’s saw the birth of digital synthesizers, with Roland pushing the envelope of digital synth design, which has evolved into the successful AIRA range – instruments inspired by Roland’s legacy but utilising the technology of the future.
In the spirit of its predecessors (SYSTEM-100, SYSTEM-100M, and SYSTEM-700), the SYSTEM-1m continues to break new ground with remarkable flexibility. It’s our second Plug-Out synth, which gives access to plug-in versions of legendary Roland synthesizers that can be hosted in the SYSTEM-1m, without a computer.
Contributed by Hannah Lockwood for the Roland Australia Blog
INDEX
#1: CHOOSE ONE OF TWELVE OSCILLATOR WAVEFORMS TO CREATE A WORLD OF SOUNDS
#2: MASTER OSCILLATOR MODULATION TO CREATE COMPLEX SYNTH TONES
#3: MIX SOME DEPTH TO YOUR SOUND WITH SUB-BASS AND NOISE
#4: CONTROL THE BRIGHTNESS OF YOUR SYNTH PATCH WITH THE MULTIMODE FILTER
#5: USE THE AMP ENVELOPE TO SHAPE THE VOLUME OF EACH NOTE
#6: CREATE SPACE AND TEXTURE WITH CRUSHER, REVERB AND DELAY
#7: MASTER MOVEMENT WITH LFO MODULATION
#8: ADD EXPRESSION TO YOUR NOTES WITH PITCH MODULATION
#9: EXPAND AND RECONFIGURE YOUR PATCH WITH CV
#10: BEND, MOLD AND SHAPE YOUR SOUND WITH AUDIO I/O
#11: STEP BACK INTO ROLAND’S HISTORY AND “PLUG-OUT” AN ICONIC SYNTHESIZER
#12: SAVE, EDIT AND RECALL UP TO 128 KILLER SYNTH PATCHES
#13: MIDI IS YOUR KEY TO MASTER YOUR SYNTH RIG
What is a semi-modular synthesizer?
A semi-modular synthesizer has a fixed signal path, allowing it to function as a standalone synthesizer voice. Its key difference is the additional patch points that allow you to expand and reconfigure the signal path. To access and fully exploit these patch points, we introduce Control Voltage (CV).
The beauty of the semi-modular synth lies in its ability to expand and provide more sonic options, without relying on external patching to produce sound. The result is a highly flexible instrument, both in application and sound, with the stability of a standard set signal path synthesizer. This is what makes a semi-modular synth great for both beginners and synth heads alike.
TIP #1: CHOOSE ONE OF TWELVE OSCILLATOR WAVEFORMS TO CREATE A WORLD OF SOUNDS
The AIRA SYSTEM-1m PLUG-OUT Synthesizer has two oscillators (OSC1 and OSC2) with each oscillator hosting 12 waveforms! This provides you with the ability to stack similar waveforms for a thick bass or lead, or combine different waveforms for different pitch ranges selected by the six-position OCTAVE (feet) knob.
The WAVE knob shows six waveforms on the SYSTEM-1m synthesizer; SAW, SQUARE and TRIANGLE are the traditional wave shapes used in most synthesizers. However, there are three unique waveforms with the same character as the first three waveforms with additional harmonics: SUPER-SAW, SUPER-SQUARE AND SUPER-TRIANGLE.
In the Version 1.2 System Update, the SYSTEM-1m gets six new waveforms for even more sounds to add to your arsenal. These new waveforms provide a great palette for creating modern electronic sounds that add to the classic six original waveforms.
The six new waveforms are:
1. NOISE SAW:
The Noise Saw takes the traditional sawtooth to another level with the introduction of noise giving a brighter, brassier sound with a fuller bass response when using LPF cutoff.
2. LOGIC OPERATION:
A logic operation refers to a gate signal, switched high or low (on or off) based on a mathematical function. There are a number of logic operations that you may have seen in modular synth world such as OR, AND, NAND, XOR… there are many more. In synthesis, these gates provide a semi-random on/off signal for triggering envelopes or can mix signals, including oscillators, to create a unique and complex waveform.
This LOGIC OPERATION waveform in the SYSTEM-1m features a novel cascaded logic circuit that mixes multiple waveforms to create a special synth tone unique to this AIRA synthesizer.
3. FREQUENCY MODULATION:
There are a number of ways to control the pitch of an oscillator: one of which is by using one oscillator to modulate the frequency of another. You can use an LFO for vibrato effects or use an audio-rate oscillator for FREQUENCY MODULATION – also called FM.
As the pitch of the modulating oscillator rises (i.e. frequency of the wave gets faster), a very complex waveform is produced which contains overtones normally not available from the original oscillator. These can be harmonic overtones that are great for deep basslines, or non-harmonic overtones that provide metallic, bell-like sounds. The SYSTEM-1m make this complex synthesis process easy with a range of sounds controlled by one knob: COLOR.
4. FM + SYNC:
This waveform combines the same synthesis method as above, Frequency Modulation, but uses oscillator sync with the FM oscillator to produce a more harmonic waveform. Waveform synchronization, or “sync”, is a process of modulating a high frequency waveform to generate a thick, aggressive harmonic synth tone. Combined with FM, it can produce a range of harmonics when swept for build-ups and crescendos.
5. VOWEL:
This formant waveform uses a series of waveforms and complex filtering to mimic the human voice. The [COLOR] knob sweeps through a series of vowel-like modulations from “A” to “U” of each oscillator. Modulating the [COLOR] knob with an envelope or LFO via the MOD switch creates some expressive and interesting synth-voices.
6. COWBELL:
The cowbell has become an iconic drum machine sound courtesy of the Roland TR-808. This metallic waveform is also now part of the twelve oscillator waveshapes in the SYSTEM-1m synthesizer. This unique tone now has a suite of controls; add delay and long release for cowbell/pad like sounds or use a snappy amplifier envelope with an arpeggio for a pitched percussive line that you can match, or syncopate, with your rhythm track.
To access the six additional waveforms, hold down the [LEGATO] button and turn the OSC1 or OSC2 knob. Use the [PITCH (PUSH GATE)] knob to trigger a note if no other devices are connected to trigger sound.
TIP #2: MASTER OSCILLATOR MODULATION TO CREATE COMPLEX SYNTH TONES

The shape of the waveform is a foundation in which you build your synth tone. Modulating, or creating movement of the waveform, produces an evolution of the synth tone by adding and subtracting harmonics. Shallow depth of modulation generates subtle, expressive variations whereas large modulation depth creates aggressive, dissonant tones. Using one, or a number of modulation types, allows you to develop complex tones.
DETUNING
Detuning is a technique where you change the pitch of one oscillator relative to another. This can be done by a few cents, sharp or flat, to create a thicker, chorus-like sound. Or spread the tuning out to a harmonic intervals (fifths are a good starting point). This is a favourite synth technique with saw waves for an iconic detuned lead tone.

PULSE WIDTH MODULATION (PWM)
Each waveform has a shape that repeats with each cycle. The symmetry or “width” of this shape is a source of modulation, with an envelope or LFO, with square/pulse waveforms a classic combination. This is Pulse Width Modulation (PWM) however; waveform width modulation can yield interesting textures for a number of different shapes.
The source and rate of modulation is important in mastering this synth technique. Slow sine wave sweeps can add subtle dynamic movement to a drone, or a S&H LFO can produce a randomized evolving tone synced to tempo.
The [COLOR] knob in the SYSTEM-1m controls the depth of the width modulation with different modulation sources. These include LFO, any of three envelopes (PITCH, FILTER and AMP) or SUB OSC.

CROSS-MODULATION
Cross-modulation is a technique where two (or more) oscillators modulate each other. The output of one oscillator modulates the pitch of a second, which in turn modulates the first. This bi-directional modulation creates a complex waveform that can reach dissonance very quickly.
RING MODULATION
The ring modulator is a circuit that “multiplies” the frequencies of OSC1 and OSC2, creating an output signal result that contains no original input frequencies. The output contains the sum and difference of the input signals, which produces “sidebands”, resulting in a complex harmonic sound that greatly differs from the original.
To access the coarse tuning mode for oscillator 2, hold down [SYNC] and [RING MOD], then set the interval using the [SELECT] knob. The display will indicate the coarse tune amount. A dot appears in the display to indicate a negative value, and the PITCH ENV (IN) will light up to indicate +10.

OSCILLATOR SYNCHRONIZATION (SYNC)
Sync involves using one oscillator to “reset” another oscillator in order to shift the waveshape cycle to zero. This reset in turn creates a new waveform, with new peaks (or added harmonics), that provides a characteristic “ripping” or “tearing” sync tone. When the oscillator sync is lit, OSC2 is slaved to OSC1, while the Pitch Envelope moves to the slave oscillator.

TIP #3: MIX SOME DEPTH TO YOUR SOUND WITH SUB-BASS AND NOISE
The mixer section of the AIRA SYSTEM-1m not only blends OSC1 and OSC2 to create the right sound mix, but it also has two additional sound sources to add some dimension to your patch.
Importantly, the SUB-OSCILLATOR has two pitch options: -1 octave or -2 octave below OSC1, which is set using the OSC TYPE button. The sub-octave is a triangle waveform and is best used to fill out the bottom-end of a patch.
The NOISE source has a level control and [NOISE TYPE], where you can choose between pink or white noise. This sound source is useful for percussive sounds especially when using a series of gates from a sequencer.
TIP #4: TAME THE BRIGHTNESS OF YOUR SYNTH PATCH WITH THE MULTIMODE FILTER

The Voltage Controlled Filter (VCF) in the AIRA SYSTEM-1m has two modes to control the brightness of the synth sound. Mastering a number of controls gives you a range of expression on the timbre of your patch and is a skill that synthesists spend years perfecting.
The VCF gives you a choice of LPF (controlled via TYPE [slope], CUTOFF and RESO) and HPF (CUTOFF only). High RESONANCE settings boost the signal around the CUTOFF frequency. At full RESONANCE, the boost is with so much emphasis that the VCF can produce its own sine wave like tone. This can be used to great effect in layering a pitched tone from the VCF on top of melody/sequencer lines.
ADSR Envelope
An ADSR envelope is another way to control the brightness by modulating the CUTOFF FREQUENCY. The [ENV] knob controls the depth of inverted (-) and non-inverted (+) envelope shapes. The ADSR sliders allow you to shape the filter’s response to the incoming signal, and enable you to manipulate the characteristics of the filter’s cutoff and resonance response. Try a slow attack for a sound that gradually rises the cutoff frequency over time.
The [KEY] knob (KEYBOARD FOLLOW) uses the pitch of the notes to control the CUTOFF FREQUENCY. When turning the knob towards the right, the CUTOFF frequency becomes higher with the higher notes and when turned left it becomes lower with the lower notes.

TIP #5: USE THE AMP ENVELOPE TO SHAPE THE VOLUME OF EACH NOTE
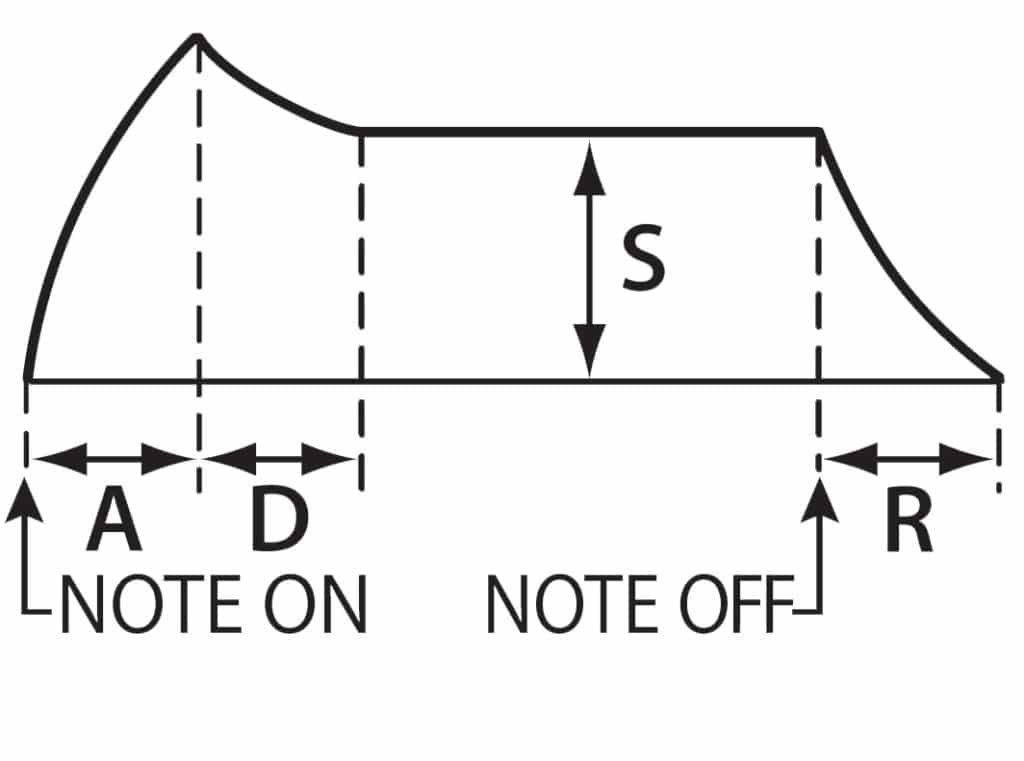
Every instrument, from mallet-based xylophones to the bowed strings of a violin have a characteristic “shape” to its volume when played. Studying the attack, decay and release of different sounds will give you an idea of how to use an amp ADSR envelope to shape the volume of each note/chord played on the SYSTEM-1m synthesizer.

An envelope requires a TRIGGER or GATE signal to begin the ADSR cycle. In the SYSTEM-1m synthesizer, each time a key is pressed (or note sent via sequencer), a GATE signal is sent to the amp envelope. When the key is down, the GATE is on and the ATTACK, DECAY and SUSTAIN phase of the ADSR shapes the amplifier volume. When the key is released, the GATE is off and the RELEASE phase of the ADSR finishes the volume modulation.

TIP #6: CREATE SPACE AND TEXTURE WITH CRUSHER, REVERB AND DELAY
The AIRA SYSTEM-1m synthesizer contains three effects to provide space and texture to your synth patch. The CRUSHER creates a textured effect from digital bit-depth/sample-rate reduction. This effect allows for tuning to emphasize certain harmonics in a melody or can be taken to the extreme for a complete disharmonic destruction.
The spatial effects of REVERB and DELAY make all the difference to a synthesizer patch. The large stereo hall reverb and clean delay are great for adding width to a chord pad or for syncopated delay repeats on a sequenced arpeggio. Resonator-type effects are on hand with short delay times and long delay time adds that extra level of expression to lead synth lines.

TIP #7: MASTER MOVEMENT WITH LFO MODULATION
As stated in Tip #2, the LFO of the SYSTEM-1m is great for modulating the width of the oscillator waveform for dynamic tone shifts. However, the LFO can modulate multiple parameters simultaneously and understanding how these LFO controls work alongside each other is a key element to mastering the SYSTEM-1m.
The LFO has six waveforms available with a wide RATE range that goes up in audio-rate to create tones reminiscent of ring-modulation & FM synthesis. The LFO waveforms include:
- Sine
- Triangle
- Sawtooth
- Square
- Sample & Hold
- Random (smooth S&H)
Modulation of OSC 1 and OSC 2, VCF and VCA via the LFO allows for PITCH (vibrato), FILTER (cutoff sweep) and AMP (tremolo) effects, or a combination of each. Turning the PITCH, FILTER or AMP knob to the right controls the depth of modulation. Turning the knob to the left uses an inverted LFO waveform with depth increasing at the knob’s minimum. Using a mix of inverted and standard LFO modulation adds another dimension to the movement of your patch.

TIP #8: ADD EXPRESSION TO YOUR NOTES WITH PITCH MODULATION
The AIRA SYSTEM-1m synthesizer has several features that give your notes pitch movement. Envelopes, vibrato, legato and portamento are just a few functions and techniques you can use to add character your sound.
PORTAMENTO
Portamento creates a smooth change in pitch between one key and the next key played. The [PORTAMENTO] knob adjusts the time required for the pitch change. Legato provides further control over “pitch glide”. The [LEGATO] button applies portamento only when you play legato (i.e. when you press the next key before releasing the previous key). Using a combination of the two provides expressive pitch control with your playing.
When activating legato mode, the amp and filter sections perform monophonically but still maintain four-voice polyphony. In mono and unison modes, the envelopes are not retriggered.
PITCH ENVELOPE
Another method to alter the pitch whilst playing is by using the PITCH ENVELOPE. Pressing any key/s triggers the attack-decay envelope. When turning the [ENV] knob toward the right, the pitch initially becomes higher and then returns to the pitch of the pressed key. To the left, the pitch drops, then returns to the initial pitch. The ATTACK and DECAY sliders shape the depth of modulation. Add further modulation to your Pitch Envelope with the [MOD] knob that feeds the COLOR control.
PITCH BEND
Pitch bend is a great way to add depth and expression to your note. Although the SYSTEM-1m does not come with a dedicated pitch bend wheel, you are able to utilize this effect with an external controller. To change the pitch bend range on the SYSTEM-1m, hold down [LEGATO] and turn the [SELECT] knob. The display will indicate the pitch bend amount. The PITCH ENV (IN) lights up to indicate +10, and the MIX OUT jack will light up at +20.
VIBRATO
Using the LFO on the [PITCH] triggers pitch modulation (vibrato). The [FADE TIME] knob sets the amount of time until the vibrato kicks in, and [RATE] allows you to adjust the speed of the swell.
TIP #9: EXPAND AND RECONFIGURE YOUR PATCH WITH CV
Control Voltage is a kind of language that allows analog gear to communicate. It refers to an electrical signal measured in Volts, sent between devices to control various parameters. The higher the voltage, the stronger the signal is, and the more depth you have to control these parameters.
CV allows you to perform multiple actions that would ordinarily require several pairs of hands. Sweep filters, shift pitch, modify volume, and shape sounds, all simultaneously! The AIRA System-1m offers a range of Control Voltage (CV) jacks that seriously expand its power and flexibility. Connecting the SYSTEM-1m with other pieces of gear through CV opens up a huge range of sonic possibilities, with unexpected and creative results.
On the System-1m, these CV/Trigger controls have mini-jack sockets that light up blue and audio-based signals glow red. Down arrows represent INPUTS, while Upwards arrows represent OUTPUTS. Working from left to right we will look at the individual functions of the CV Inputs and Outputs.
NOTE: You are only able to access the CV and AUDIO connections in mono mode.
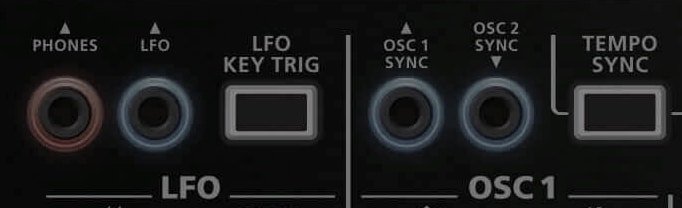
LFO (OUT
The LFO (OUT) can be used to modulate virtually anything with a CV Input. Send it to an external device, like a Eurorack system, to use as an additional standard modulation source. While using the standard LFO section, try using the LFO output on the SYSTEM-1m’s Amp, Filter or Pitch ENV (IN) inputs for interesting exaggerated results. [RATE] and [FADE TIME] knobs will control the LFO accordingly and [ENV] knobs will control the level of the incoming LFO signal.
OSC 1 SYNC (OUT)
OSC 1 SYNC (OUT) jack outputs a pulse wave from OSC 1, allowing you to synchronize an external oscillator. Use Oscillator Sync if you are looking to create the distinctive “ripping” sync tone.
When the [SYNC] button is lit, OSC 2 will synchronize to the signal incoming at the OSC 2 SYNC (IN) jack. If this jack is not used, OSC 2 will sync to OSC 1. Use the OSC 2 SYNC (IN) to reset the SYSTEM-1m’s OSC 2 from an external oscillator.

PITCH ENV (IN)
The PITCH ENV (IN) jack can used to shape and control the envelopes of OSC 1 and OSC 2, using an external source. Take the envelope you use to glide between notes in your modular and use that same envelope in the SYSTEM-1m. The [ENV] knob adjusts the amount of effect and if the jack is not being used, the standard PITCH ENV is active.
FILTER ENV (IN)
The FILTER ENV (IN) jack can be used to shape and control the CUTOFF Frequency of the filter from an external source. When this jack is engaged, the [ENV] knob in the Filter section adjusts the effect. Use the FILTER ENV (OUT) for the reverse effect and send the classic snappy Roland ADSRs to your Eurorack system.
FILTER LFO (IN)
FILTER LFO (IN) allows you to control the CUTOFF frequency of the filter from an external device. Some synths can produce very complex LFO waveforms and this input allows you to control the SYSTEM-1m with those same waveforms. The [FILTER] knob in the LFO section will adjust this effect. When the jack is not used, the standard LFO is active.
Have you noticed that the System-1m doesn’t produce any sound when there is no MIDI or USB device connected? To produce sound, a gate and CV signal are needed to inform the SYSTEM-1m what notes to play, when to play them and for how long. Gate and CV connections are responsible for supplying this information.
GATE (IN)
Use the GATE (IN) to input note on/off information from an external source, like a keyboard or sequencer. When a note on the keyboard is pressed, a gate signal is sent to the SYSTEM-1m, signalling the note is on. When the key is let go, note off information is sent to the SYSTEM-1m, via this input.
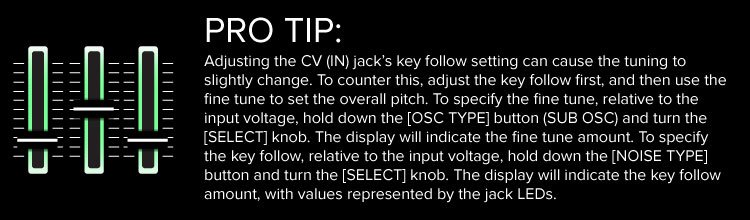
CV (IN)
Use the CV (IN) jack to control the pitch of the SYSTEM-1m from an external device, like a keyboard or sequencer. This jack supports OCT/V but does not support Hz/v.

AMP ENV (IN)
The AMP ENV (IN) jack allows you to shape the envelope of the Amplifier from an external source, so you can use your favourite Eurorack ADSR with the SYSTEM-1m. Use the AMP ENV (OUT) to control the envelope of external gear with the SYSTEM-1m’s Amplifier ADSR sliders.
Using the SYSTEM-1m alongside a Eurorack modular synth, keyboard or sequencer can unlock a world of possibilities and makes for easy integration into a preexisting setup. Mastering the CV element of the System-1m will ensure you get the most out of your synth. If you can command this section then you will be able to take your sounds into exciting and inspiring places. It will also lead to more fulfilling results that are uniquely your own.
If you are new to Control Voltage, take some time to really explore the CV controls. CV provides a kind of flexibility that’s just not possible with most standard synthesizers.
TIP #10: BEND, MOLD AND SHAPE YOUR SOUND WITH AUDIO I/O
PHONES (OUT)
PHONES (OUT) outputs a stereo audio signal from the single output jack. This is where you plug in your headphones to listen to the AIRA SYSTEM-1m.

Inserting a jack into the RING (IN) input will bypass the SYSTEM-1m’s default routing for Oscillator 1. Send a sine wave from an external device into this input for useful ring modulation. The incoming waveform is multiplied by the waveform of Oscillator 2.
OSC1 (OUT) and OSC2 (OUT)
Use OSC1 (OUT) and OSC2 (OUT) outputs to send the SYSTEM-1m’s unique waveforms to external gear. These additional oscillators are perfect to modulate other oscillators in your setup, for FM and sync effects. You can also try routing the output of Oscillator 2 into the ENV input of the filter section. This will create some interesting FM filter effects. Explore how the different waveforms produce diverse results.
EXT (IN)
EXT (IN) When this jack is engaged, the sub oscillator is replaced in the mixer section by an incoming audio signal from an external source. Use this jack to process an external sound source with the SYSTEM-1m’s filter section, modulation sources and effects.
MIX OUT
MIX OUT This jack outputs the mix section before the filter, amplifier and effects sections, so you can use the SYSTEM-1m sound sources alongside external devices. Send the mix out to the filter of your favourite hardware synth or special fx processor.
OUTPUT L + R (OUT)
OUTPUT L + R (OUT) are the main outputs for the SYSTEM-1m. Use the left jack for a mono audio signal and both L + R for a stereo audio signal output. Use these jacks to send the audio of the SYSTEM-1m to a mixer or sound card.

TIP #11: STEP BACK INTO ROLAND’S HISTORY AND PLUGOUT AN ICONIC SYNTHESIZER
Through the new PLUG-OUT technology, the AIRA SYSTEM-1m can control and host software reproductions of legendary Roland synthesizers. Taking these classic synthesizers and introducing modular capabilities is completely new terrain in synth design. To access the PLUG-OUT mode, simply press the [PLUG-OUT] button on the SYSTEM-1m. All controls that do not relate to that particular PLUG-OUT will “black out” making it easier to shape your PLUG-OUT sounds. Not only can you take the ACB envelopes of your favourite classics synths, but you can also use these envelopes with other devices in your rig.
The SYSTEM-100 PLUG-OUT is a modern reproduction of the classic 1975 semi-modular monosynth. This software synthesizer perfectly integrates into the AIRA SYSTEM-1m hardware. In the software, connecting cables between the patch points enables you to alter the signal path and modulate various parameters. The new Pin Routing Matrix provides a visual representation of the connections, making it easier and quicker to patch away.
The SH-101 PLUG-OUT is a contemporary recreation of the iconic SH-101 synthesizer. ACB (Analogue Circuit Behavior) technology faithfully reproduces both the sound and behavior of the original synth. The PLUG-OUT software gives you the freedom of hardware gear alongside the reliability and the flexibility of software. You now get the sound of the original SH-101, with more control and additional features like the reverb, chorus, delay, and bit crusher effects, which were not present in the original design. You can use these effects to take the SH-101 sound into new and uncharted places.
If you are using multiple versions of the SH-101 VST in your DAW, you can use the variety of coloured skins to differentiate between the individual sounds.
Discover the other PLUG-OUTS like the PROMARS and SH-2 here.
TIP #12: SAVE, EDIT AND RECALL UP TO 128 KILLER SYNTH PATCHES
Manual mode causes the sound to be produced according to the sliders’ and faders’ current settings. If you are the type to avoid presets, this is a start point from which you can create your new patches! It can be particularly handy for live performance, if you want to create a new patch on the fly. Set the Manual start point by turning the [SELECT] dial far right, until you see on the Memory Display. This symbol represents Manual mode.
The SYSTEM-1m allows you to store and recall up to 64 user defined patches! It offers eight banks, with eight presets (1-8) in each bank, accessed via the [SELECT] knob. To select a user bank (1-8), hold the [PLUG-OUT] button, turn the [SELECT] dial and push the dial to enter. To switch between presets (1-8), simply turn the [SELECT] dial and press enter. The saved PLUG-OUT synth also has eight banks of eight presets giving you a total of 128 monophonic and polyphonic sounds available at the press of a button. However only one PLUG-OUT synth can be saved onto the SYSTEM-1m at a time so choose wisely!
Memory Slot
When you make changes to a Memory slot, a dot will appear in the left corner. To save these changes press the [WRITE] button. The button will light up and the selected memory (1-8) will blink. To change the memory, turn the [SELECT] dial. To change banks, hold the [PLUG-OUT] button and turn the [SELECT] dial. Press enter on the dial to save the settings. Press the [WRITE] button a second time if you wish to cancel the save.
The state of each input jack, both connected and disconnected, is also stored in patch memory. This is especially useful if you are creating a number of complex patches, using a variety of Audio and CV jacks. When an input jack has nothing plugged in, it is stored as a disconnected jack. When you are recalling your patches, this jack will still remain a disconnected jack, even if a plug is inserted into the socket. This is signified by the jack blinking. This allows you to store different patches that use various combinations of CV and Audio I/O.
NOTE: To access the jack point of a blinking disconnected jack, unplug the jack and re-plug it into the socket. This will overwrite the stored setting.
SYSTEM-1m LIBRARIAN
The AIRA SYSTEM-1 Software Synthesizer acts as both a DAW plug-in and librarian to create, save and get patches.

With your SYSTEM-1m connected to your DAW, you can take a patch from the SYSTEM-1 Software Synthesizer by pressing EXPORT. Once you have exported the patch from your computer to your SYSTEM-1m, you are able to unplug the synth from the computer and the plug-in becomes a completely functional hardware synth.
When the SYSTEM-1m is attached by USB, the PLUG-OUT becomes a traditional plug-in within your DAW. The SYSTEM-1m hardware now acts as a controller, with the audio signal routing to your DAW. You are also able to use the software synth as a regular VST in your DAW, without the hardware.
Using the SYSTEM-1 Software Synthesizer as a Librarian, allows you to build a library of sounds using the software and load them into the SYSTEM-1m. To save a patch into your computer, connect it to the SYSTEM-1m via USB. Open the SYSTEM-1m software and press [GET] to load in the active patch from your SYSTEM-1m. You can then save this patch to your Library, by selecting an empty slot and pressing [WRITE]. To send a patch from your Library to the SYSTEM-1m, select the patch in your Library, select the desired memory slot on the SYSTEM-1m and click [SEND].
ALWAYS REMEMBER TO BACKUP!
To backup and restore data, hold down the [LFO KEY TRIG] button and turn the power on. Then connect your computer to the SYSTEM-1m’s USB port via a USB cable. The drive that appears on your computer will contain two folders – BACKUP and RESTORE. To backup data from the SYSTEM-1m, copy the SYSTEM-1m memory files from the BACKUP folder onto your computer. If a PLUG-OUT is loaded, there will be the additional PLUG-OUT files in the backup directory. To restore data, copy the SYSTEM-1m memory files from your computer to the ‘RESTORE’ folder.
TIP #13: MIDI IS YOUR KEY TO MASTERING YOUR SYNTH RIG
MIDI provides a number of control options that should be utilized alongside the CV jacks for maximum power. Through MIDI, you can use your SYSTEM-1m to control other pieces of your synth setup, control your DAW, and keep in sync with other instruments. MIDI allows you sync the delay and LFO, and is needed in order to play the SYSTEM-1m polyphonically. It also allows you to play the SYSTEM-1m from an external keyboard or sequencer.

Use the settings below to make your life easier, in the studio and on stage. To access the MIDI control options of the AIRA SYSTEM-1m, hold down the [WRITE] button and press the [LFO KEY TRIG] button. The [LFO KEY TRIG] button will blink.
You can synchronise the SYSTEM-1m to the MIDI Clock of another external device through the MIDI IN of the SYSTEM-1m. Alternatively, you can use the SYSTEM-1m as the Master Clock, from which you can sync external gear. The MIDI Clock is set with the [RING] button.
- If [RING] is lit, the System-1m’s tempo will automatically synchronise to any USB or MIDI Clock input.
- When they are both active input, the USB will take priority over the MIDI input.
- If the [RING] button is unlit, the Internal setting is activated. This means the SYSTEM-1m will operate at its own specified tempo and prevents the device from synchronising to other external devices.
The SYSTEM-1m is capable of MIDI Thru and this is set with the [OSC TYPE] button. As you do when setting the MIDI clock, you access this setting by holding down the [WRITE] button and pressing the [LFO KEY TRIG] button whilst powering on the device.
- When [OSC TYPE] is lit, ON is activated and the information received from the MIDI IN will be retransmitted from the MIDI Thru.
- MIDI Thru OFF is indicated when the [OSC TYPE] is unlit. This setting will not re-transmit MIDI data.
NOW RECORD THAT MIDI!
Connecting the AIRA SYSTEM-1m to a computer via USB enables you to record MIDI information into your DAW. Furthermore, you are able to send recorded MIDI data from your DAW into the SYSTEM-1m interface.
To set the MIDI transmit/receive channel, hold down the [WRITE] button and pressing the [LFO KEY TRIG] button whilst powering on the device. Use the [SELECT] knob to specify the MIDI channel (1 – 16). Full left (-) signifies MIDI is off, while full right ( ) sets the device to OMNI mode. In this mode, all MIDI messages are received across all channels (1-16) and MIDI is transmitted on channel 1.
It is important to note that playing via MIDI or USB is not possible if cables are inserted into the CV (IN) and GATE (IN) jacks whilst in MONO mode. These cables must be disconnected to allow for MIDI or USB connection.
If you prefer to use a keyboard for music creation, the SYSTEM-1 will provide you with the same powerful sound engine, as well as a keyboard, arpeggio, and scatter section. For more information on this device, refer to our Ultimate Guide to the SYSTEM-1 below. However if you do want to utilize the flexibility of CV, then the SYSTEM-1m is an ideal choice.
RELATED ARTICLE
The ARIA SYSTEM-1 Plug-Out Synthesizer – The Ultimate Guide
RELATED PRODUCT