The Roland DJ-808 is an exceptionally powerful DJ performance instrument. Featuring an onboard TR sequencer, low latency platters and AIRA Link, the DJ-808 is set to truly take live DJ performances to the next level.
However, the DJ-808 is only half of the equation.
Without understanding Serato DJ software, you won’t be getting the most out of this amazing piece of kit. In this article, we’ll go into depth on how to make the most of Serato DJ’s amazing features and how they relate to the DJ-808’s hardware controls.
Contributed by David Whitehead for Roland Corporation Australia
Sync and Beatgrids
Serato DJ has a few different sync options. These include Smart Sync, Simple Sync and no syncing. You can mix without syncing, which is similar to classic turntable DJing, or you can mix with tempo syncing, which is a newer feature and found on many CDJs.
However, to get the most out of your DJ-808, using the Beatgrids is highly recommended. The Beatgrids show bar and beat markers throughout the song and enables your Serato DJ tracks to stay synced with the TR-S sequencer and any external gear connected via AIRA Link or MIDI.
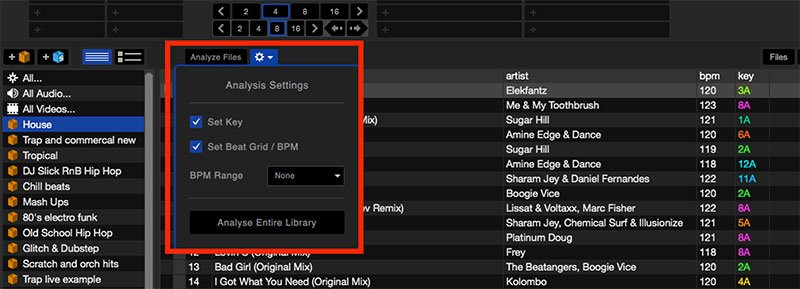
The best way to do this is to Analyze your files before starting to mix. If you start up Serato DJ before you plug in the DJ-808, Serato DJ will start in offline mode and you will see a button above your library to analyze your files.

.
In the drop-down menu you can choose what you are analyzing, but we suggest analyzing BPM and key. Having the key analyzed enables you to use the Key Sync and Pitch Play features on the DJ-808. You can either highlight any new files or analyze the full library. Analyzing will also detect corrupt files for you to fix or remove.
You can also analyze while playing by loading a track into a Serato DJ deck. However, as it takes a while to process it can slow down your mix, plus you will not be able to sort by BPM or key. So, prepping your tracks before your set will give you the best results!
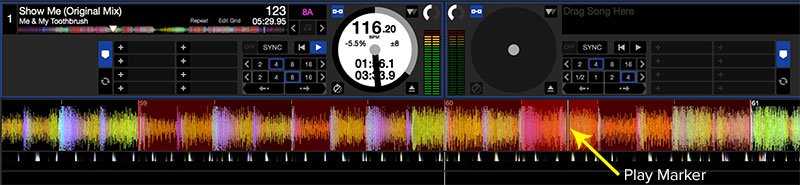
We suggest that you check your Beatgrids after analysis, as sometimes they can be a little “off” and might require minor adjustments. Sometimes, the tempo can appear in half or double time, especially in a genre like Dubstep, where the predominant drum pattern is half time.
If the tempo is showing in half time but the Beatgrids look to be on the beat, then double click on the BPM field of the track in your library to manually change it. Alternatively, press OPTION/ALT (depending on your computer) and UP or DOWN. When you press ENTER, the BPM will double or half.
If the Beatgrids look “off”, click EDIT GRID just below the track title in your play deck.
There are two ways to edit a grid, which are Adjust and Slip.
Adjust moves the marker you are closest to either left or right, while keeping previous markers intact. It also affects the registered BPM.
Slip moves the whole grid to the left or the right if the BPM is correct, but the markers are slightly off the beat.

You can also enter or remove markers manually using Set and Clear, or you can enter markers with the hotkey ‘X’. Markers are displayed as a red line, whereas beats that are not markers (and are not locked in place) are a white line. You can use the manual entry technique to set up tempo changes in a track while keeping the synced devices (TR-S, AIRA, MIDI) in time.
We recommend checking a few points in the song, especially near the start and end of the track. Don’t forget to save your Beatgrid after editing.
More information is available from Serato here:
https://support.Serato DJ.com/hc/en-us/articles/202538540-Preparing-and-Analyzing-Your-Files-
https://support.Serato DJ.com/hc/en-us/articles/202856014-Beatgrids-in-Serato DJ-DJ
Beatgrids can be adjusted on the fly using shortcuts on the DJ-808. This is great if you load a track in and it’s slightly “off”. Hold down the ADJ or SLIDE keys to the top right of the platter and then move the platter forward or back to adjust the grid. You can also enter Markers or clear markers by pressing SHIFT and ADJUST or SLIDE.
SYNCING DECKS AND TR-S
Serato DJ will always sync to the device that sync was engaged on first, regardless if it’s one of the four Serato DJ Decks, Serato DJ Sampler or TR-S.
For new users, we recommend starting with Smart Sync, with Beatgrids on. This allows for maximum use of the AIRA Link and TR-S sync functions, as well as being able to adjust or change the sync on your Serato DJ decks.
When using Smart Sync and playing the track from the Start button, the track will automatically snap to the nearest Beatgrid. The sync ‘option’ in the Serato DJ deck will appear blue, displaying beat sync engagement.
If you start a track and manually cue on the platter (or if you move the platter during playback), then the sync option will appear gold. This indicates that the deck is tempo synced but not beat synced.
If your tracks are not playing but are ready to beat sync (in standby), the sync option will appear grey, indicating that the track is in beat sync mode. Hit the SYNC button again to snap back to beat sync.

If you are syncing two tracks and one is closer to half or double the tempo of the other, Serato DJ will sync to this new ‘root’ tempo.
Sampler
.
Serato DJ Sampler has four banks of eight parts. These are mapped to the eight pads under each deck and also to numbers 1-8 on the TR-S sequencer. The banks labelled A-D can store eight different samples for use in different parts of a set or different sets, however you cannot use samples from different banks at once.

You can trigger the samples live using the pads, or have them triggered as part of your TR-S sequence. As with the TR drum sounds, the Serato DJ sampler is able to be programmed into the sequencer via Step Inputs, or recorded live via Inst-Rec mode.
To record live, press SHIFT and TR-REC. When the TR-REC button starts blinking, all presses of the pad will record into the sequencer.
When playing live, you can either trigger samples with velocity sensitivity by pressing SAMPLER a second time until the pads light up blue, or you can trigger them with a fixed velocity. For the latter option, the pads will light up purple.
In Serato DJ, the samples have a number of controls. Some of these are displayed in the main screen where you can see the sample waveform. Some are behind, which you can get to by pressing ![]() .
.
The volume of the sample is adjustable on the left of the sample slot. This will change when playing with velocity sensitivity. You can also sync samples to your decks/TR-S etc. As with the decks and TR-S, whichever you enable Sync on first becomes the master. If you want the sample to be the master, enable SYNC before you do so on the decks or TR-S. Each sample also has a tempo control to speed up or slow down a sample manually.
There is a Loop option to loop a sample over and over. When the loop is enabled, the first press of the pad will start the loop, the second will stop it.
Each sample has 3 different play options. These are Trigger mode ![]() , Hold mode
, Hold mode ![]() and On/Off mode
and On/Off mode ![]() . Trigger mode will play the sample in its entirety each time it is triggered. This is good for drums and useful when using the TR-S sequencer. In Trigger mode, you cannot stop the sample. Once triggered, it will play out. If pressed again, it will retrigger from the start, so make sure that your samples do not have excess silence at the end of them!
. Trigger mode will play the sample in its entirety each time it is triggered. This is good for drums and useful when using the TR-S sequencer. In Trigger mode, you cannot stop the sample. Once triggered, it will play out. If pressed again, it will retrigger from the start, so make sure that your samples do not have excess silence at the end of them!

Hold mode will only play as long as you press the pad down. When you release the pad, it will stop, cutting off the end of the sample. When you are programming a sequence in the TR-S and have Hold mode enabled, each sample will play for one step (16th, 8th , etc., depending on what scale you are set to).
On/Off mode works as when it is in Loop. The first press starts the sample, while the second press stops it. When in On/Off mode and using the TR-S, the first step will start the sample and the second step will stop it.
The Sampler is able to be output to any channel of the DJ-808 or sent straight to the Master. If you route to channel 1-4, you can use the Serato DJ and Channel effects on your samples, while still using the Serato DJ deck (or AIRA Link) on the channel that the sampler is set to.
When sequencing samples using the TR-S, pattern information is retained even when changing the samples. This means that you can change the samples being used by pressing +/- and changing banks. This can sound great when using different banks of percussion samples. You can also change the pattern of both the TR drums and the samples, using the pattern selection on either the pads or the TR-S section. This is great if you want to have different patterns playing during different parts of a track.
You can adjust where a sample starts by loading it into a Serato DJ deck and creating Hotcues. Then, when dropped into the sample player in the start drop down menu, you can choose which Hotcue to start from. This is particularly useful when loading whole tracks into the sampler.

.
Hotcues
.
Hotcues are a powerful feature in Serato DJ. The DJ-808 has the ability to trigger eight per track. You can insert a Hotcue either by pressing the relevant pad (1-8), or one of the plus signs in Serato DJ on the lower part of the deck. It will create a Hotcue wherever the play marker is located. Hotcues will jump to that part of the track when pressed. If the track is playing, it will continue to play from that point.
If the track is stopped, it will play for as long as you hold the pad down. You can use Hotcues to chop up a track, rearrange a vocal or melody for a live remix, to get to a certain part of a track quickly or start after a long quiet intro, to trigger scratch sounds from a sentence, as well as many other interesting live performance applications.

If you press SHIFT and the HOTCUE button, you enter Hotcue loop mode, which will loop the track from your Hotcues. You can double or half the loop length by pressing the +/- keys.
Loop Rolls, Beatjump and Slicer
When you go to the Roll section, each of the pads will default to a loop of a pre-specified length which doubles as you move right to the next pad. You can again shift the whole group of pads longer or shorter, by pressing the +/- buttons.
Press a button to engage the loop at the play cursor point and release it to stop the loop. If you have Beatjump enabled, the bottom four pads will be the Beatjump controls otherwise they will act as four more loop rolls. To enable Beatjump, go to Serato DJ’s setup menu and tick SHOW BEATJUMP CONTROLS.
Beatjump allows you to skip ahead or back in a track while staying in time. The central two buttons change the number of bars or beats it will move by. The far left button moves back, the far right moves forward. This is a very useful feature when you are mixing two tracks and want them to line up.
For example if you want both tracks to breakdown at the same time, but one has a longer intro, you can jump the other one back until they are lined up to drop in sync. If you want to skip a particular part of a song (like an annoying guest verse!), then you can jump forward to the next part seamlessly.
.
The DJ-808 pads also control Serato DJ’s Slicer effect, by pressing SHIFT+ROLL. The Slicer breaks the current part of the song into eight parts and spreads them across the eight performance pads. Try having it set to one beat, in order to repeat or rearrange the track on the fly for creative live performances, keeping it in sync with the other tracks or TR-S throughout.
If you press Shift + Roll twice, the pads will light up blue. In this mode, the track will loop eight specific slices as determined by your set Beatgrids. This is opposed to playing through the complete track. In effect, this function is focusing on a looped section of the track and is corresponding the Beatgrids within that section to the pads. Using this feature, you can play the pads to trigger different slices within the looped section in any way you wish.
If you have Serato DJ set to Slip mode, when you finish slicing the track will play from the same place it would do if you did not initially trigger the slices. The blue play marker shows where the track will pick up from when you release that slice.
Key Sync and Pitch play
.
The DJ-808 comes with a licence for Serato DJ’s Pitch ‘n Time software. This allows you to sync your tracks to the same key, or pitch shift tracks up and down for effect. A guide on how to set up the Pitch ‘n Time licence is available here:
.
When you Analyze your songs, Serato DJ displays what key they are in. You can choose to have that display in a “classical” key (i.e. Am) or Camelot (i.e. 8A). If you are not used to traditional keys, then try using Camelot, as it’s easy to know what will work together.
The basic rule is if you move one number either up or down (i.e. 7A – 8A), or from an A to a B (i.e. 8A – 8B), it will mix nicely. By choosing songs that work well together and combining this with the Key Sync feature, you can make very smooth mixes that move through different keys without any clashes.
On the outside of each deck on the DJ-808, you will see the Key Sync button. As with tempo sync, the first one you engage becomes the master. Just below the Key Sync button are Down and Up buttons. These shift the key manually. You can manually pitch shift a track to change key, or shift it up or down by up to 12 semitones for an interesting effect.
Pitch ‘n Time also allows you to use the Pitch Play feature. Pressing SHIFT + SAMPLER in the pad section goes to Pitch Play. Then, you can play your Hotcues, shifting them up or down by a semitone. Drop a single hit sample into Deck C or D to add a live instrument to your DJ set. To choose what Hotcue to play, hold down SHIFT and press the pad assigned to that Hotcue.
Effects
Serato DJ comes with a range of DJ-centric effects, including Filters, Flangers, Delays and Distortion. There are two effects sections, each of which can have either three different effects with simple controls, or one effect with more in-depth controls.
Click on the ![]() or
or ![]() buttons to switch between multi or single effects. In multi-effect mode, each effect can be turned on with the On buttons over each deck of the DJ-808. The knob increases the amount of the effect, which can be a wet/dry for some, feedback for delays, or other depending on the effect. You also have a rotary encoder that controls the beats or time of the effect. All four decks and the TR drum sounds can be sent to either effects section (or both).
buttons to switch between multi or single effects. In multi-effect mode, each effect can be turned on with the On buttons over each deck of the DJ-808. The knob increases the amount of the effect, which can be a wet/dry for some, feedback for delays, or other depending on the effect. You also have a rotary encoder that controls the beats or time of the effect. All four decks and the TR drum sounds can be sent to either effects section (or both).

You can also add extra effects from your Serato DJ account section. The Wolf FX pack is free with your Serato DJ account. Try using “Brake Echo” for genre transitions!
Mastering both the DJ-808 hardware and Serato DJ software will enable you to make the most of your DJ-808 and inspire new creative performances. Happy mixing!
See more on the DJ-808 here:
https://www.youtube.com/watch?v=X2PTwp2HZvQ
Related Articles
TR-8 AND EFFECTS – PART 1: ONBOARD EFFECTS
TR-8 AND EFFECTS – PART 2: PEDALS
TR-8 AND EFFECTS – PART 3: MODULAR EFFECTS
TB-03 VS. TB-3
TR-09 VS. TR-8
Related Product


