Here, we'll cover how to use clicks and backing tracks with the Roland SPD-SX sampling pad.
Loops and samples can be played along to the master click on the front panel.
Each kit can also have its own tempo saved with the kit so every time it’s selected, the kit always uses its own unique tempo in turn setting a new master tempo.
To achieve this, make sure the SPD-SX is aware of each sample’s length and timing using the TEMPO MATCH function then set the KIT TEMPO as follows.
Tempo matching samples
1. Press MENU–PAD–ENTER–QUICK
2. Select TEMPO MATCH Press ENTER
3. Listen to the rhythm and count the timing. Enter the time signature and number of measures here i.e.: 4/4 @ 1 measure/bar
4. The beats per minute tempo of the sample will be calculated
5. Press ENTER to set the KIT TEMPO to this new timing.
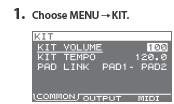
Setting the kit tempo
1. Press MENU–KIT–ENTER
2. On the COMMON tab, you can choose the KIT TEMPO.
Turning tempo sync on for pad/samples
Once the TEMPO MATCH and KIT TEMPOs are set, you can also enable/disable certain pads so they don’t follow the tempo.
This can useful for non-rhythmic samples like ambient sounds where the timing is not important.
1. Press MENU–PAD–ENTER
2. Hit or select pads and use the +- buttons to switch their individual TEMPO SYNC on or off
Starting the click from a pad, foot-switch or trigger
As well as the front panel click button, you can start the click from a pad or foot-switch.
Here’s how to assign a click to a pad
1. Press MENU–SYS–ENTER–PAD/FS CTRL–ENTER
2. Choose or hit the trigger that will operate the click
3. Press +- to select CLICK from the functions
Synchronizing Clicks and Backing Tracks with the SPD-SX
Method 1- Using the built-in click
This first technique uses the internal click or metronome of the SPD-SX.
The click is started with either button press, footswitch or trigger hit.
Advantages:
- The click volume can be adjusted in real-time via the click knob
No separate preparation of the click audio file is required - The tempo of the click can be easily changed
- The sound of the click can be quickly and easily changed
Disadvantages:
- Click cannot incorporate tempo or timing signature changes
- The backing track must be triggered at precisely the right time to play in sync with the click
Method 2- Creating your own click
This second technique uses the pad-link function of the SPD-SX.
The click and backing track start at precisely the same time and play in perfect sync with one another.
Advantages:
- Only a single hit is required to start both the click and backing tracks
- Click and backing track will play perfectly in sync every time
- Tempo, time signature and timing changes can be designed into the click
- The sound of the click can be completely customized before importing
Disadvantages:
- Realtime volume changes of the click are not possible; The volume must be adjusted in the pad menu
- The tempo of the click cannot be altered easily in realtime.
Here are the steps for creating separate click and backing tracks and playing them from the SPD-SX:
- Import your backing track into DAW software at bar 1, beat 1
- If you know the BPM of the track, enter the tempo at bar one (use a search engine to find the original song tempo if unsure)
- If you don’t know the tempo of the backing track, use tap tempo if available to get close then small changes to get it right or simply record your own click along to the backing track using sounds from the SPD-SX
- Turn on the software metronome in the DAW and set the time signature to the same one as the song ie: 4/4, 6/8, 10/8 etc
- Move the backing track to bar 2 so that you create 2 empty bars before the backing track starts
- Start playback and confirm the click and backing tracks play together in time. Check the end of the song to make sure they are still in time!
- Mute the backing track and export, bounce or mixdown the click from bar 1 beat one for the entire length of the song.
- Unmute the backing track, turn off the click and bounce, export or mixdown the backing track from bar 1 beat 1
- Load both of these into the SPD-SX
- Assign the click to PAD1 and the backing track to PAD2 for example
- Route the click on pad1 to PHONES only in [MENU]-KIT-OUTPUT
- Route the backing track on pad2 to MASTER and PHONES
- Link the two pads using PAD LINK PAD1-PAD2 in [MENU]-KIT-COMMON
- Set pad1 and pad2 to the PHRASE template in [MENU]-PAD-MODE
- Adjust the click and backing track volumes in [MENU]-MAIN-VOLUME
TIP:
In Method 2 when recording your own click,
you can incorporate extra information to help you
before the backing track starts.
This process, a type of note keeping, often called ‘slating’ which was a
common phrase used in studio recording where engineers
would verbally record time, date and session details
for easy session recall and replay later.
This information could be the name of the song,
the number of bars count in and the time signature
and any special playing notes
eg: “Concentrate on the GROOOVE!”
The Top Ten Tips for creating clicks and backing tracks for the Roland SPDSX
Always use the same amount of bars count-in before the backing starts to avoid confusion with each new song
Slate the click with song details such as name, time signature and bars count-in: eg: Blue sky in ⅞ 2 bars intro
Name the click the same as the song but with ‘_click’ as the suffix for easy location eg: “Blue sky_click”
When choosing a click sound, choose sounds that cut through just enough that when you play perfectly in time, your drumming just masks the click but you know it’s there
To help your timing, choose a click rhythm with polyrhythmic intervals that compliment what you will be playing ie: If you are playing an 1/8th note rock groove, use a 16th note shaker rhythm with cowbell accents on the quarter notes
Turn dynamics off for clicks and backing tracks so they always play at full volume no matter how soft you accidentally hit the pad!
Switch the play mode of the click and backing track to PHRASE ALT in the pad settings so that a second hit stops the backing track and click
Set the backing track and click to MONO NOT POLY in the pad playing settings so that accidental double strokes don’t start two versions of the song and click from playing at the same time! Use the Phrase template.
Save a backup of the entire SPD-SX using the SAVE ALL function in [MENU]-UTIL
Once you’ve created a system that works for you, maintain it!
Related Product