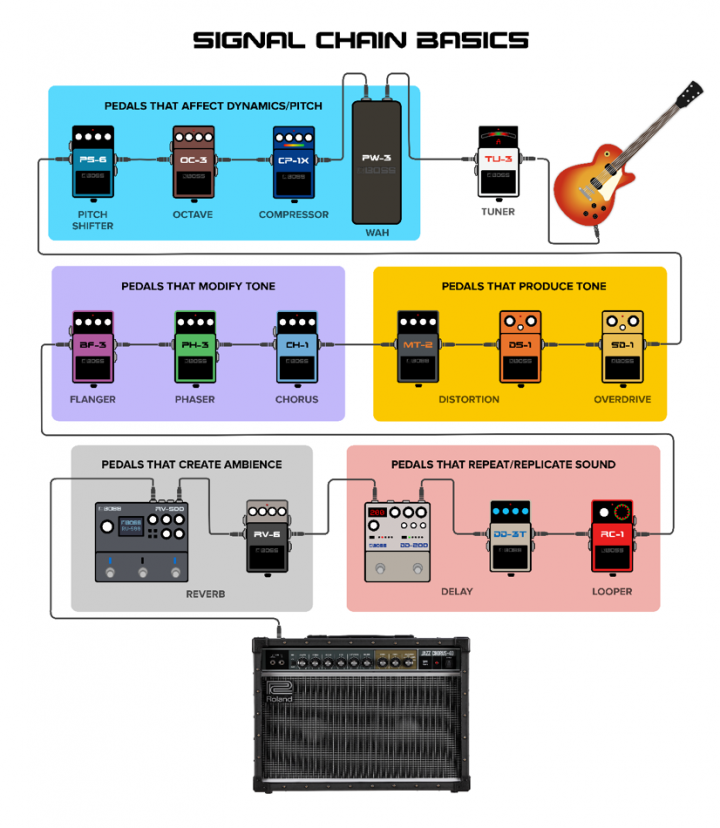
So you’ve amassed a collection of cool effects pedals, and now you want to assemble them onto a pedalboard, but you’re stuck on what order to arrange your signal chain. Do you put the reverb pedal before or after the delay? Does the chorus pedal go before or after your drive pedals? Don’t worry, we’re here to help!
Understanding the fundamentals of how to arrange your signal chain is a key part of getting the best out of your pedalboard, which in turn affects how well it works with your amp, and how your overall tone comes out.
People like to say “there are no rules”, and to a certain extent that’s true. Experimentation and out of the box choices can certainly lead you to stumble on unique combinations that might yield your desert island tone.
But also… there are rules.
Similar to learning music theory, it’s useful to know all of the basic rules, and once you’ve mastered those, you can learn how to break them!
THE FIVE FAMILIES
Effects pedals can be separated into groups based on their functions and their, well, effect on your tone.
To get our heads around the fundamental concepts, we’re going to divide these into five broad families or classifications:
- Pedals that affect dynamics/pitch
- Pedals that produce tone
- Pedals that modify tone
- Pedals that repeat/replicate sound
- Pedals that create ambience

All BOSS pedals use buffered-bypass. A well designed buffer maintains both signal quality and level but with the added benefit of having a low output impedance capable of driving long cables or feeding true bypass pedals with much less quality loss.
PEDALS THAT AFFECT DYNAMICS/PITCH
And the wah pedal? That goes first and foremost, because… that’s just rock n roll.
PEDALS THAT PRODUCE TONE
These pedals take your clean guitar signal and produce a gain tone ranging from light, edge of breakup tones to crunchy classic rock all the way up to molten high gain madness.
If you’ve used overdrive or distortion before, you’ll know that turning up the gain also turns up the noise floor of your signal fairly significantly. This is why we position drive pedals early in the chain – if they’re later in the signal path, they’ll amplify the noise of everything before them.
If you’re using more than one dirt pedal to create your sound, that’s called stacking. As a general rule, you should stack them in order from lightest drive to heaviest distortion.

PEDALS THAT MODIFY TONE
PEDALS THAT REPEAT/REPLICATE SOUND
REPEAT
Delay pedals like the DD-3T or DD-8 take your guitar sound and bounce it back at you, like yelling “HELLO!!” (hello…. hello….) down into the Grand Canyon. So it stands to reason that when you’re using this delay effect, you want all of the chunky, chorusy, swirly guitar tones you’ve lovingly crafted through the three families of effects we’ve built up to be represented in what you’re putting into the delay pedal. This is why we put it near the end of the chain.REPLICATE
Loopers! Loopers aren’t effects—they’re recorders that you can use to build up a multi-layered sound out of, ala Ed Sheeran. Normally, you’ll want the looper to be able to record and playback the sounds you’ve created. So, like the delay pedal, you’ll want to put it near the end of the chain. Where exactly you place it will require some trial and error and an understanding of the way your personally looping philosophy/sound works.You may want to have some overdubs in the loop that use short delays (like rockabilly slapback effects), so in this case, the looper should come after the delay. But on the other hand, it should almost certainly be placed before long reverbs or delays, as these will be very difficult to loop properly.
In many cases, pro musicians who use loopers on guitar just don’t use delay at the same time as their looper – it’s just easier to build up loops without worrying about the added dimension of delay repeats.
Similarly, do you want the reverb to be part of the effect that you can record onto your looper? Then put the looper after the reverb. Or if you just want the reverb to impart some general ambience and “room feel” to your overall playing? Then put the looper before the reverb.
PEDALS THAT CREATE AMBIENCE
Reverberation, or reverb, is what you hear in an enclosed physical when sound bounces back to your ears off surfaces like walls and the ceiling. The amount of reverb that you hear relays to your brain the physical size of the space that the sound is occurring in – think about the difference between clapping your hands in a small room, compared to a cave, or a cathedral.
RULES ARE MEANT TO BE BROKEN
Now that you know the basic concepts about why certain effects should go before or after others, use this as a starting point for experimenting with your own signal chain. You might find that some of these rules work well for you, while others can be modified or thrown out altogether for your style and sound.
Go make some noise and have fun!


